JSTLは「JSP Standard Tag Library」の略で、JSP内でよく使われる機能をタグライブラリとしてまとめたものであるが、JSF内のXHTMLファイル内でも、JSTLを利用することができる。
今回は、JSTL coreタグを利用した、一覧画面を表示してみたので、そのサンプルプログラムを共有する。
なお、JSTL coreタグライブラリの詳細は、以下を参照のこと。
https://qiita.com/sculptcat/items/53d1a3a2d3b973354085
前提条件
以下の記事の実装が完了していること。

サンプルプログラムの作成
作成したサンプルプログラムの構成は、以下の通り。
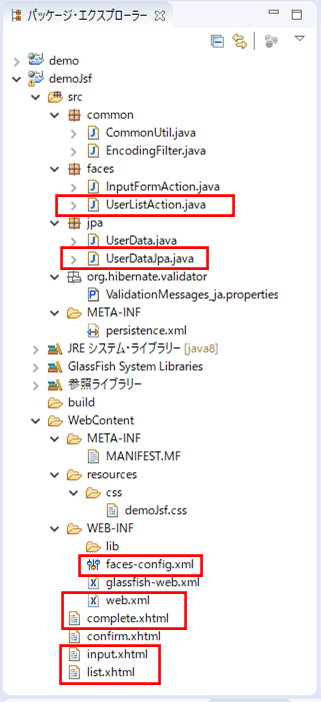
なお、上記の赤枠は、前提条件のプログラムから追加・変更したプログラムである。
一覧画面(list.xhtml)の内容は以下の通りで、JSTL coreタグ(c: http://xmlns.jcp.org/jsp/jstl/core)を利用している。
<?xml version="1.0" encoding="UTF-8" ?>
<!DOCTYPE html PUBLIC "-//W3C//DTD XHTML 1.0 Transitional//EN"
      "http://www.w3.org/TR/xhtml1/DTD/xhtml1-transitional.dtd">
<html xmlns="http://www.w3.org/1999/xhtml"
      xmlns:h="http://xmlns.jcp.org/jsf/html"
      xmlns:f="http://xmlns.jcp.org/jsf/core"
      xmlns:c="http://xmlns.jcp.org/jsp/jstl/core">
<h:head>
    <meta http-equiv="Content-Type" content="text/html; charset=UTF-8" />
    <title>一覧画面</title>
</h:head>
<h:body>
    <!-- 初期表示時に、UserListActionクラスのinitializeメソッドを呼び出す -->
    <f:metadata>
        <f:viewAction action="#{userListAction.initialize()}"/>
    </f:metadata>

    <p>ユーザーデータテーブル(user_data)の全データ</p>

    <!-- ユーザーデータが存在しない場合 -->
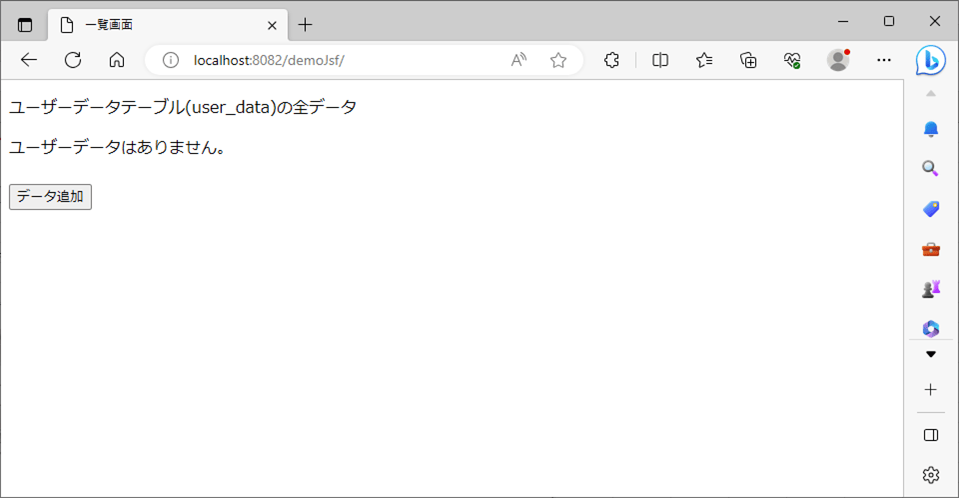
    <c:if test="${empty userListAction.userDataList}">
        ユーザーデータはありません。
    </c:if>

    <!-- ユーザーデータが存在する場合 -->
    <c:if test="${not empty userListAction.userDataList}">
        <table border="1" cellpadding="5">
            <tr>
                <th>ID</th>
                <th>名前</th>
                <th>生年月日</th>
                <th>性別</th>
            </tr>
            <c:forEach var="userData" items="#{userListAction.userDataList}">
                <tr>
                    <td><h:outputText value="#{userData.id}" /></td>
                    <td><h:outputText value="#{userData.name}" /></td>
                    <td><h:outputText value="#{userData.birthYear}年 #{userData.birthMonth}月 #{userData.birthDay}日" /></td>
                    <td>
                        <c:choose>
                            <c:when test="${userData.sex == '1'}">男</c:when>
                            <c:when test="${userData.sex == '2'}">女</c:when>
                            <c:otherwise>不明</c:otherwise>
                        </c:choose>
                    </td>
                </tr>
            </c:forEach>
        </table>
    </c:if>
    <br/><br/>

    <!-- データ追加ボタンを追加 -->
    <h:form>
        <h:commandButton value="データ追加" action="#{userListAction.toAdd()}" />
    </h:form>

</h:body>
</html>
また、一覧画面を表示する処理を定義したクラスは以下の通りで、初期表示処理(initialize)に加え、入力画面に遷移する処理(toAdd)・他の画面から一覧画面に遷移する処理(toList)を定義している。
package faces;

import java.io.Serializable;
import java.util.List;

import javax.enterprise.context.RequestScoped;
import javax.inject.Inject;
import javax.inject.Named;

import jpa.UserData;
import jpa.UserDataJpa;
import lombok.Getter;

/**
 * USER_DATAリスト取得処理を定義.
 */
@Named(value="userListAction")
@RequestScoped
public class UserListAction implements Serializable{

    // シリアルバージョンUID
    private static final long serialVersionUID = -8890511854883241114L;

    /** USER_DATAリスト */
    @Getter
    private List<UserData> userDataList;

    /** UserDataテーブルへアクセスするJPA */
    @Inject
    private UserDataJpa userDataJpa;


    /** 一覧画面の初期表示処理 */
    public void initialize(){
        // USER_DATAテーブルの全件を取得する
        userDataList = userDataJpa.getAll();
    }

    /**
     * 入力画面への遷移.
     * @return 入力画面へのパス
     */
    public String toAdd(){
        return "add";
    }

    /**
     * 一覧画面への遷移.
     * @return 一覧画面へのパス
     */
    public String toList(){
        // 初期表示処理を呼び出し、一覧画面に遷移する
        this.initialize();
        return "list";
    }

}
さらに、一覧画面に表示するデータを取得するクラスは以下の通りで、 USER_DATAテーブルの全件を取得する処理(getAll)を定義している。
package jpa;

import java.util.List;

import javax.enterprise.context.RequestScoped;
import javax.persistence.EntityManager;
import javax.persistence.PersistenceContext;
import javax.transaction.Transactional;

/**
 * USER_DATAテーブルへアクセスするJPA.
 */
@RequestScoped
public class UserDataJpa {

    @PersistenceContext
    private EntityManager em;

    /**
     * USER_DATAテーブルに引数のデータを追加する
     * @param userData
     */
    @Transactional
    public void regist(UserData userData){
        // UserDataテーブルのid最大値を取得
        Integer maxId = em.createQuery("SELECT MAX(u.id) FROM UserData u"
               , Integer.class).getSingleResult();

        // id最大値がNULLの場合は、0に変換
        maxId = (maxId == null) ? 0 : maxId;

        // USER_DATAテーブルのIDを設定後、登録処理を実行
        userData.setId(maxId + 1);
        em.persist(userData);
        em.flush();
    }

    /**
     * USER_DATAテーブルの全件を取得する
     * @return USER_DATAテーブル全件のリスト
     */
    @Transactional
    public List<UserData> getAll(){
        // UserDataテーブルのデータを全件取得し返却
        List<UserData> uList =  em.createQuery("FROM UserData u ORDER BY u.id ASC"
            , UserData.class).getResultList();

        // 取得したデータを返却
        return uList;
    }

}
また、入力画面(input.xhtml)の内容は以下の通りで、戻るボタンを追加している。
<?xml version="1.0" encoding="UTF-8" ?>
<!DOCTYPE html PUBLIC "-//W3C//DTD XHTML 1.0 Transitional//EN"
"http://www.w3.org/TR/xhtml1/DTD/xhtml1-transitional.dtd">
<html xmlns="http://www.w3.org/1999/xhtml"
xmlns:h="http://java.sun.com/jsf/html"
xmlns:f="http://java.sun.com/jsf/core">
<h:head>
<meta http-equiv="Content-Type" content="text/html; charset=UTF-8" />
<title>入力画面</title>
<h:outputStylesheet library="css" name="demoJsf.css"/>
</h:head>
<h:body>
<p>下記必要事項を記載の上、「確認」ボタンを押下してください。</p><br/>
<h:form>
<table border="0">
<tr>
<td align="left" valign="top">名前:</td>
<td align="left" valign="top">
<h:inputText id="name" value="#{inputFormAction.name}" />
</td>
<td align="left" valign="top">
<h:messages for="name" errorClass="errorMessage" layout="table" />
</td>
</tr>
<tr>
<td align="left" valign="top">生年月日:</td>
<td align="left" valign="top">
<!-- 生年月日_年・月・日のチェックを行うため、
InputFormActionクラスのvalidateメソッドを呼び出す -->
<h:outputLabel id="birth">
<f:event listener="#{inputFormAction.validate}" type="postValidate" />
<h:inputText id="birthYear"
value="#{inputFormAction.birthYear}" size="4" />
年
<h:selectOneMenu id="birthMonth" value="#{inputFormAction.birthMonth}">
<f:selectItems value="#{inputFormAction.birthMonthItems}"/>
</h:selectOneMenu>月
<h:selectOneMenu id="birthDay" value="#{inputFormAction.birthDay}">
<f:selectItems value="#{inputFormAction.birthDayItems}"/>
</h:selectOneMenu>日
</h:outputLabel>
</td>
<td align="left" valign="top">
<h:messages for="birth" errorClass="errorMessage" layout="table" />
</td>
</tr>
<tr>
<td align="left" valign="top">性別:</td>
<td align="left" valign="top">
<h:selectOneRadio id="sex" value="#{inputFormAction.sex}">
<f:selectItems value="#{inputFormAction.sexItems}" />
</h:selectOneRadio> </td>
<td align="left" valign="top">
<h:messages for="sex" errorClass="errorMessage" layout="table" />
</td>
</tr>
<tr>
<td align="left" valign="top">メモ:</td>
<td align="left" valign="top">
<h:inputTextarea value="#{inputFormAction.memo}" cols="40" rows="6" />
</td>
<td align="left" valign="top"></td>
</tr>
<tr>
<td align="left" valign="top">入力確認:</td>
<td align="left" valign="top">
<h:selectBooleanCheckbox id="checked"
value="#{inputFormAction.checked}" />
</td>
<td align="left" valign="top">
<h:messages for="checked" errorClass="errorMessage" layout="table" />
</td>
</tr>
</table>
<br/>
<h:commandButton value="確認" action="#{inputFormAction.confirm()}" />
<!-- 戻るボタンを追加 -->
<!-- その際、フォームの各項目値の入力チェックを省くため、immediate="true"を追加 -->
<h:commandButton value="戻る" action="#{userListAction.toList()}"
immediate="true" />
</h:form>
</h:body>
</html>さらに、完了画面(complete.xhtml)の内容は以下の通りで、一覧画面に戻るためのボタンを追加している。
<?xml version="1.0" encoding="UTF-8" ?>
<!DOCTYPE html PUBLIC "-//W3C//DTD XHTML 1.0 Transitional//EN"
      "http://www.w3.org/TR/xhtml1/DTD/xhtml1-transitional.dtd">
<html xmlns="http://www.w3.org/1999/xhtml"
      xmlns:h="http://java.sun.com/jsf/html">
<h:head>
   <meta http-equiv="Content-Type" content="text/html; charset=UTF-8" />
   <title>完了画面</title>
</h:head>
<h:body>
   <p>お申し込みが完了しました。</p><br/>

   <!-- 一覧画面に戻るボタンを追加 -->
   <h:form>
        <h:commandButton value="一覧画面に戻る" action="#{userListAction.toList()}" />
   </h:form>
</h:body>
</html>
また、faces-config.xmlの内容は以下の通りで、一覧画面・完了画面からの画面遷移を追加している。
<?xml version="1.0" encoding="UTF-8"?>
<faces-config
    xmlns="http://xmlns.jcp.org/xml/ns/javaee"
    xmlns:xsi="http://www.w3.org/2001/XMLSchema-instance"
    xsi:schemaLocation="http://xmlns.jcp.org/xml/ns/javaee http://xmlns.jcp.org/xml/ns/javaee/web-facesconfig_2_2.xsd"
    version="2.2">

    <!-- 一覧画面から入力画面への遷移 -->
    <!-- ただし、リダイレクトさせるために、redirectタグを追加 -->
    <navigation-rule>
        <from-view-id>/list.xhtml</from-view-id>
        <navigation-case>
            <from-outcome>add</from-outcome>
            <to-view-id>/input.xhtml</to-view-id>
            <redirect/>
        </navigation-case>
    </navigation-rule>

    <!-- 入力画面から確認画面・一覧画面への遷移 -->
    <!-- ただし、リダイレクトさせるために、redirectタグを追加 -->
    <navigation-rule>
        <from-view-id>/input.xhtml</from-view-id>
        <navigation-case>
            <from-outcome>confirm</from-outcome>
            <to-view-id>/confirm.xhtml</to-view-id>
            <redirect/>
        </navigation-case>
        <navigation-case>
            <from-outcome>list</from-outcome>
            <to-view-id>/list.xhtml</to-view-id>
            <redirect/>
        </navigation-case>
    </navigation-rule>

    <!-- 確認画面から完了画面・入力画面への遷移 -->
    <!-- ただし、リダイレクトさせるために、redirectタグを追加 -->
    <navigation-rule>
        <from-view-id>/confirm.xhtml</from-view-id>
        <navigation-case>
            <from-outcome>send</from-outcome>
            <to-view-id>/complete.xhtml</to-view-id>
            <redirect/>
        </navigation-case>
        <navigation-case>
            <from-outcome>back</from-outcome>
            <to-view-id>/input.xhtml</to-view-id>
            <redirect/>
        </navigation-case>
    </navigation-rule>

    <!-- 完了画面から一覧画面への遷移 -->
    <!-- ただし、リダイレクトさせるために、redirectタグを追加 -->
    <navigation-rule>
        <from-view-id>/complete.xhtml</from-view-id>
        <navigation-case>
            <from-outcome>list</from-outcome>
            <to-view-id>/list.xhtml</to-view-id>
            <redirect/>
        </navigation-case>
    </navigation-rule>

    <!-- サポートしている言語を日本語に指定 -->
    <application>
        <locale-config>
            <default-locale>ja_JP</default-locale>
            <supported-locale>ja</supported-locale>
            <supported-locale>ja_JP</supported-locale>
        </locale-config>
    </application>

</faces-config>
さらに、web.xmlの内容は以下の通りで、初期表示を入力画面(input.xhtml)から一覧画面(list.xhtml)に変更している。
<?xml version="1.0" encoding="UTF-8"?>
<web-app xmlns:xsi="http://www.w3.org/2001/XMLSchema-instance"
         xmlns="http://java.sun.com/xml/ns/javaee"
         xsi:schemaLocation="http://java.sun.com/xml/ns/javaee http://java.sun.com/xml/ns/javaee/web-app_3_0.xsd"
         id="WebApp_ID" version="3.0">
  <display-name>demoJsf</display-name>
  <welcome-file-list>
    <!-- 画面遷移先でJSFタグを利用できるよう、Faces ServletのURL(faces/)を先頭に付与 -->
    <!-- 初期表示を入力画面(input.xhtml)から一覧画面(list.xhtml)に変更 -->
    <welcome-file>faces/list.xhtml</welcome-file>
  </welcome-file-list>
  <servlet>
    <servlet-name>Faces Servlet</servlet-name>
    <servlet-class>javax.faces.webapp.FacesServlet</servlet-class>
    <load-on-startup>1</load-on-startup>
  </servlet>
  <servlet-mapping>
    <servlet-name>Faces Servlet</servlet-name>
    <url-pattern>/faces/*</url-pattern>
  </servlet-mapping>
  <!-- JSFでのテキスト・テキストエリアの文字化け防止用Filterを設定 -->
  <filter>
    <filter-name>Encoding</filter-name>
    <filter-class>common.EncodingFilter</filter-class>
    <init-param>
      <param-name>encoding</param-name>
      <param-value>utf-8</param-value>
    </init-param>
  </filter>
  <filter-mapping>
    <filter-name>Encoding</filter-name>
    <url-pattern>/*</url-pattern>
  </filter-mapping>
</web-app>
その他のソースコード内容は、以下のサイトを参照のこと。
https://github.com/purin-it/java/tree/master/javaee-jsf-show-list/demoJsf

サンプルプログラムの実行
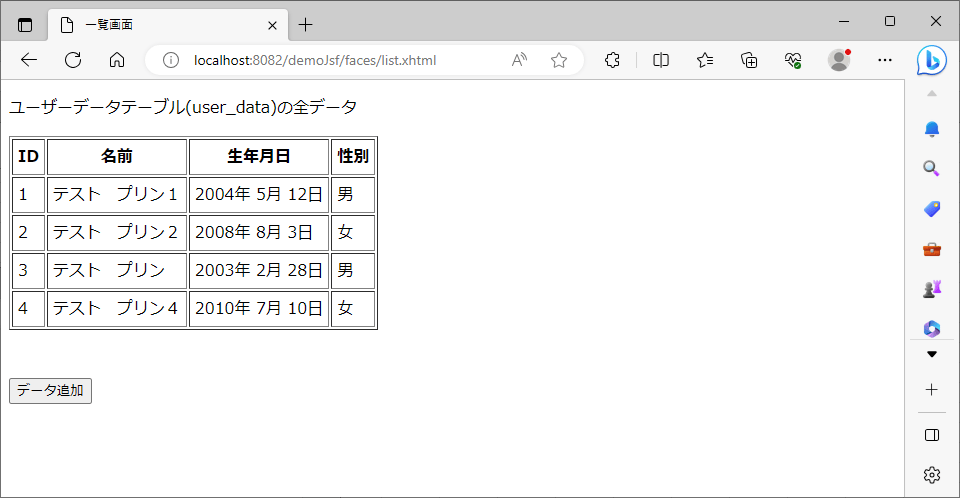
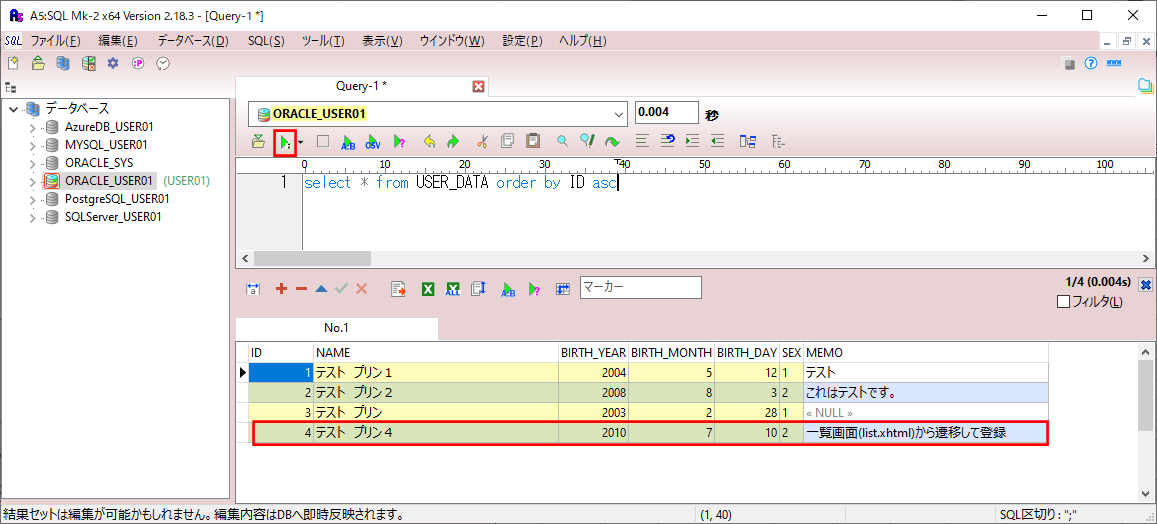
サンプルプログラムの実行結果は以下の通りで、USER_DATAテーブルから取得したユーザーデータが一覧画面に表示され、データの追加も行えることが確認できる。
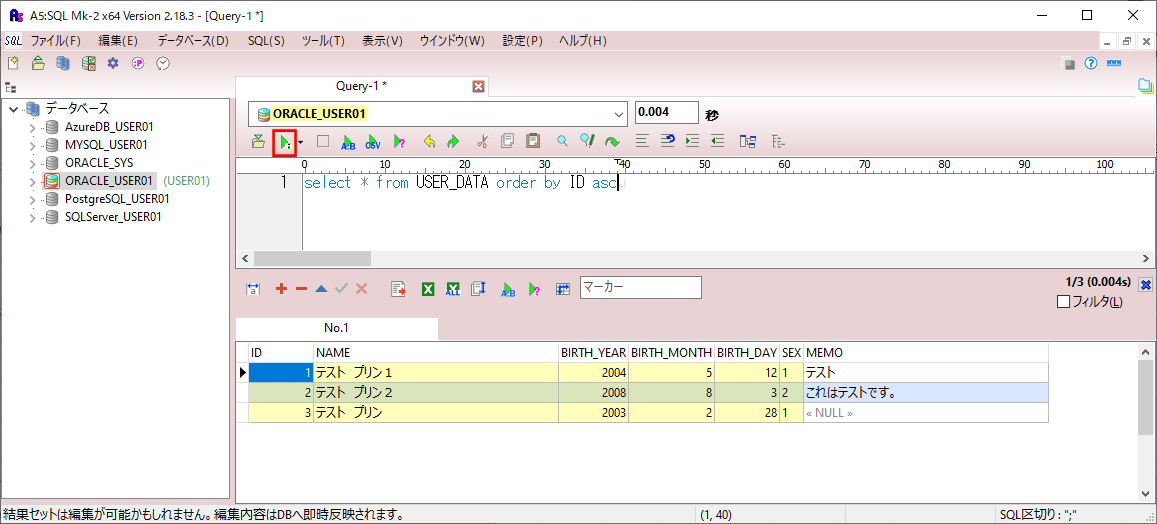
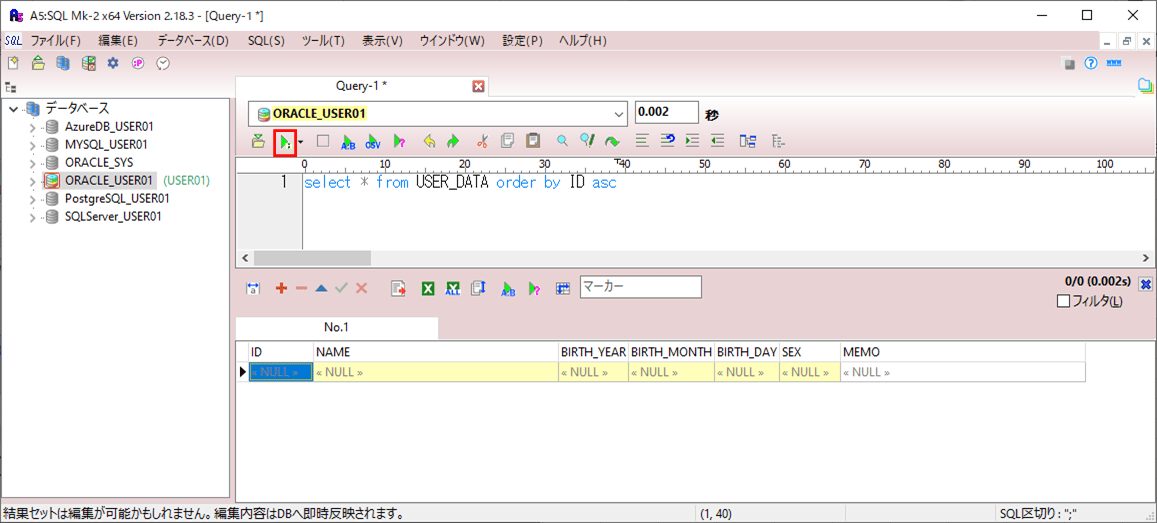
1) 実行前のUSER_DATAテーブルの中身は、以下の通り。
select * from USER_DATA order by ID asc
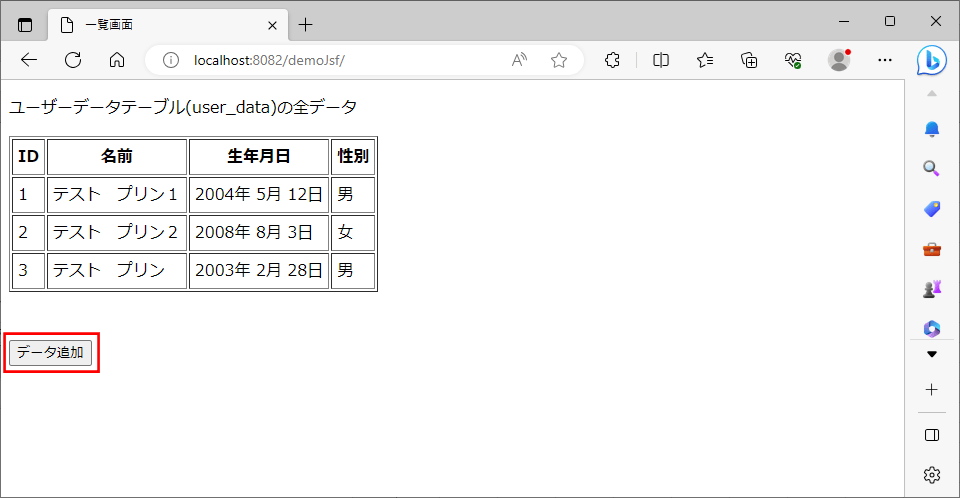
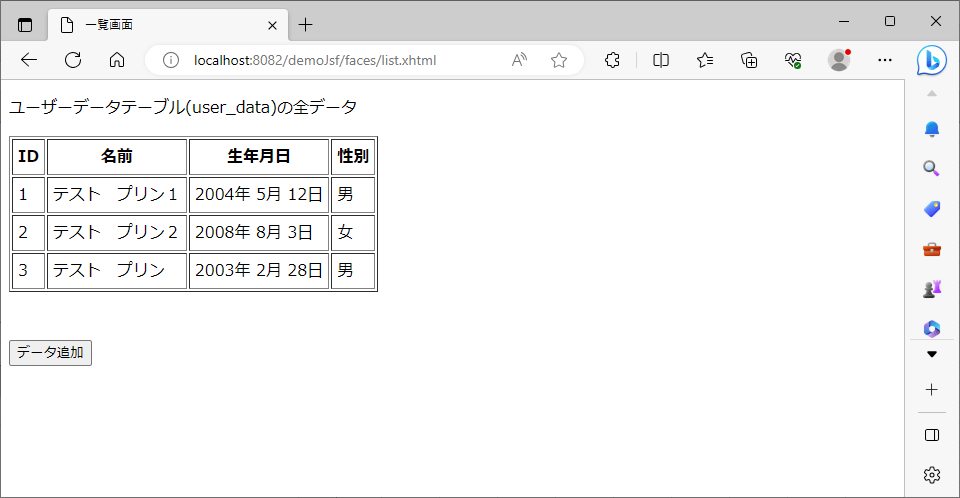
2) GlassFishサーバーを起動後、Webブラウザ上で「http:// (ホスト名):(ポート番号)/(Webアプリケーションのプロジェクト名)/」とアクセスすると、以下のように、user_dataテーブルの中身が一覧画面(list.html)に表示されることが確認できる。ここで「データ追加」ボタンを押下する。
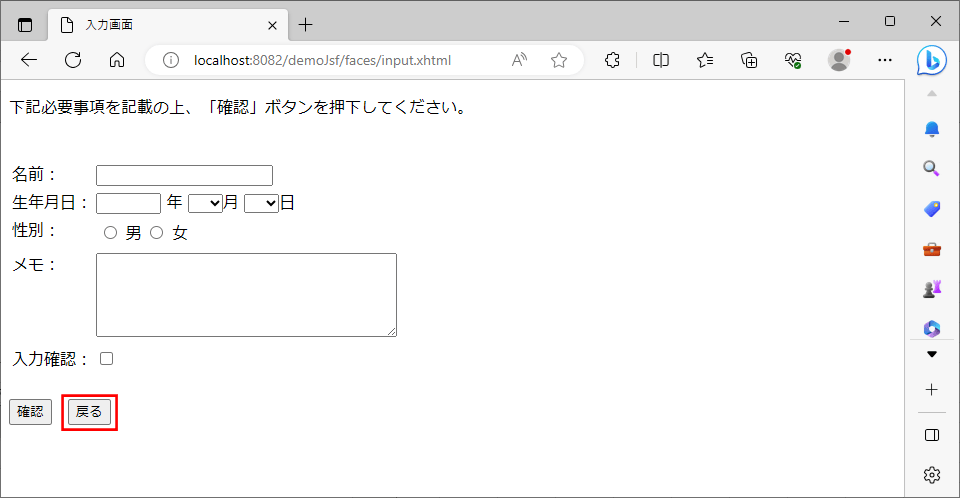
3) 以下のように、入力画面の表示が確認できる。ここで「戻る」ボタンを押下する。
4) 以下のように、一覧画面(list.html)に戻ることが確認できる。
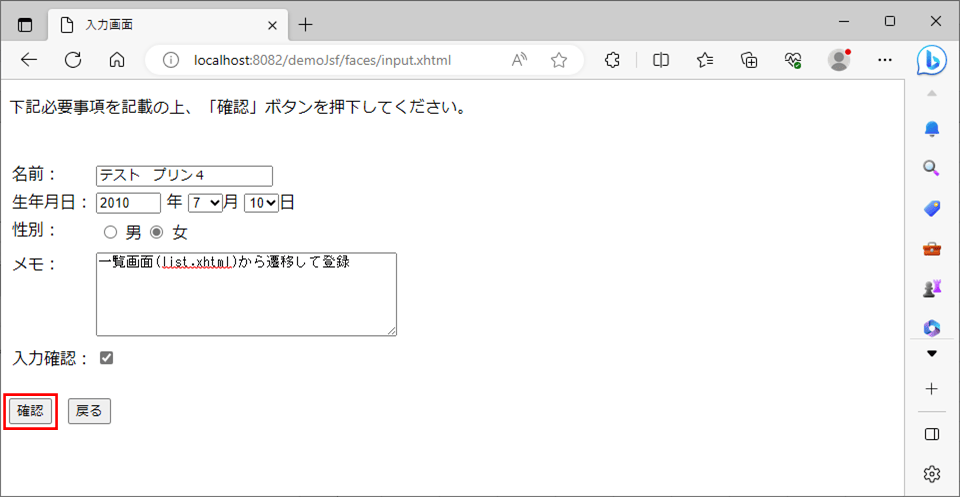
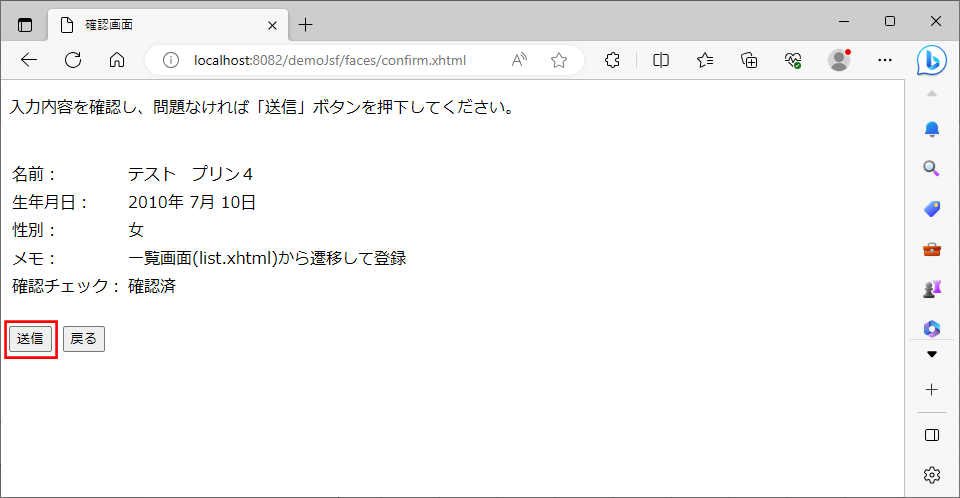
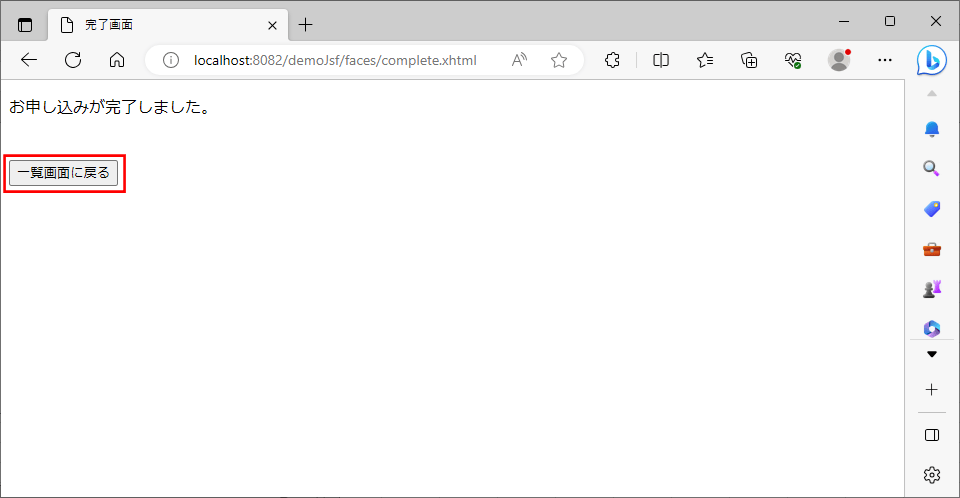
5) 入力画面(input.html)、確認画面(confirm.html)、完了画面(complete.html)の遷移は以下の通りとなっている。また、完了画面で「一覧画面に戻る」ボタンを押下すると、一覧画面(list.html)に戻ることが確認できる。
6) 実行後のUSER_DATAテーブルの中身は、以下の通り。
select * from USER_DATA order by ID asc
7) USER_DATAテーブルを0件にした状態で、一覧画面を表示した結果は、以下の通り。
select * from USER_DATA order by ID asc
要点まとめ
- JSTLは「JSP Standard Tag Library」の略で、JSP内でよく使われる機能をタグライブラリとしてまとめたものであるが、JSF内のXHTMLファイル内でも、JSTLを利用することができる。
- 画面の初期表示時に呼び出すメソッドは、JSF 2.2の場合、f:metadata要素内のf:viewAction要素内で定義すればよい。
- フォームの各項目値の入力チェックを省いて画面遷移するには、JSFのh:commandButtonタグで「immediate=”true”」を追加すればよい。


