複数のAzure App Serviceに同じカスタムドメインを設定してみた
以下のサイトに記載の通り、複数のAzure App Service間でも、場所(リージョン)が異なっていれば、同じカスタムドメインを設定することができる。
https://qiita.com/shimamura_io/items/9b2a05825437346778b1
ただし、Spring Bootを利用したJavaアプリケーションを複数のAzure App Serviceにデプロイすると、認識できるController クラスのパスは1つのAzure App Serviceのみとなる。
今回は、複数のAzure App Serviceに同じカスタムドメインを設定し、Spring Bootを利用したJavaアプリケーションをデプロイし動作確認してみたので、その手順を共有する。
前提条件
以下の記事のAzure App Serviceの実装が完了していること。

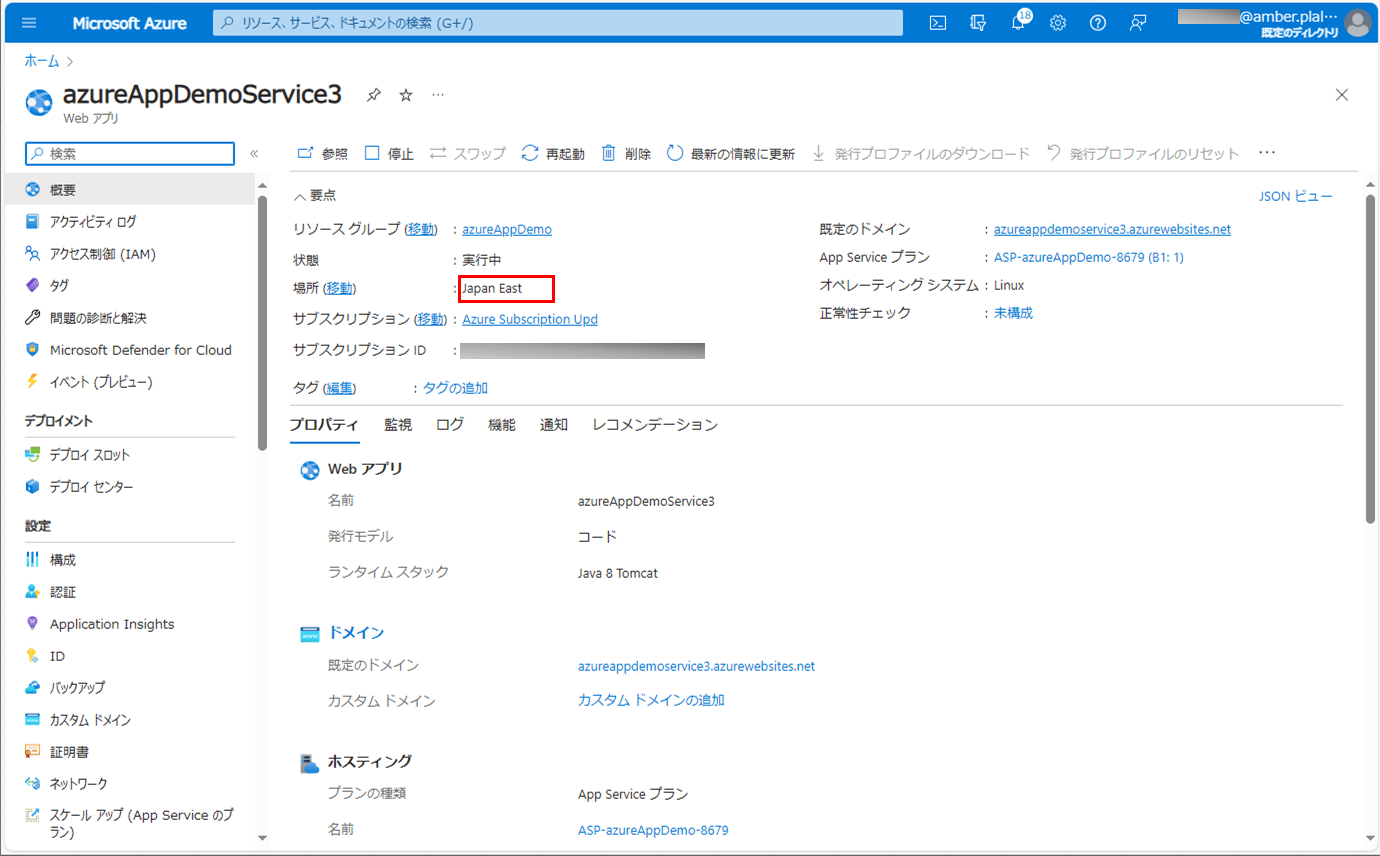
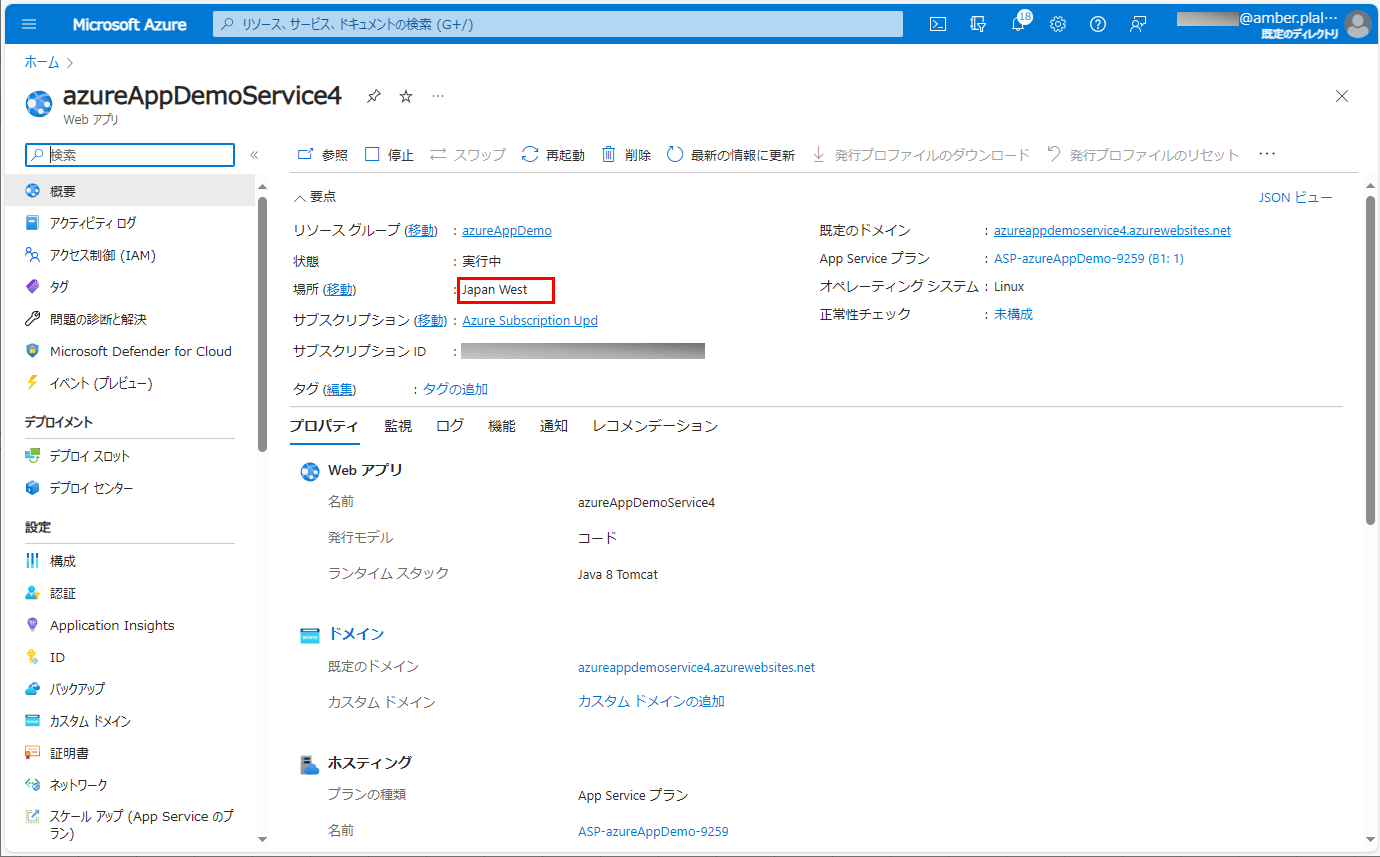
また、以下のAzure App Serviceを2つ作成済で、赤枠の場所(リージョン)が異なっていること。
やってみたこと
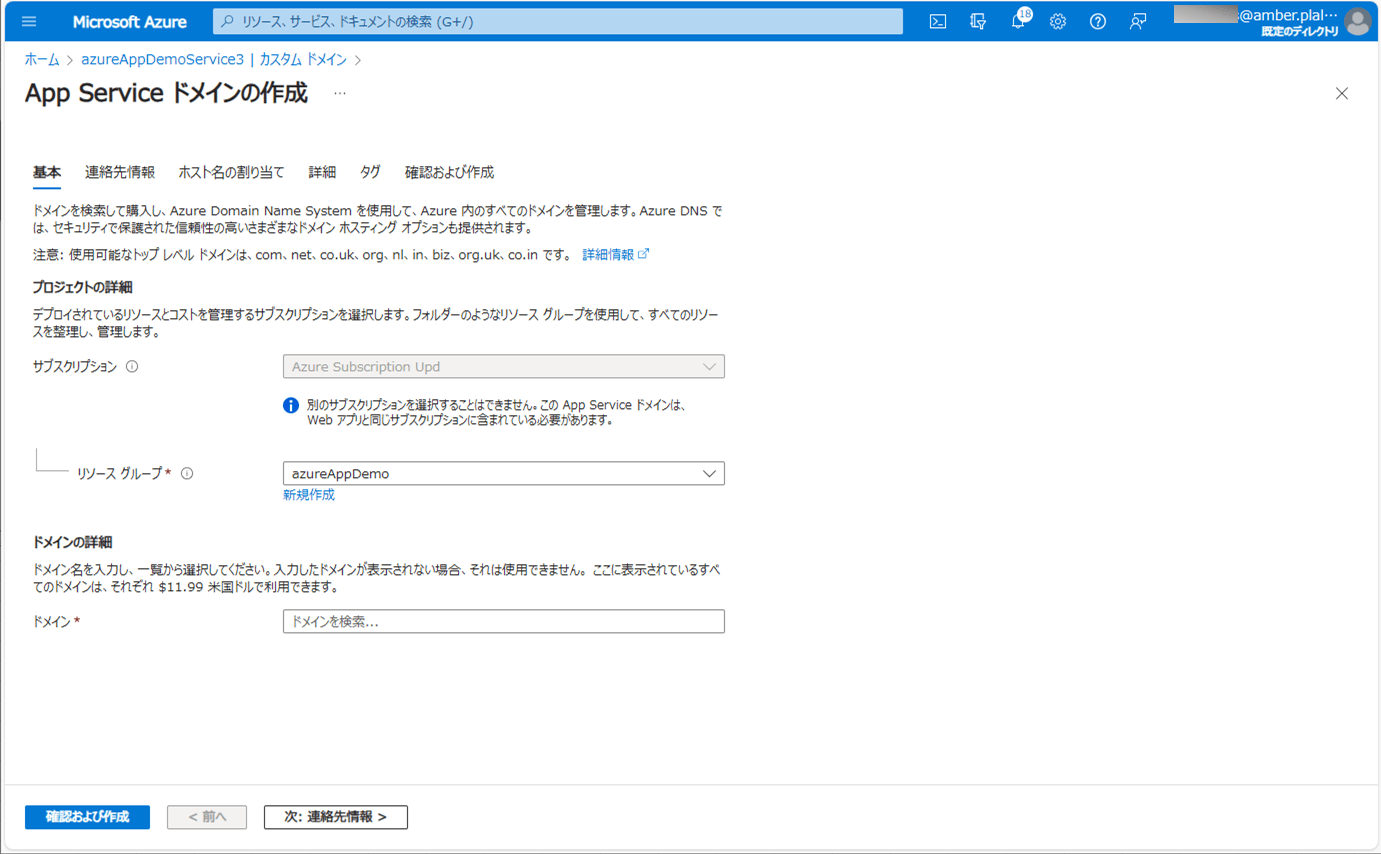
App Serviceドメインの作成
カスタムドメインに設定するドメインに、App Serviceドメインを設定すると、複数のAzure App Service間でも、場所(リージョン)が異なっていれば、同じカスタムドメインを設定することができる。App Serviceドメインの作成手順は、以下の通り。
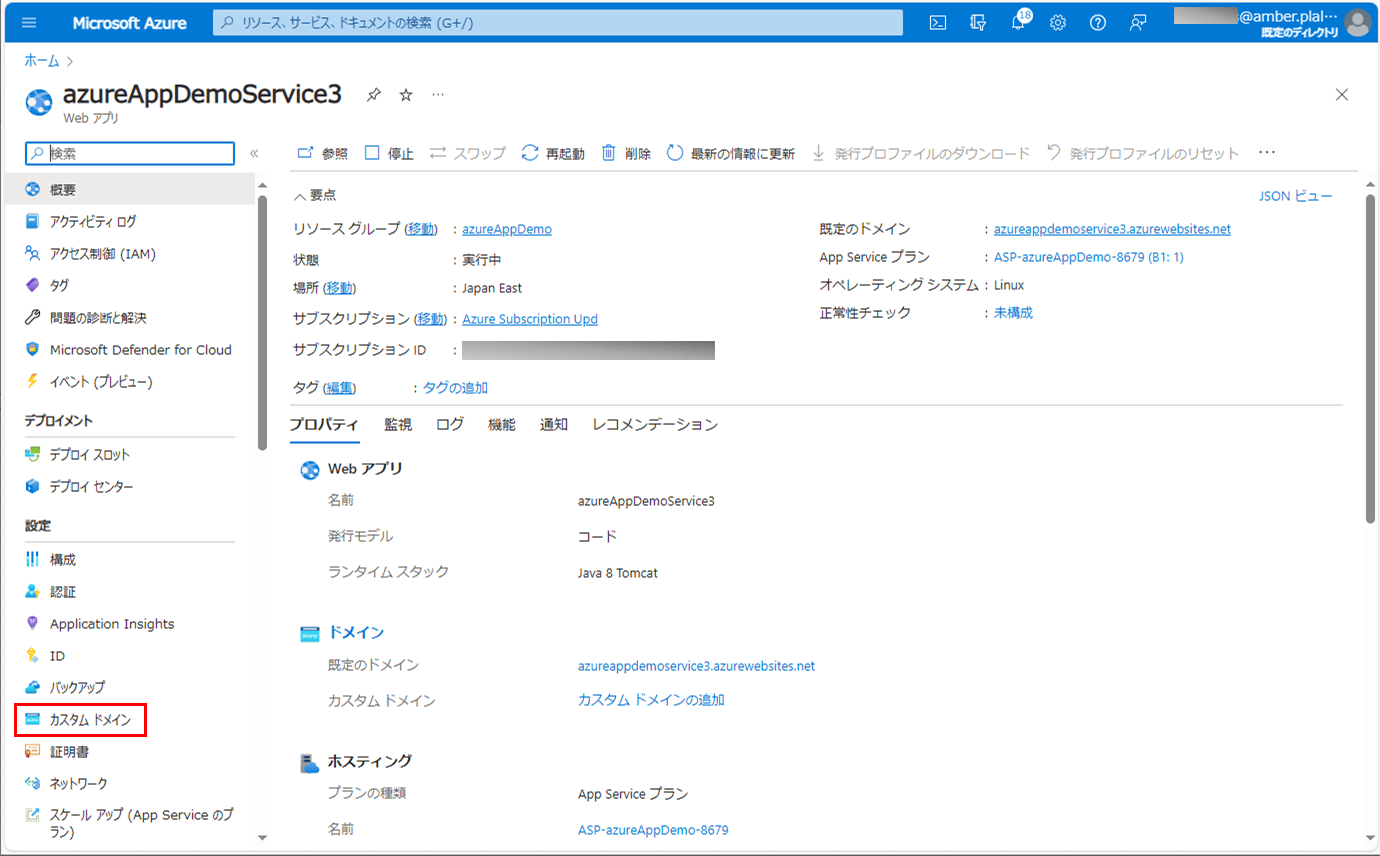
1) Azure Portalにログインし、カスタムドメインを設定する1つのAzure App Serviceを表示後、「カスタム ドメイン」メニューを押下する。
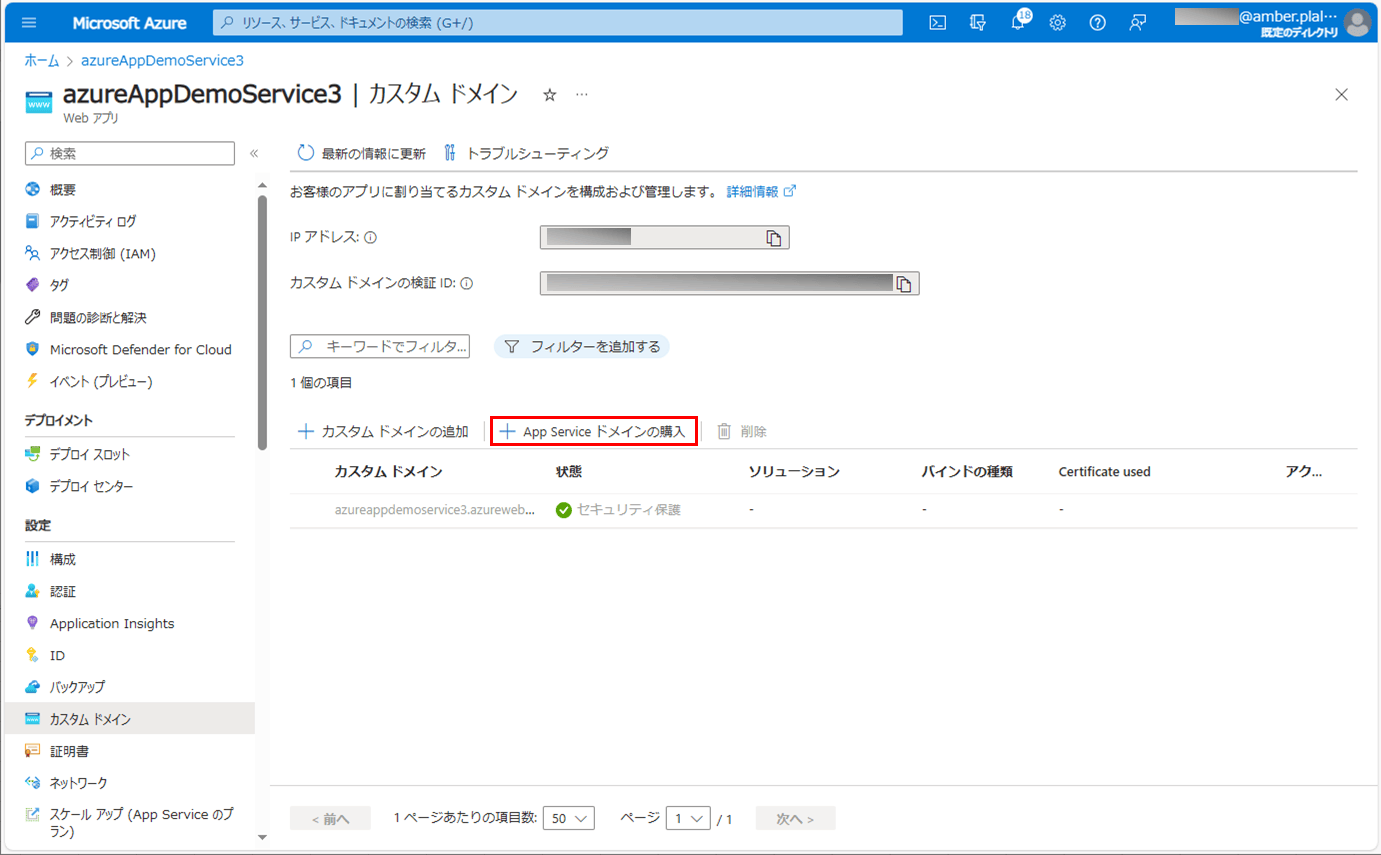
2)「App Serviceドメインの購入」ボタンを押下する。
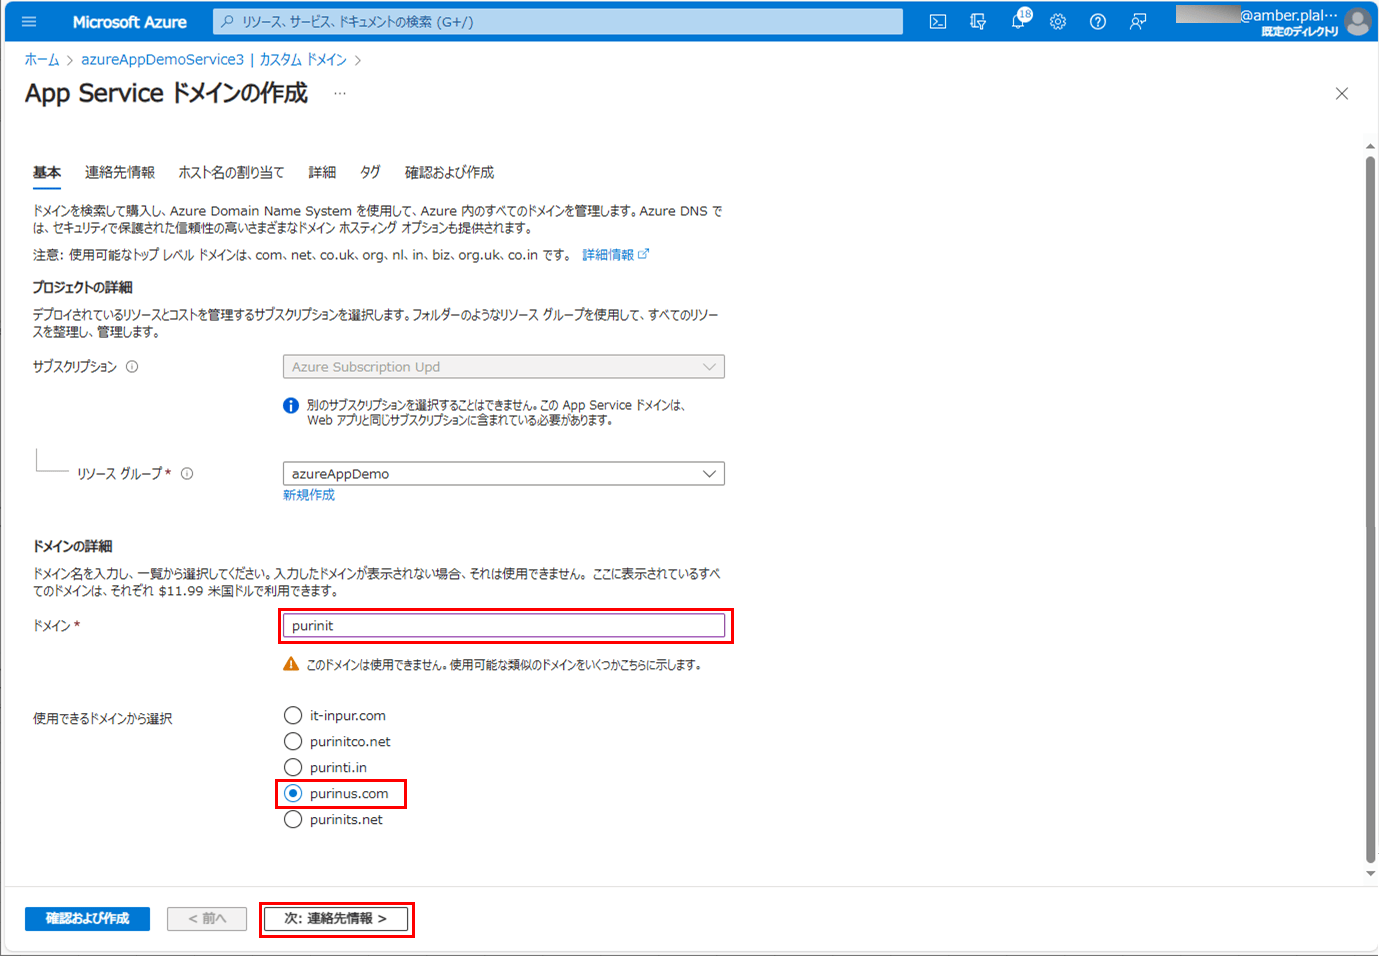
3) ドメイン名を入力し、設定したいドメイン名を選択後、「次:連絡先情報>」ボタンを押下する。
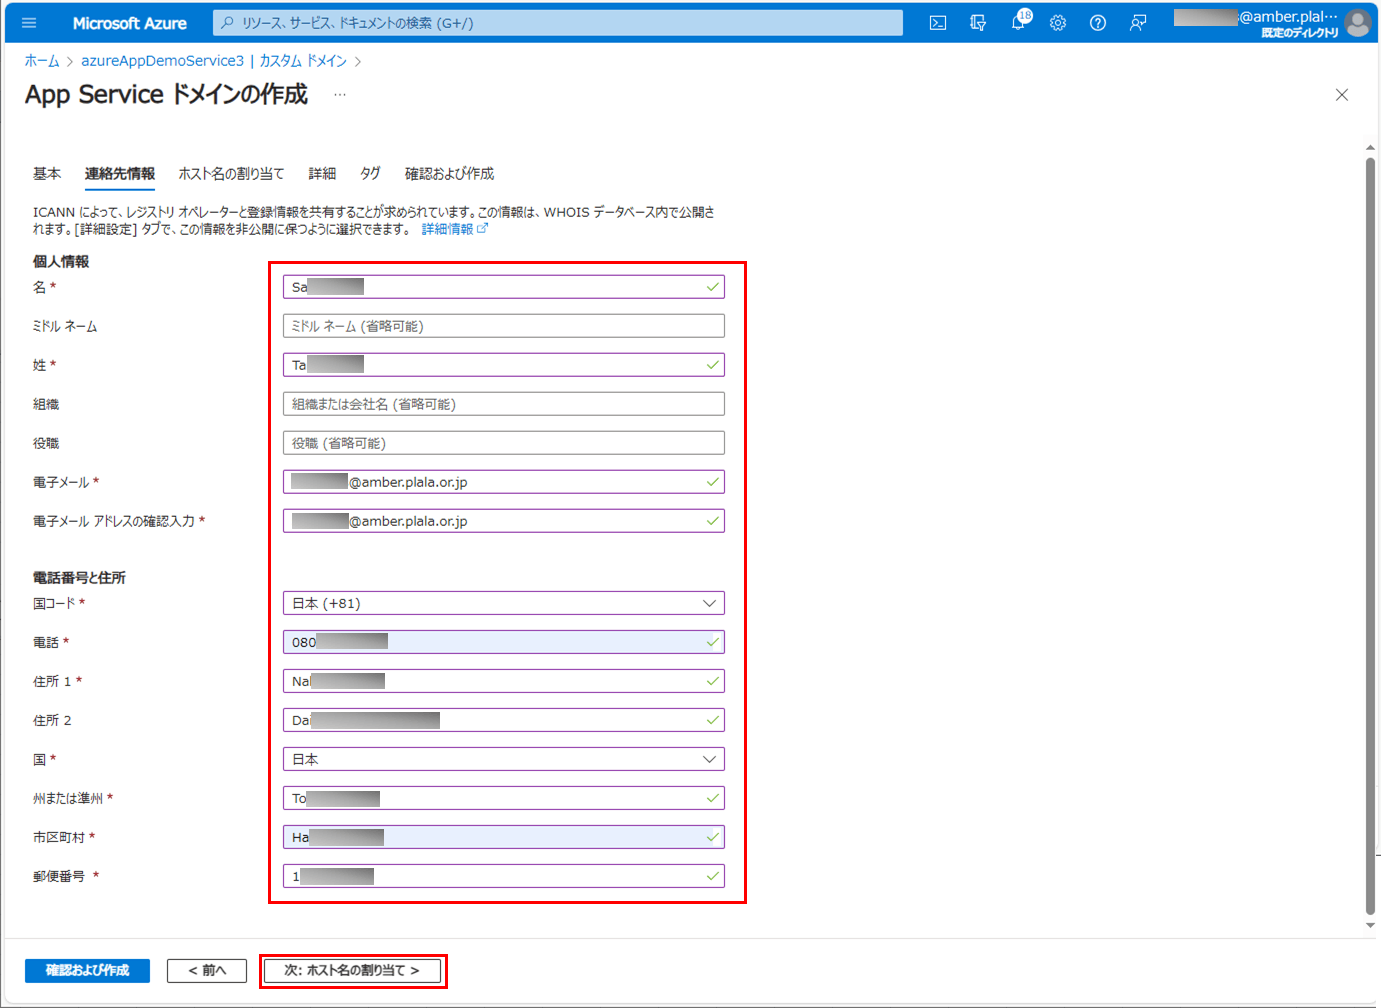
4) 連絡先をローマ字で入力し、設定したいドメイン名を選択後、「次:ホスト名の割り当て>」ボタンを押下する。
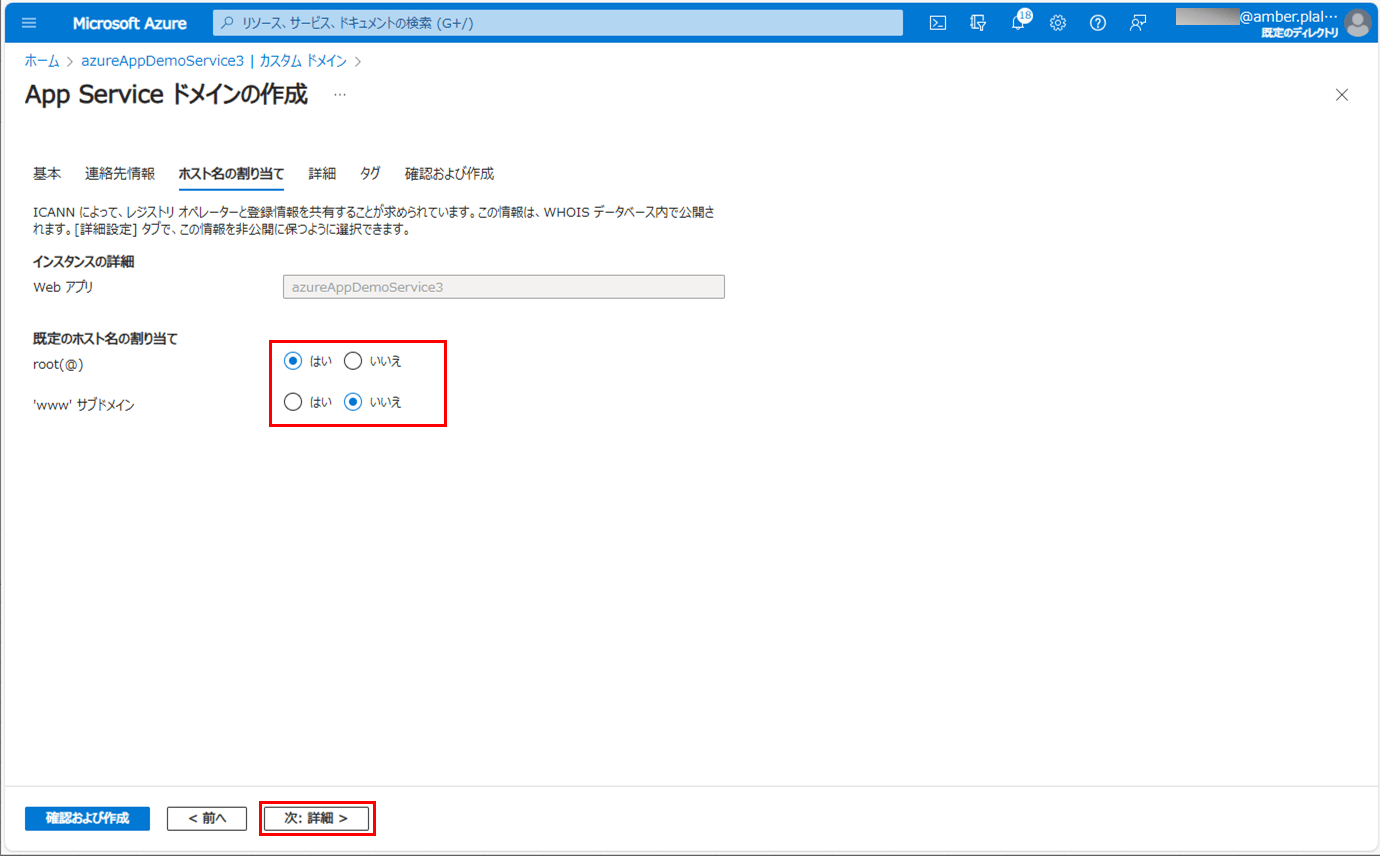
5) ホスト名の割り当て方法を入力し、設定したいドメイン名を選択後、「次:詳細>」ボタンを押下する。
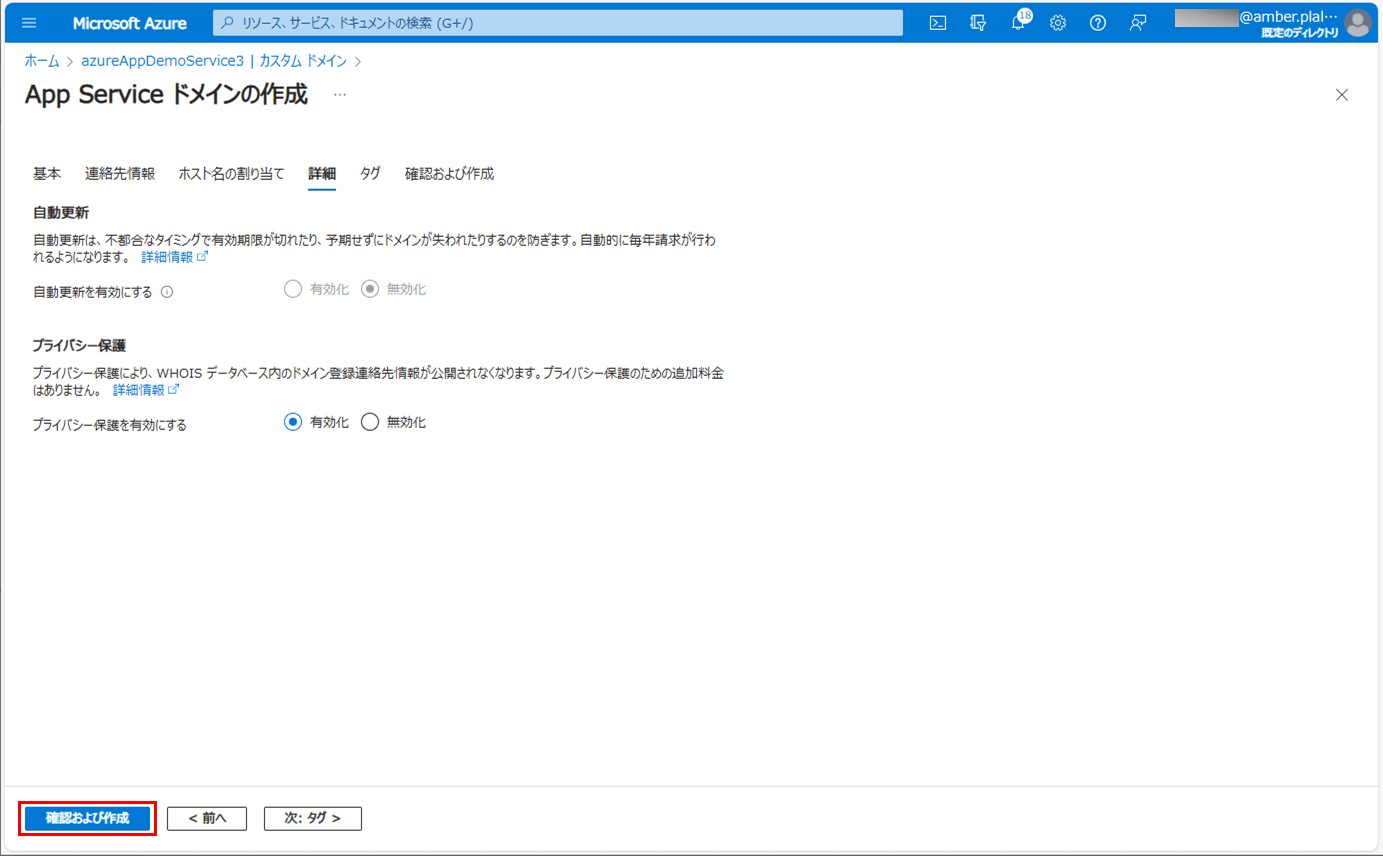
6) 以下を入力し、タグは設定しないため「確認および作成」ボタンを押下する。
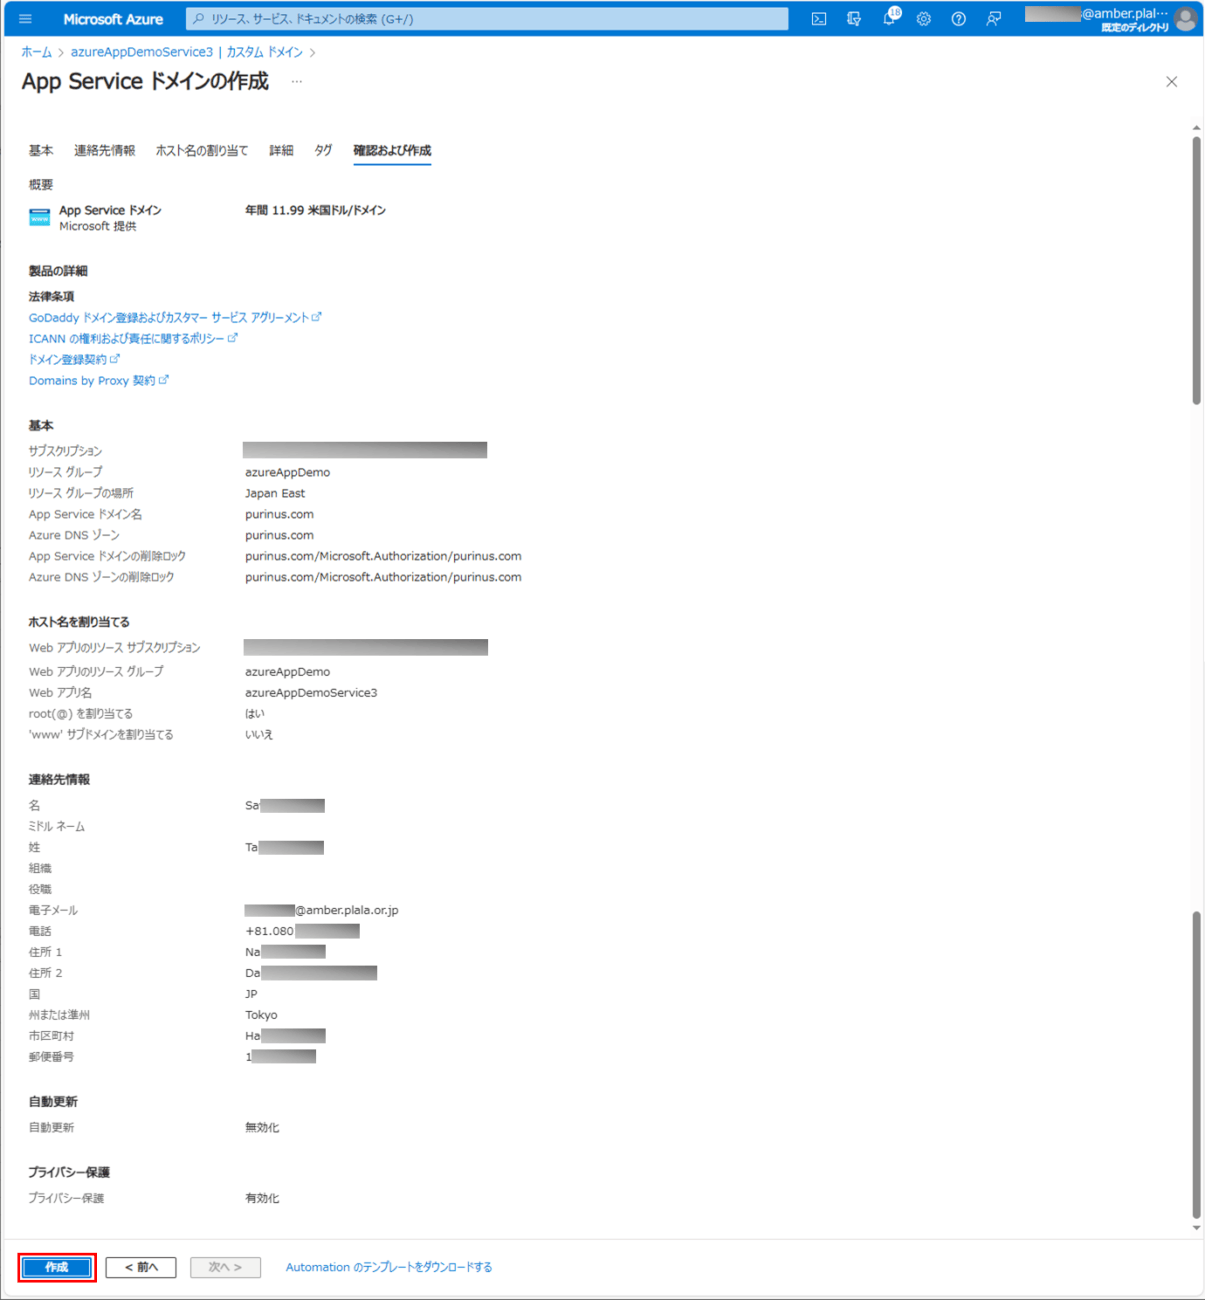
7) 内容を確認後、「作成」ボタンを押下する。
8) デプロイが完了すると、以下の画面が表示されるため、「リソースに移動」ボタンを押下する。

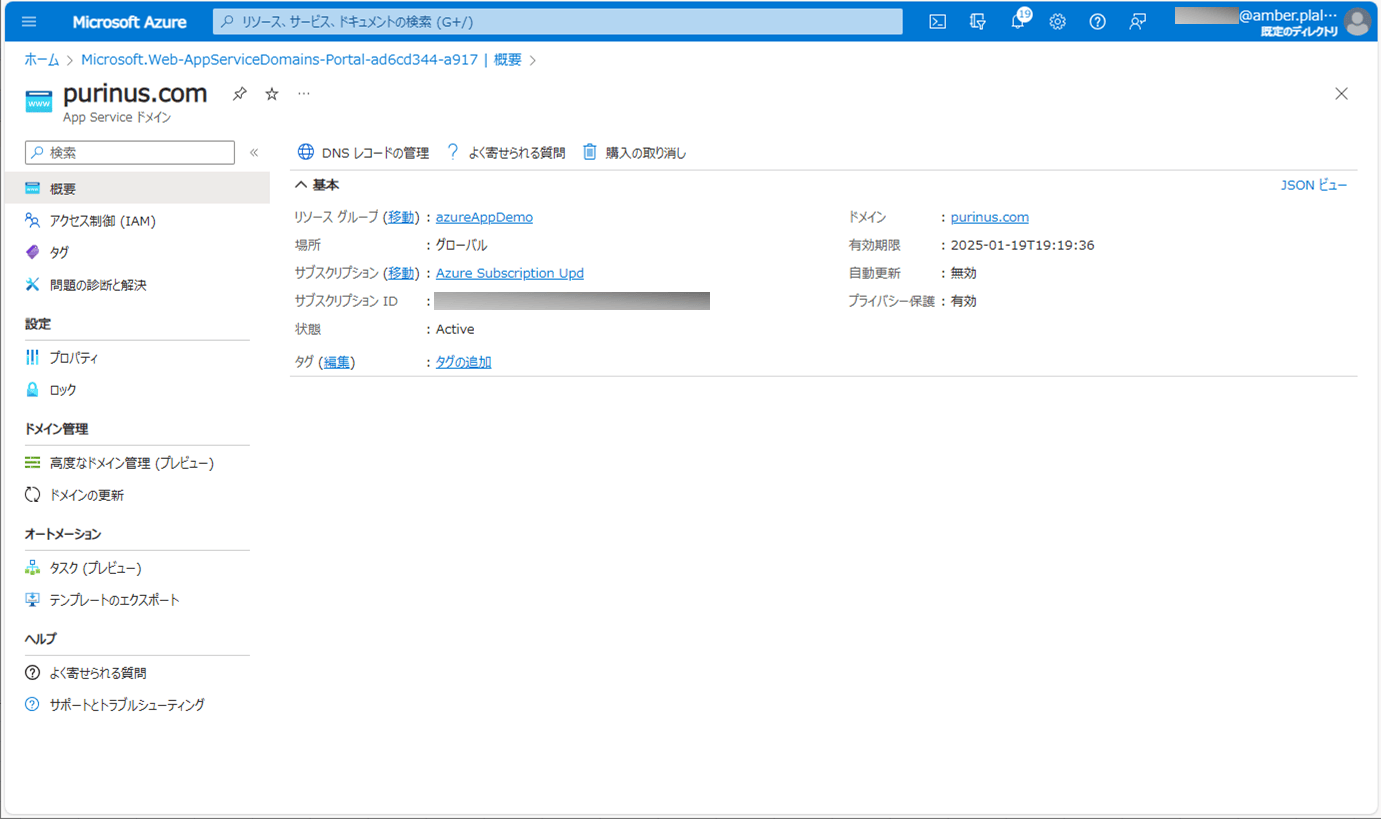
9) 以下のように、「purinus.com」ドメインが作成されたことが確認できる。
10) 以下のように、App Serviceドメインを設定したAzure App Serviceのカスタムドメインを確認すると、カスタムドメインに「purinus.com」ドメインが設定されていることが確認できる。
カスタムドメインの設定
先ほど作成したApp Serviceドメインを、カスタムドメインに設定する。その手順は、以下の通り。
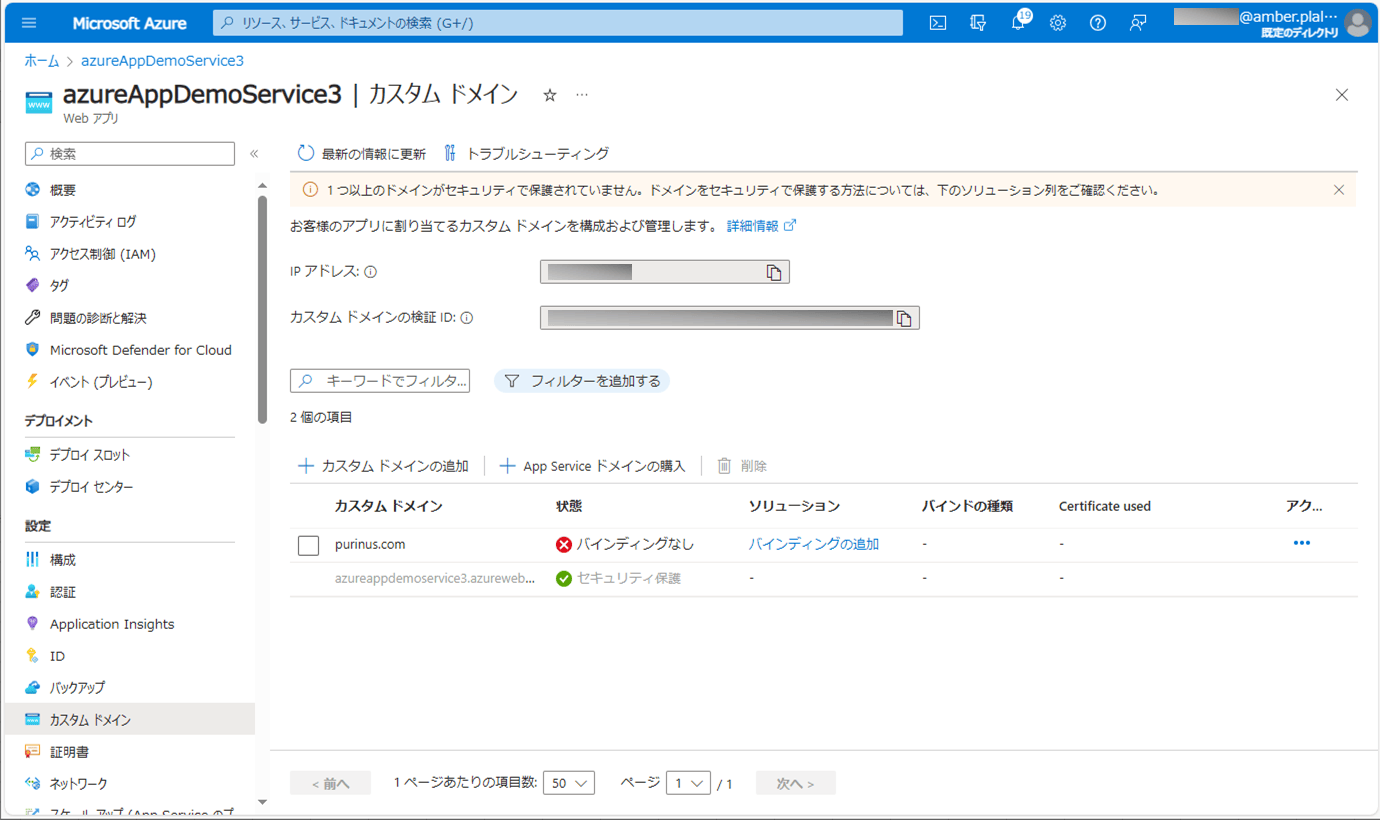
1) App Serviceドメインを設定したAzure App Serviceのカスタムドメインの状態が「バインディングなし」となっているため、証明書を設定し、カスタムドメインに追加する。その際の証明書の設定内容は、以下の通り。
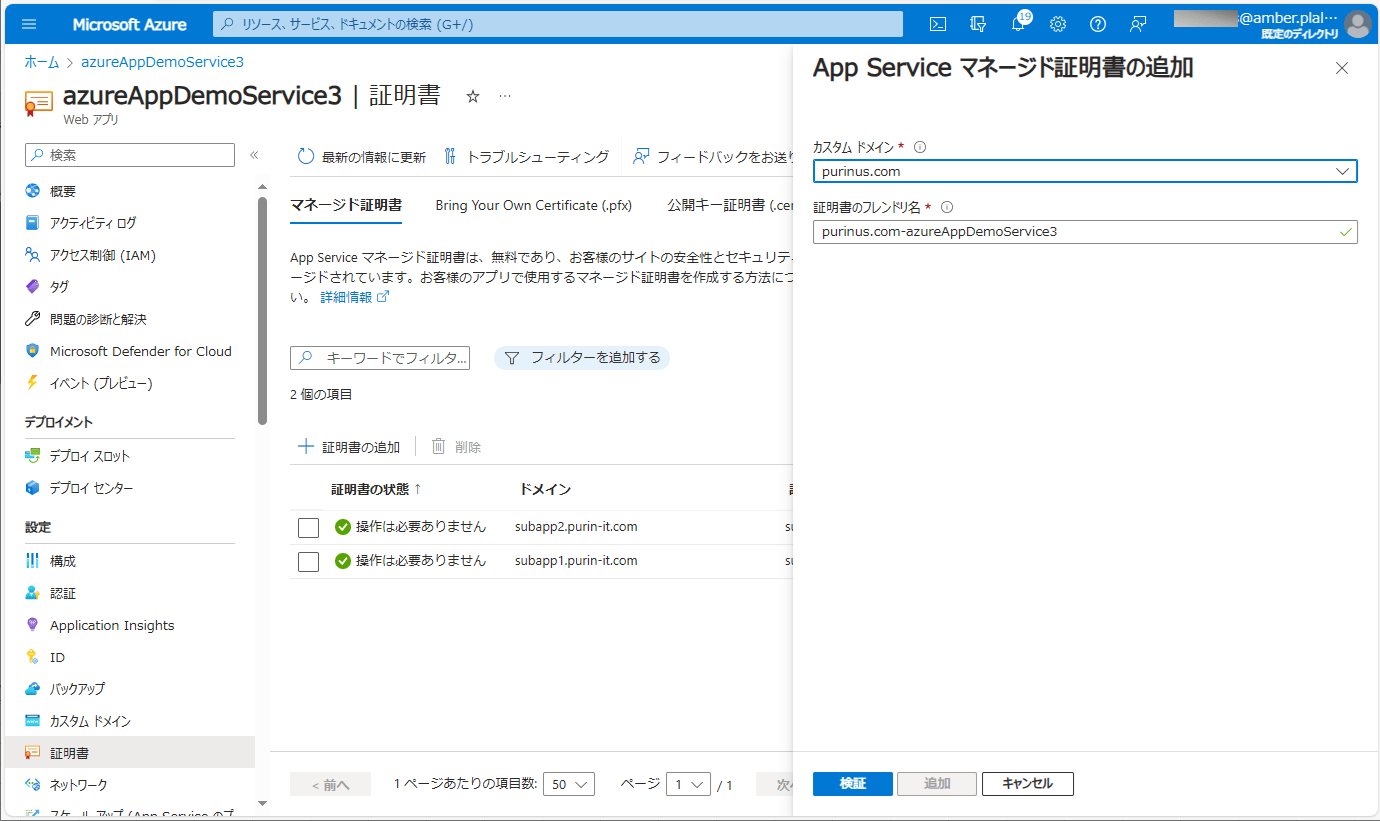
なお、証明書の設定や、カスタムドメインへのバインディング方法は、以下の記事の「証明書(マネージド証明書)の追加」「カスタムドメインへの証明書追加」を参照のこと。

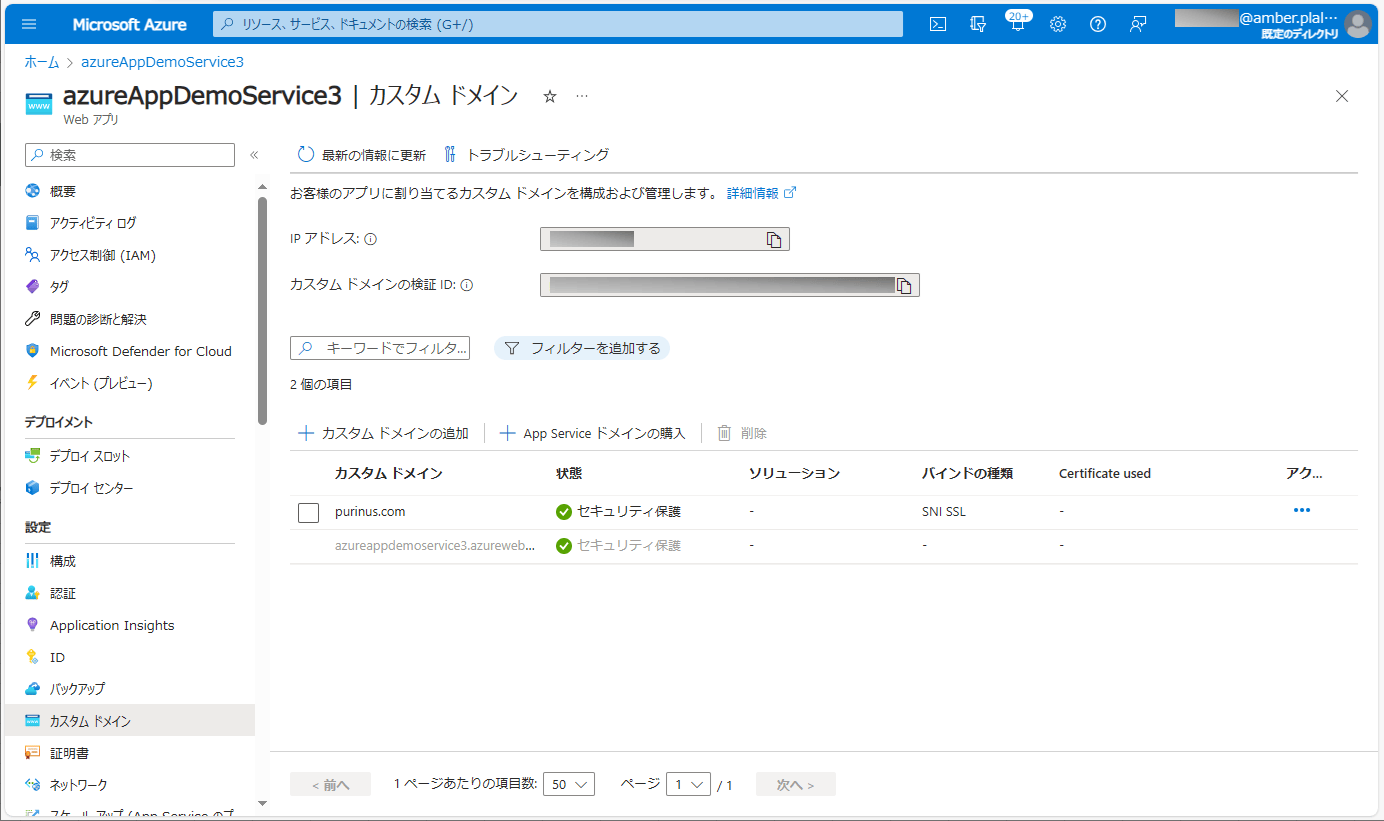
2) 証明書を追加すると、カスタムドメインの状態は以下のようになる。
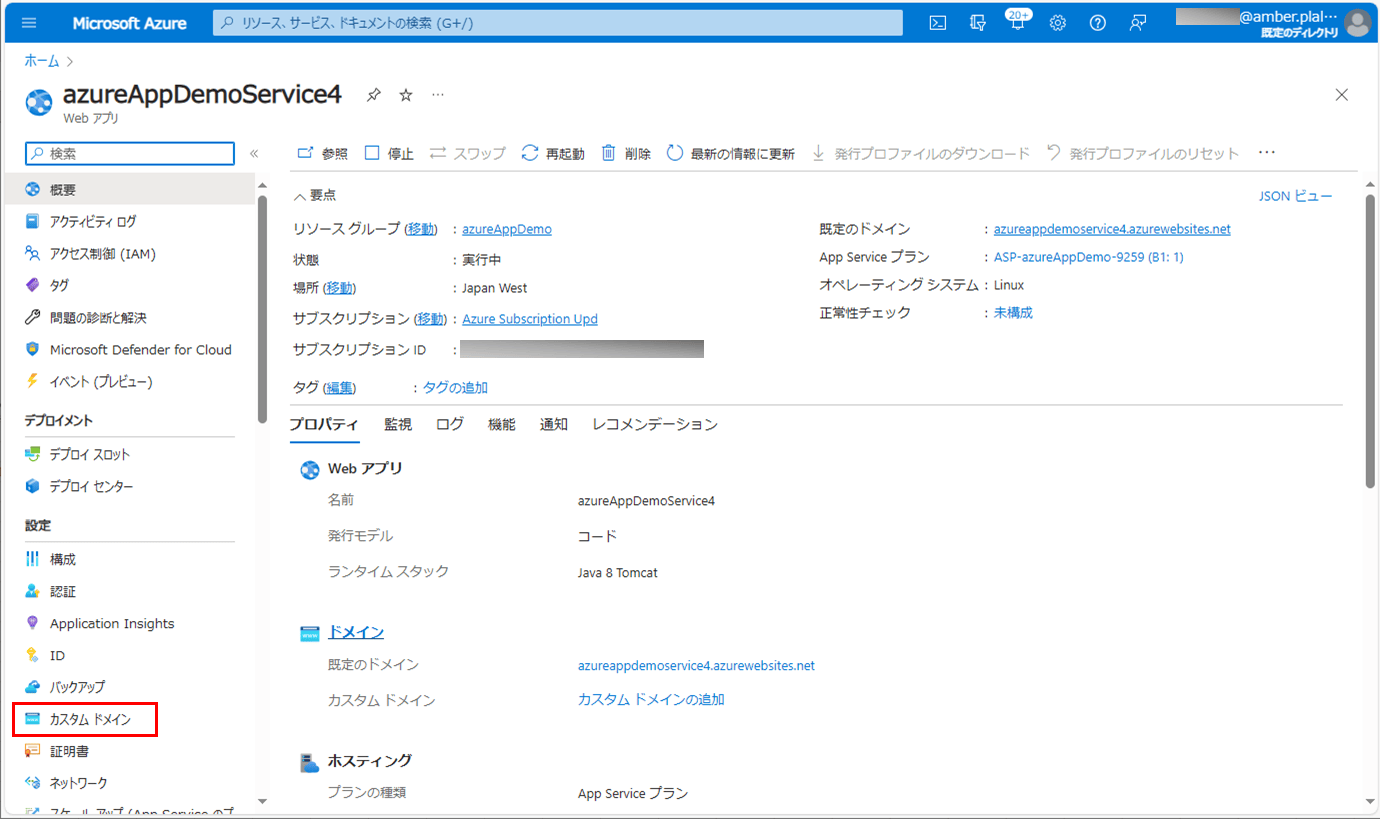
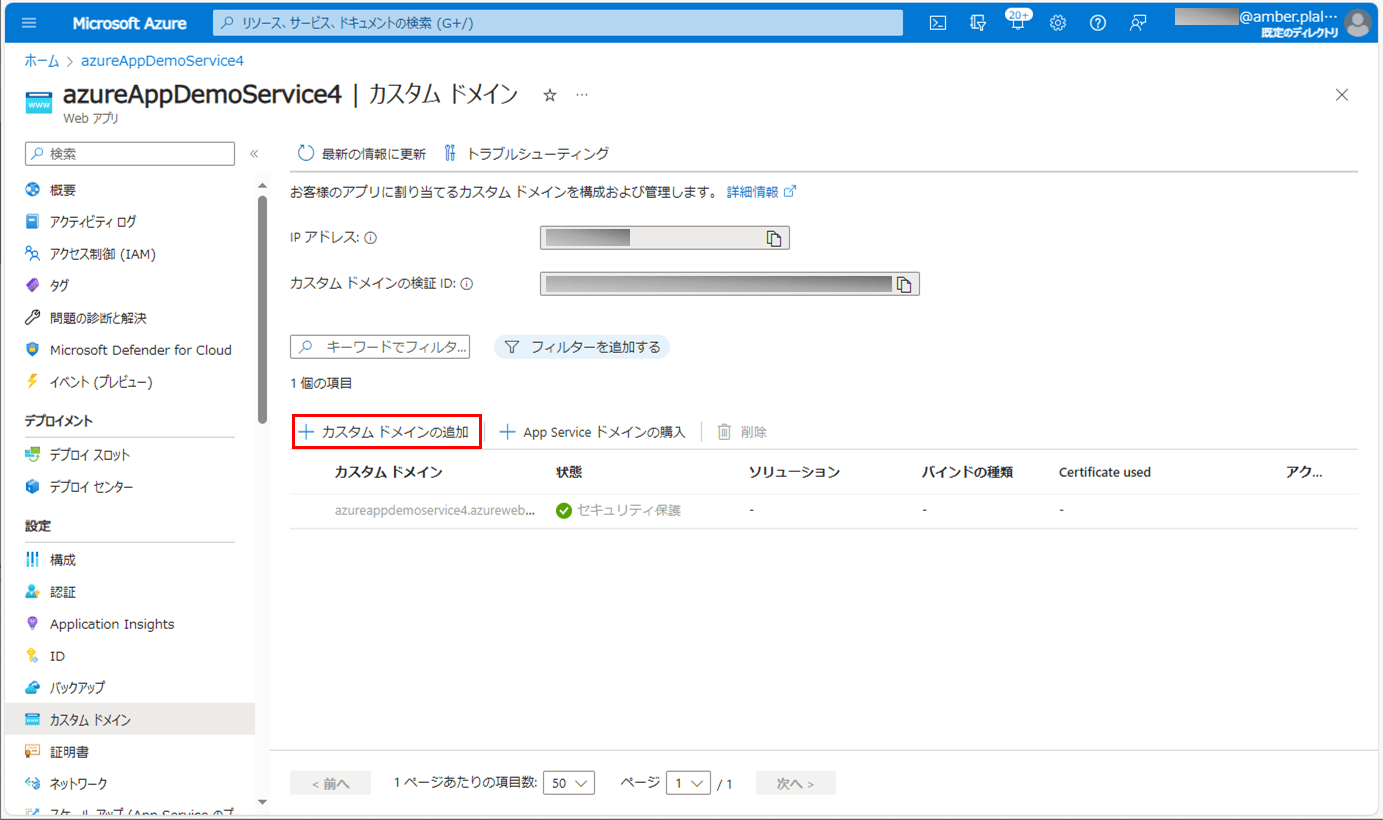
3) App Serviceドメインをまだ設定していないAzure App Serviceを表示後、「カスタム ドメイン」メニューを押下する。
4)「カスタムドメインの追加」ボタンを押下する。
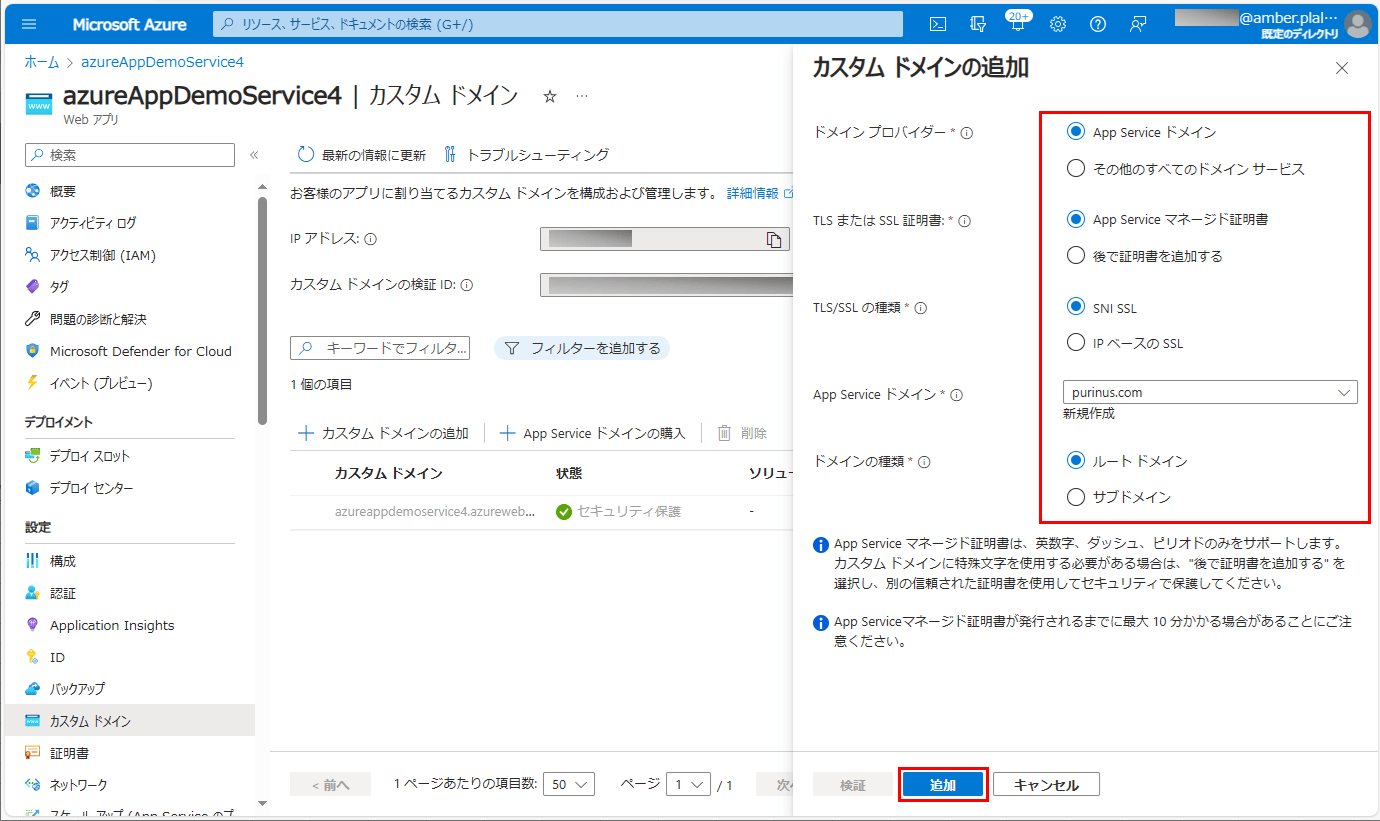
5) カスタムドメインに先ほど追加したApp Serviceドメインを設定し、「追加」ボタンを押下する。
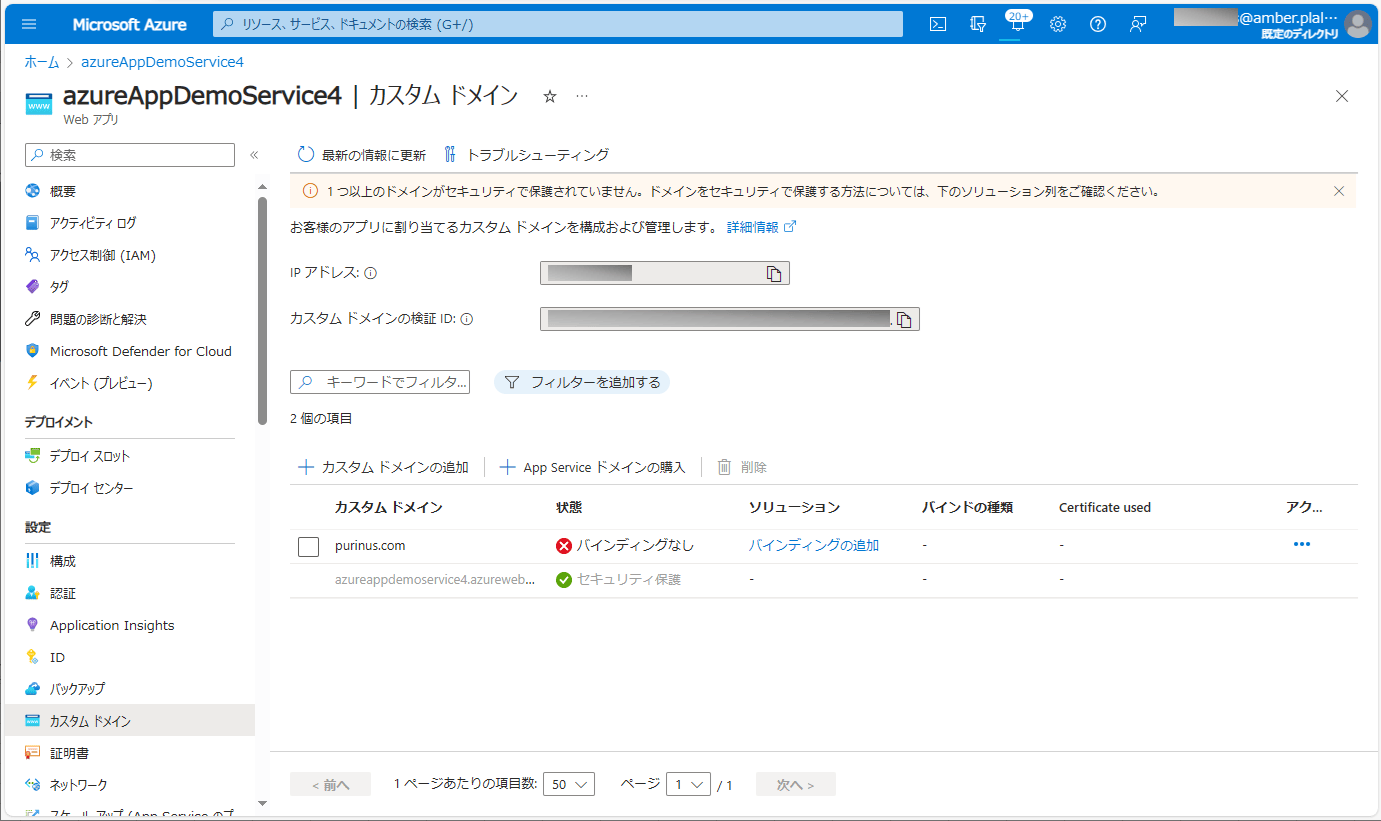
6) 以下のように、設定したカスタムドメインが表示されることが確認できる。
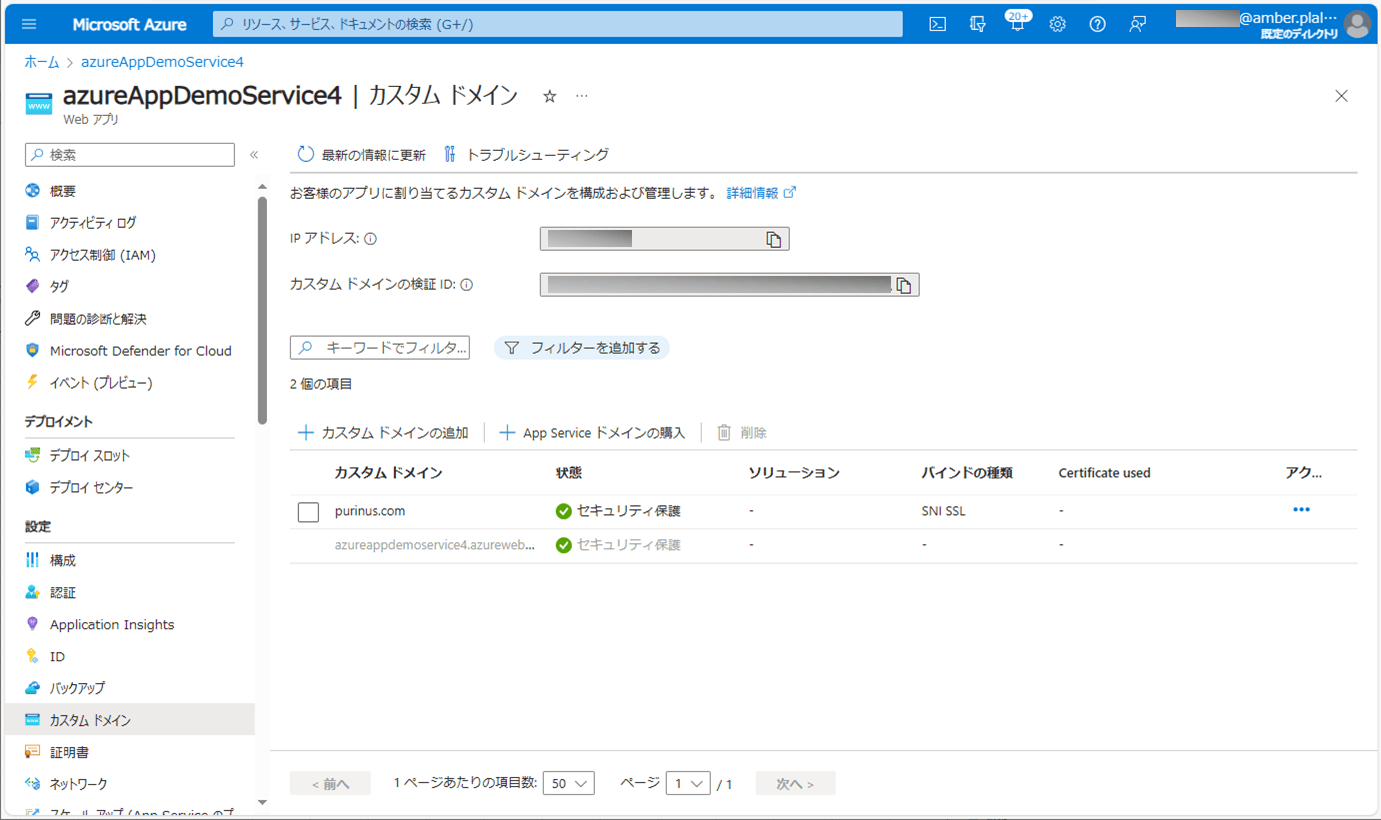
7) 少し待つと、バインディングの設定も行われ、以下の画面表示となる。
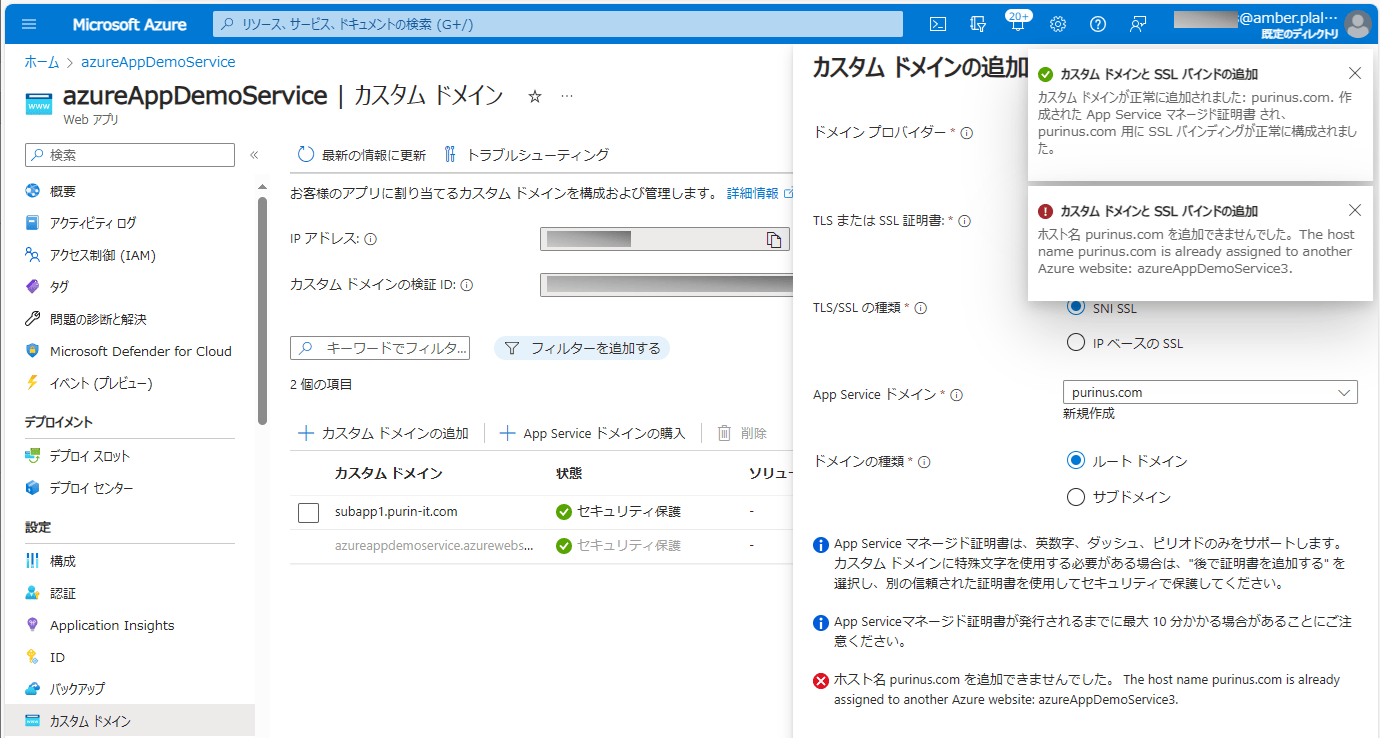
なお、場所(リージョン)が同じAzure App Serviceに、同じカスタムドメインを設定しようとすると、以下のようなエラーメッセージが表示される。

サンプルプログラムの作成
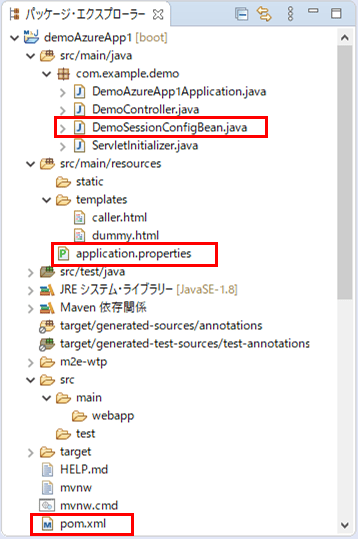
作成したサンプルプログラム(呼び出し元のApp Service)の構成は、以下の通り。なお、下記の赤枠は、前提条件のプログラムから変更したプログラムである。
また、作成したサンプルプログラム(呼び出し先のApp Service)の構成は、以下の通り。なお、下記の赤枠は、前提条件のプログラムから変更したプログラムである。
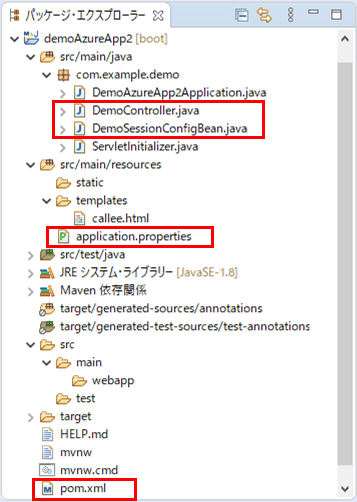
呼出元・呼出先のpom.xmlの変更内容は以下の通りで、デプロイ先となるAzure App Serviceを変更している。
<build>
  <plugins>
    <plugin>
      <groupId>org.springframework.boot</groupId>
      <artifactId>spring-boot-maven-plugin</artifactId>
    </plugin>
    <plugin>
      <groupId>com.microsoft.azure</groupId>
      <artifactId>azure-webapp-maven-plugin</artifactId>
      <version>1.12.0</version>
      <configuration>
        <schemaVersion>v2</schemaVersion>
        <subscriptionId>(ログインユーザーのサブスクリプションID)</subscriptionId>
        <resourceGroup>azureAppDemo</resourceGroup>
        <appName>azureAppDemoService3</appName>
        <pricingTier>B1</pricingTier>
        <region>japaneast</region>
        <appServicePlanName>ASP-azureAppDemo-8679</appServicePlanName>
        <appServicePlanResourceGroup>azureAppDemo</appServicePlanResourceGroup>
        <runtime>
          <os>Linux</os>
          <javaVersion>Java 8</javaVersion>
          <webContainer>Tomcat 8.5</webContainer>
        </runtime>
        <deployment>
          <resources>
            <resource>
              <directory>${project.basedir}/target</directory>
              <includes>
                <include>*.war</include>
              </includes>
            </resource>
          </resources>
        </deployment>
      </configuration>
    </plugin>
  </plugins>
</build>
<build>
<plugins>
<plugin>
<groupId>org.springframework.boot</groupId>
<artifactId>spring-boot-maven-plugin</artifactId>
</plugin>
<plugin>
<groupId>com.microsoft.azure</groupId>
<artifactId>azure-webapp-maven-plugin</artifactId>
<version>1.12.0</version>
<configuration>
<schemaVersion>v2</schemaVersion>
<subscriptionId>(ログインユーザーのサブスクリプションID)</subscriptionId>
<resourceGroup>azureAppDemo</resourceGroup>
<appName>azureAppDemoService4</appName>
<pricingTier>B1</pricingTier>
<region>japanwest</region>
<appServicePlanName>ASP-azureAppDemo-9259</appServicePlanName>
<appServicePlanResourceGroup>azureAppDemo</appServicePlanResourceGroup>
<runtime>
<os>Linux</os>
<javaVersion>Java 8</javaVersion>
<webContainer>Tomcat 8.5</webContainer>
</runtime>
<deployment>
<resources>
<resource>
<directory>${project.basedir}/target</directory>
<includes>
<include>*.war</include>
</includes>
</resource>
</resources>
</deployment>
</configuration>
</plugin>
</plugins>
</build>また、呼出元・呼出先のapplication.propertiesの内容は以下の通りで、呼出先のURLを変更し、ドメイン名を削除している。
#server.port = 8084

# 呼出先画面のURL
#demoAzureApp2.urlBase = http://localhost:8085/sub/
demoAzureApp2.urlBase = https://purinus.com/sub/

# Spring Sessionに関する設定
spring.session.store-type=redis
spring.redis.ssl=true

spring.redis.host=azurePurinRedis.redis.cache.windows.net
spring.redis.port=6380
spring.redis.password=(Azure Cache for Redisのパスワード)
#server.port = 8085

# Spring Sessionに関する設定
spring.session.store-type=redis
spring.redis.ssl=true

spring.redis.host=azurePurinRedis.redis.cache.windows.net
spring.redis.port=6380
spring.redis.password=(Azure Cache for Redisのパスワード)
さらに、呼出元・呼出先のセッション設定を行うクラスの内容は以下の通りで、ドメイン名の設定を削除している。
package com.example.demo;

import org.springframework.beans.factory.annotation.Value;
import org.springframework.context.annotation.Bean;
import org.springframework.context.annotation.Configuration;
import org.springframework.data.redis.connection.RedisStandaloneConfiguration;
import org.springframework.data.redis.connection.lettuce.LettuceClientConfiguration;
import org.springframework.data.redis.connection.lettuce.LettuceConnectionFactory;
import org.springframework.data.redis.serializer.GenericJackson2JsonRedisSerializer;
import org.springframework.data.redis.serializer.RedisSerializer;
import org.springframework.session.data.redis.config.ConfigureRedisAction;
import org.springframework.session.data.redis.config.annotation.web.http.EnableRedisHttpSession;
import org.springframework.session.web.context.AbstractHttpSessionApplicationInitializer;

@Configuration
@EnableRedisHttpSession
public class DemoSessionConfigBean extends AbstractHttpSessionApplicationInitializer {

  /** Azure上のRedisサーバーのホスト名 */
  @Value("${spring.redis.host}")
  private String redisHostName;

  /** Azure上のRedisサーバーのポート番号 */
  @Value("${spring.redis.port}")
  private String redisPort;

  /** Azure上のRedisサーバーのパスワード */
  @Value("${spring.redis.password}")
  private String redisPassword;


  /**
   * Redisへの値の書き込み・読み込み手段を提供するシリアライザを生成する
   * @return Redisへの値の書き込み・読み込み手段を提供するシリアライザ
   */
  @Bean
  public RedisSerializer<Object> springSessionDefaultRedisSerializer() {
    return new GenericJackson2JsonRedisSerializer();
  }

  /**
   * Spring SessionがAzure上のRedisのCONFIGを実行しないようにする
   * @return Spring SessionがAzure上のRedisのCONFIGを実行しない設定
   */
  @Bean
  public static ConfigureRedisAction configureRedisAction() {
    return ConfigureRedisAction.NO_OP;
  }

  /**
   * Redisへの接続方法を生成する
   * @return Redisへの接続方法
   */
  @Bean
  public LettuceConnectionFactory connectionFactory() {
    RedisStandaloneConfiguration redisStandaloneConfiguration
       = new RedisStandaloneConfiguration();
    redisStandaloneConfiguration.setHostName(redisHostName);
    redisStandaloneConfiguration.setPassword(redisPassword);
    redisStandaloneConfiguration.setPort(Integer.parseInt(redisPort));
    LettuceClientConfiguration lettuceClientConfiguration
       = LettuceClientConfiguration.builder().useSsl().build();
    return new LettuceConnectionFactory(redisStandaloneConfiguration
       , lettuceClientConfiguration);
  }

}
また、呼出先のコントローラクラスの内容は以下の通りで、@GetMappingアノテーションの設定を変更している。
package com.example.demo;

import javax.servlet.http.HttpSession;

import org.springframework.stereotype.Controller;
import org.springframework.ui.Model;
import org.springframework.web.bind.annotation.GetMapping;
import org.springframework.web.bind.annotation.RequestParam;

@Controller
public class DemoController {

  /**
   * 呼出先画面を表示する.
   * @param model Modelオブジェクト
   * @param session Httpセッション
   * @return 呼出先画面
   */
  @GetMapping("/sub")
  public String index(@RequestParam("addParam")String paramData
      , Model model, HttpSession session) {
    // セッションからのデータを取得
    String sessionData = (String)session.getAttribute("addSession");

    // セッションからのデータを取得とリクエストパラメータの値を、画面に表示
    model.addAttribute("sessionData", sessionData);
    model.addAttribute("paramData", paramData);
    return "callee";
  }

}
その他のソースコード内容は、以下のサイトを参照のこと。
https://github.com/purin-it/azure/tree/master/azure-app-service-same-domain/
サンプルプログラムの実行結果
サンプルプログラムの実行結果は以下の通りで、認識できるController クラスのパスは1つのAzure App Serviceのみとなることが確認できる。
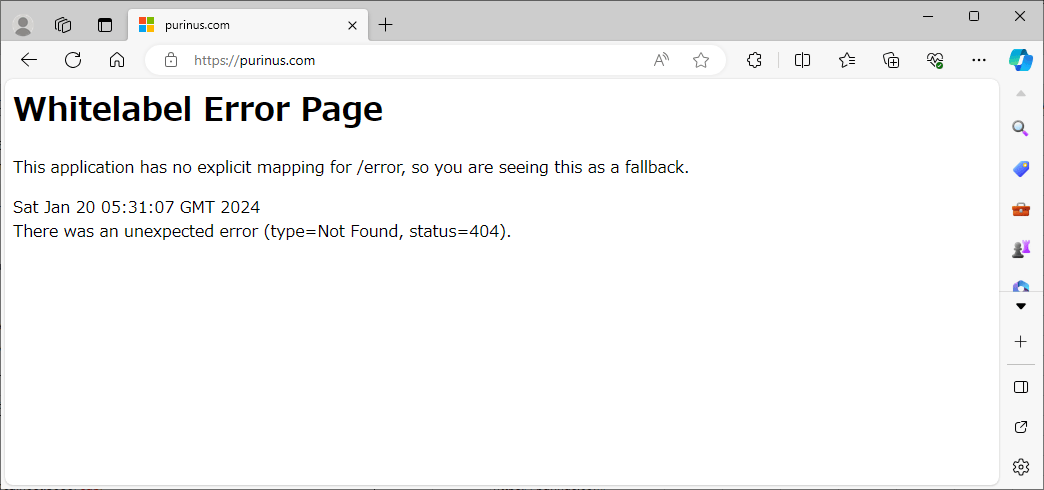
1) カスタムドメインに設定した呼出元URL「https://purinus.com/」とアクセスすると、以下のように、404エラーの発生が確認できる。
2) カスタムドメインに設定した呼出先URL「https://purinus.com/sub?addParam=1」とアクセスすると、以下のように、呼出先画面の表示が確認できる。
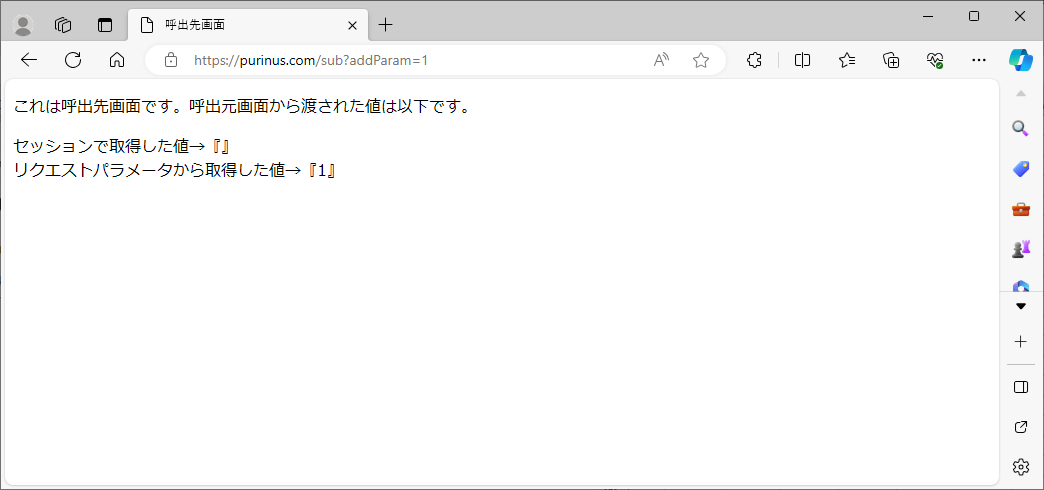
なお、カスタムドメインの設定を、azureAppDemoService3⇒azureAppDemoService4の順に設定したため、(後に設定した)azureAppDemoService4のController クラスのパスを認識している。
要点まとめ
- 複数のAzure App Service間でも、場所(リージョン)が異なっていれば、同じカスタムドメインを設定することができるが、Spring Bootを利用したJavaアプリケーションを複数のAzure App Serviceにデプロイすると、認識できるController クラスのパスは1つのAzure App Serviceのみとなる。