Azure Blob Storageのコンテナー内にファイルを格納するプログラムを作成してみた
以前、JavaでSpring Bootフレームワークを利用してファイルをアップロードするプログラムを作成したことがあったが、ファイルのアップロード先をAzure Blob Storageのコンテナー内に設定することもできる。
今回は、App Service上でAzure Blob Storageのコンテナー内にファイルをアップロードするプログラムを作成してみたので、共有する。
前提条件
下記記事のBlob Storageの作成が完了していること。

また、下記記事の実装が完了していること。

Azure Storageへのアクセスキー、Blobコンテナー名の確認
Azure Storageにアクセスするプログラム内では、アカウント名・アクセスキー・コンテナー名を設定する必要があるが、その設定内容はAzure Portal上で確認できる。その手順は、以下の通り。
1) Azure Portalにログイン後、作成したAzure Storageを表示し、「アクセスキー」メニューを押下後、「キーの表示」を押下する。
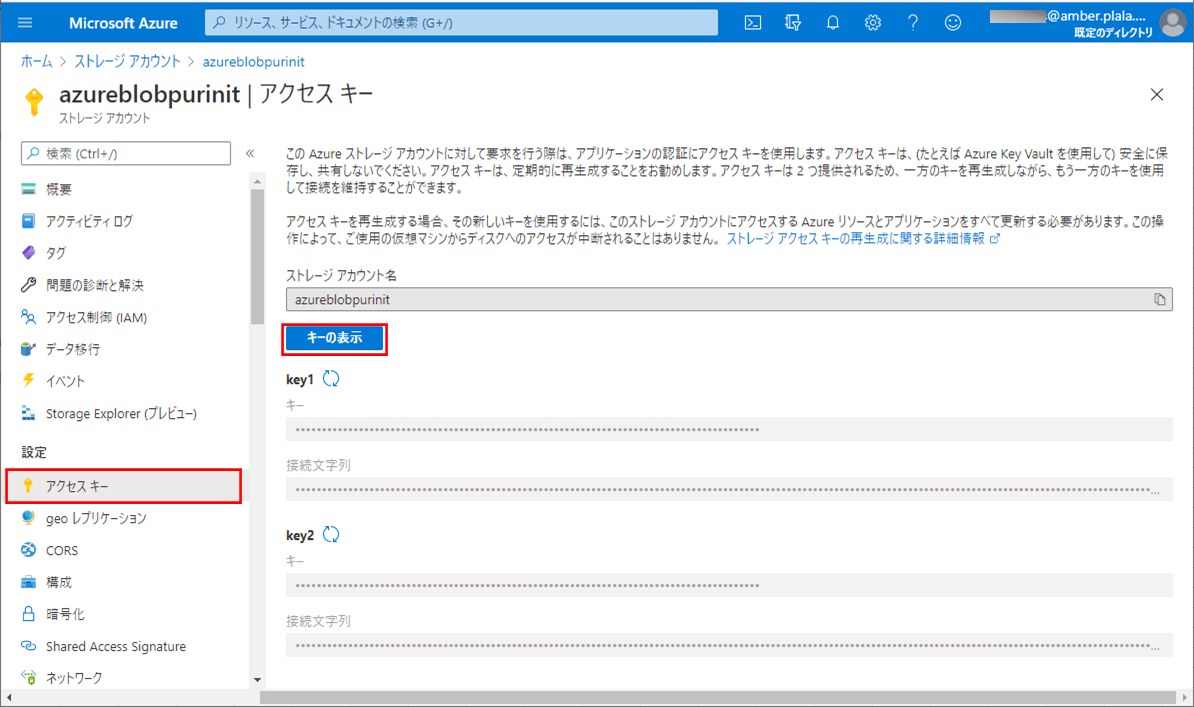
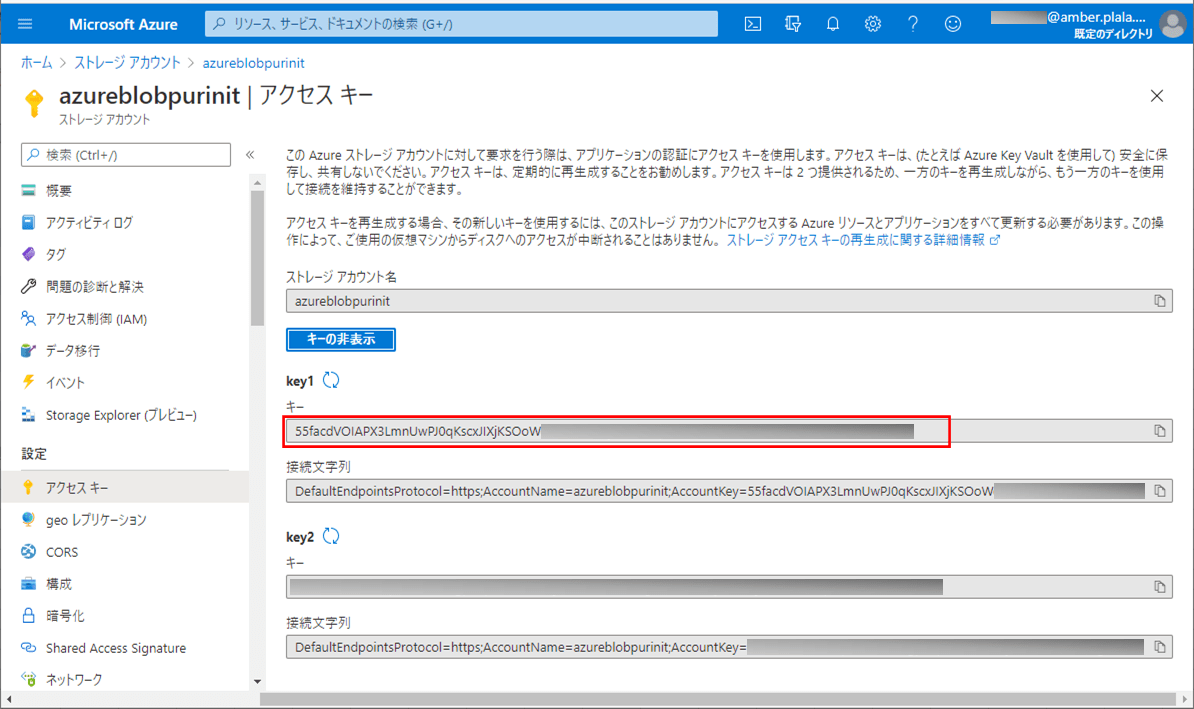
2) 以下のように、アクセスキーが表示される。このうち「key1」の「キー」をアクセスキーとする。
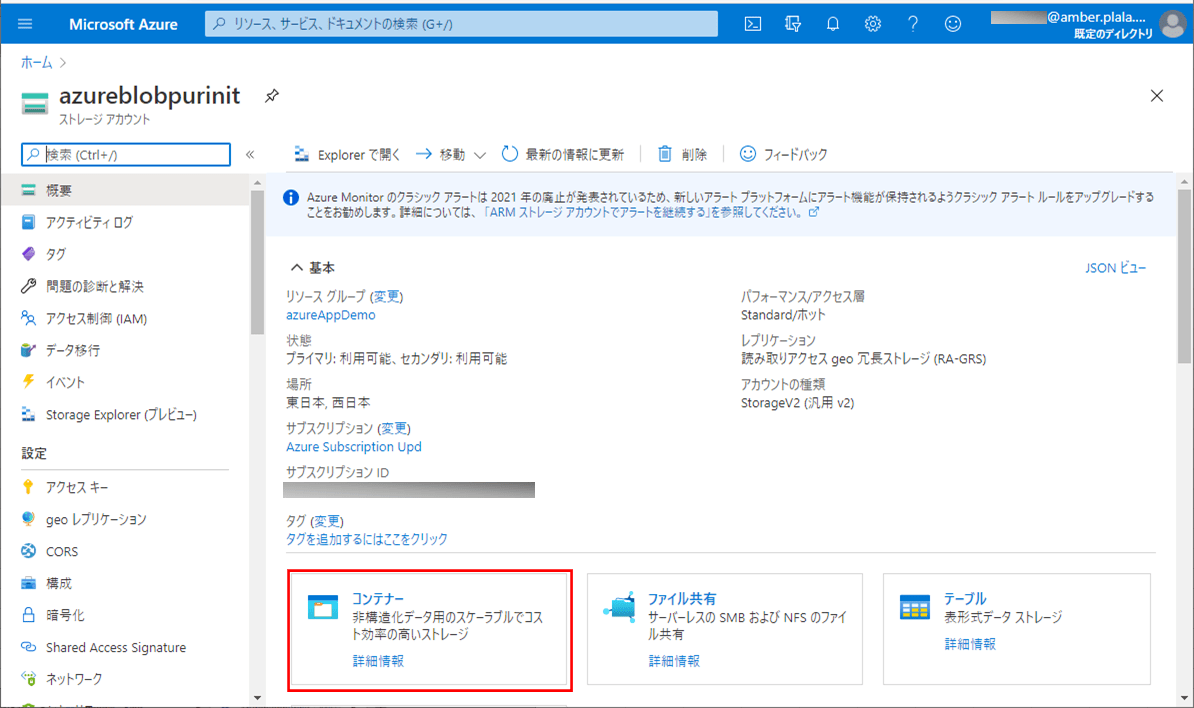
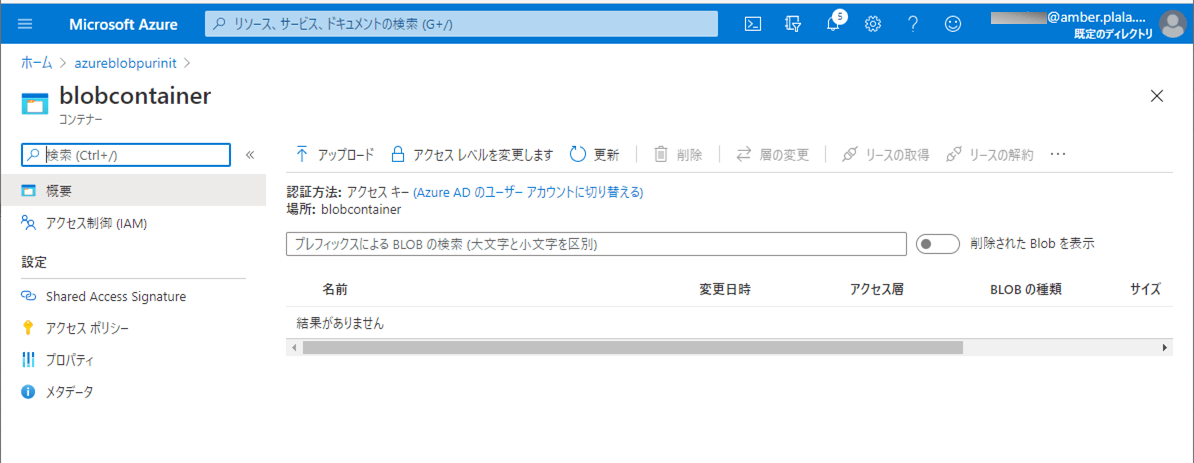
3) 「概要」メニューを表示した後で、「コンテナー」メニューを押下する。
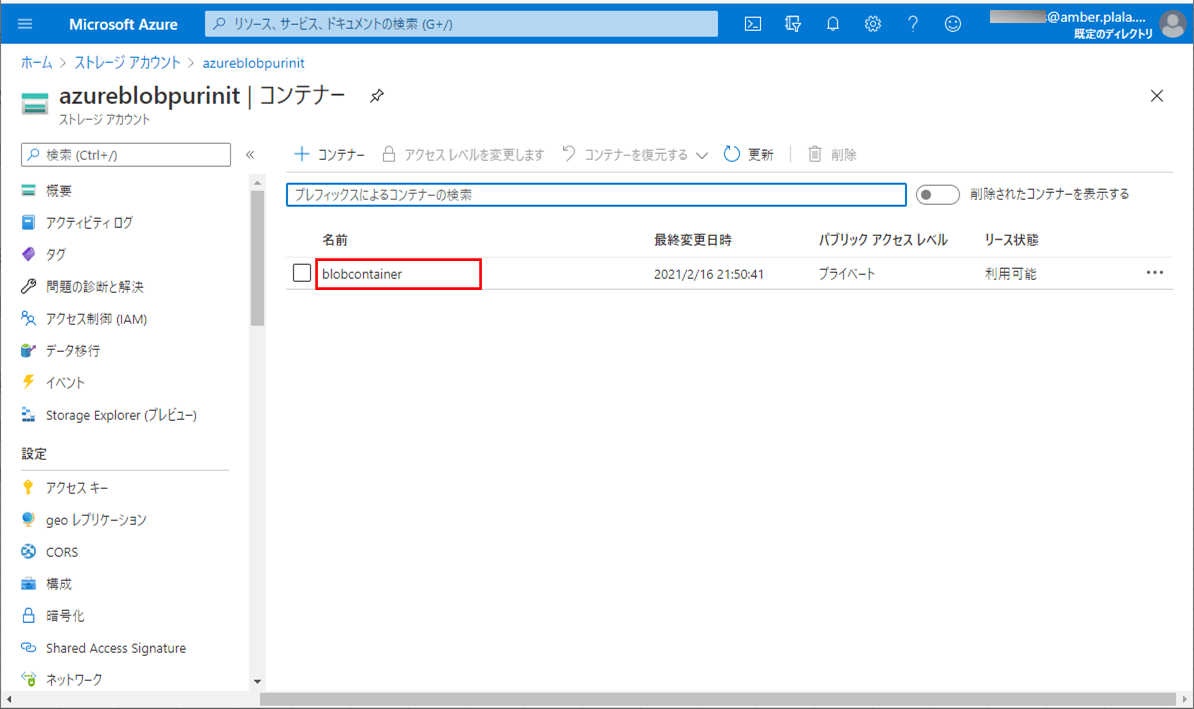
4) 以下のように、「blobcontainer」というコンテナーがあることが確認できる。
作成したサンプルプログラム(App Service側)の内容
作成したサンプルプログラム(App Service側)の構成は以下の通り。なお、Azure Functions側のソースコードは修正していない。

なお、上記の赤枠は、前提条件のプログラムから追加・変更したプログラムである。
pom.xmlの内容は以下の通りで、Azure Storageにアクセスするための設定を追加している。
<?xml version="1.0" encoding="UTF-8"?>
<project xmlns="http://maven.apache.org/POM/4.0.0" xmlns:xsi="http://www.w3.org/2001/XMLSchema-instance" xsi:schemaLocation="http://maven.apache.org/POM/4.0.0 https://maven.apache.org/xsd/maven-4.0.0.xsd">
<modelVersion>4.0.0</modelVersion>
<parent>
<groupId>org.springframework.boot</groupId>
<artifactId>spring-boot-starter-parent</artifactId>
<version>2.4.0</version>
<relativePath/>
<!-- lookup parent from repository -->
</parent>
<groupId>com.example</groupId>
<artifactId>demoAzureApp</artifactId>
<version>0.0.1-SNAPSHOT</version>
<packaging>war</packaging>
<name>demoAzureApp</name>
<description>Demo project for Spring Boot</description>
<properties>
<java.version>1.8</java.version>
</properties>
<dependencies>
<dependency>
<groupId>org.springframework.boot</groupId>
<artifactId>spring-boot-starter-thymeleaf</artifactId>
</dependency>
<dependency>
<groupId>org.springframework.boot</groupId>
<artifactId>spring-boot-starter-web</artifactId>
</dependency>
<!-- lombokの設定 -->
<dependency>
<groupId>org.projectlombok</groupId>
<artifactId>lombok</artifactId>
<scope>provided</scope>
</dependency>
<!-- Azure Storageの設定 -->
<dependency>
<groupId>com.microsoft.azure</groupId>
<artifactId>azure-storage</artifactId>
<version>8.3.0</version>
</dependency>
<dependency>
<groupId>commons-io</groupId>
<artifactId>commons-io</artifactId>
<version>2.4</version>
</dependency>
<dependency>
<groupId>org.springframework.boot</groupId>
<artifactId>spring-boot-starter-tomcat</artifactId>
<scope>provided</scope>
</dependency>
<dependency>
<groupId>org.springframework.boot</groupId>
<artifactId>spring-boot-starter-test</artifactId>
<scope>test</scope>
</dependency>
</dependencies>
<build>
<plugins>
<plugin>
<groupId>org.springframework.boot</groupId>
<artifactId>spring-boot-maven-plugin</artifactId>
</plugin>
<plugin>
<groupId>com.microsoft.azure</groupId>
<artifactId>azure-webapp-maven-plugin</artifactId>
<version>1.12.0</version>
<configuration>
<schemaVersion>v2</schemaVersion>
<subscriptionId>(ログインユーザーのサブスクリプションID)</subscriptionId>
<resourceGroup>azureAppDemo</resourceGroup>
<appName>azureAppDemoService</appName>
<pricingTier>B1</pricingTier>
<region>japaneast</region>
<appServicePlanName>ASP-azureAppDemo-8679</appServicePlanName>
<appServicePlanResourceGroup>azureAppDemo</appServicePlanResourceGroup>
<runtime>
<os>Linux</os>
<javaVersion>Java 8</javaVersion>
<webContainer>Tomcat 8.5</webContainer>
</runtime>
<deployment>
<resources>
<resource>
<directory>${project.basedir}/target</directory>
<includes>
<include>*.war</include>
</includes>
</resource>
</resources>
</deployment>
</configuration>
</plugin>
</plugins>
</build>
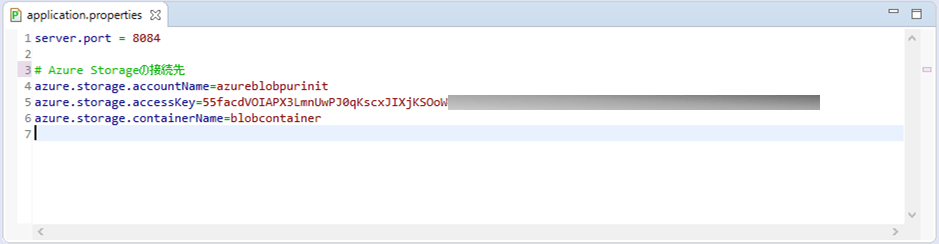
</project>application.propertiesの内容は以下の通りで、Azure Storageにアクセスするためのアカウント名・アクセスキー・コンテナー名を追加している。
コントローラクラスの内容は以下の通りで、アップロードボタンが押下されたときに、Blobコンテナーにアップロードしたファイルを格納する処理を追加している。
package com.example.demo;

import org.apache.commons.io.IOUtils;
import org.springframework.beans.factory.annotation.Value;
import org.springframework.stereotype.Controller;
import org.springframework.ui.Model;
import org.springframework.web.bind.annotation.GetMapping;
import org.springframework.web.bind.annotation.PostMapping;
import org.springframework.web.bind.annotation.RequestParam;
import org.springframework.web.multipart.MultipartFile;
import org.thymeleaf.util.StringUtils;

import com.microsoft.azure.storage.CloudStorageAccount;
import com.microsoft.azure.storage.blob.BlobOutputStream;
import com.microsoft.azure.storage.blob.CloudBlobClient;
import com.microsoft.azure.storage.blob.CloudBlobContainer;
import com.microsoft.azure.storage.blob.CloudBlockBlob;

@Controller
public class DemoController {

    /** Azure Storageのアカウント名 */
    @Value("${azure.storage.accountName}")
    private String storageAccountName;

    /** Azure Storageへのアクセスキー */
    @Value("${azure.storage.accessKey}")
    private String storageAccessKey;

    /** Azure StorageのBlobコンテナー名 */
    @Value("${azure.storage.containerName}")
    private String storageContainerName;

    /**
     * メイン画面を初期表示する.
     * @param model Modelオブジェクト
     * @return メイン画面
     */
    @GetMapping("/")
    public String index(Model model) {
        model.addAttribute("message"
            , "アップロードするファイルを指定し、アップロードボタンを押下してください。");
        return "main";
    }

    /**
     * ファイルデータをAzure Blob Storageに登録する.
     * @param uploadFile アップロードファイル
     * @param model      Modelオブジェクト
     * @return メイン画面
     */
    @PostMapping("/upload")
    public String add(@RequestParam("upload_file") MultipartFile uploadFile
            , Model model) {
        // ファイルが未指定の場合はエラーとする
        if (uploadFile == null
            || StringUtils.isEmptyOrWhitespace(uploadFile.getOriginalFilename())) {
            model.addAttribute("errMessage", "ファイルを指定してください。");
            return "main";
        }

        // ファイルアップロード処理
        try {
            // Blobストレージへの接続文字列
            String storageConnectionString = "DefaultEndpointsProtocol=https;"
                    + "AccountName=" + storageAccountName + ";"
                    + "AccountKey=" + storageAccessKey + ";";

            // ストレージアカウントオブジェクトを取得
            CloudStorageAccount storageAccount
                = CloudStorageAccount.parse(storageConnectionString);

            // Blobクライアントオブジェクトを取得
            CloudBlobClient blobClient = storageAccount.createCloudBlobClient();

            // Blob内のコンテナーを取得
            CloudBlobContainer container
                = blobClient.getContainerReference(storageContainerName);

            // Blob内のコンテナーにデータを書き込む
            CloudBlockBlob blob
                = container.getBlockBlobReference(uploadFile.getOriginalFilename());
            BlobOutputStream output = blob.openOutputStream();
            output.write(IOUtils.toByteArray(uploadFile.getInputStream()));
            output.close();

        } catch (Exception ex) {
            throw new RuntimeException(ex);
        }

        // メイン画面へ遷移
        model.addAttribute("message", "ファイルアップロードが完了しました。");
        return "main";
    }
}
メイン画面のHTMLファイルの内容は以下の通りで、ファイルのアップロードを行う画面となっている。
<!DOCTYPE html>
<html lang="ja" xmlns:th="http://www.thymeleaf.org">
<head>
<meta charset="UTF-8">
<title>メイン画面</title>
</head>
<body>
    <form method="post" enctype="multipart/form-data" th:action="@{/upload}">
    	<th:block th:if="!${#strings.isEmpty(message)}">
    		<span th:text="${message}">メッセージ</span><br/><br/>
    	</th:block>
        <th:block th:if="!${#strings.isEmpty(errMessage)}">
    		<font color="#FF0000">
                    <span th:text="${errMessage}">エラーメッセージ</span>
                </font><br/><br/>
    	</th:block>
    	ファイル : <input type="file" name="upload_file" /><br/><br/>
    	<input type="submit" value="アップロード" />
    </form>
</body>
</html>
その他のソースコード内容は、以下のサイトを参照のこと。
https://github.com/purin-it/azure/tree/master/azure-blob-storage-upload/demoAzureApp
作成したサンプルプログラムの実行結果
サンプルプログラムをAzure App Serviceにデプロイして実行した結果は、以下の通り。
1) サンプルプログラム実行前のBlobコンテナーの内容は以下の通りで、ファイルがアップロードされていないことが確認できる。
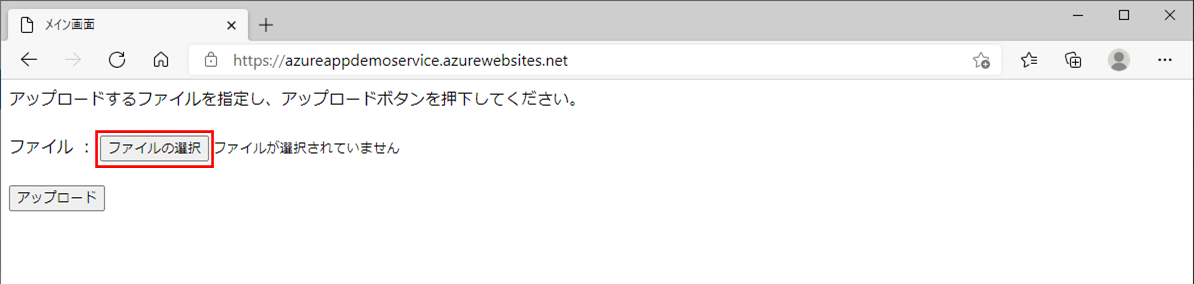
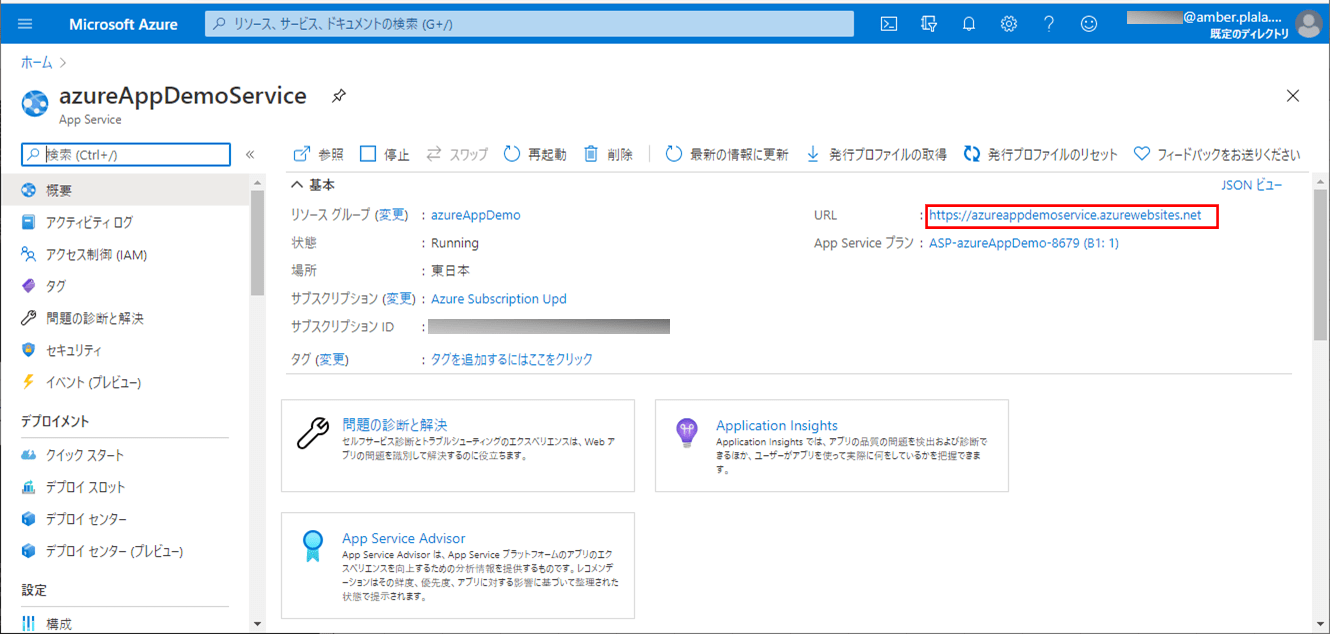
2) Azure App ServiceのURL「https://azureappdemoservice.azurewebsites.net/」とアクセスし、「ファイルの選択」ボタンが押下する。
なお、上記URLは、下記Azure App ServiceのURLから確認できる。
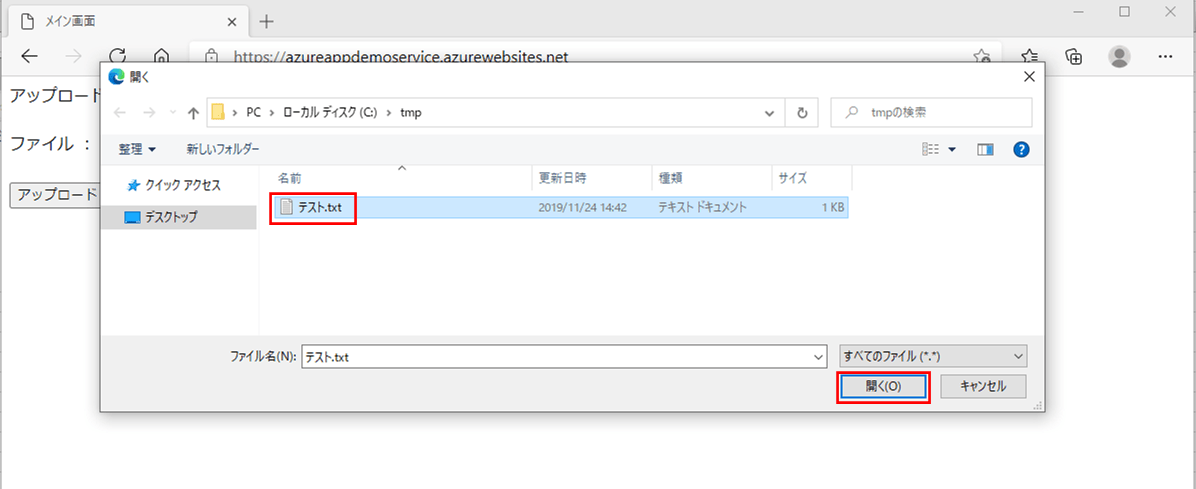
3) アップロードファイルを選択し、「開く」ボタンを押下する。
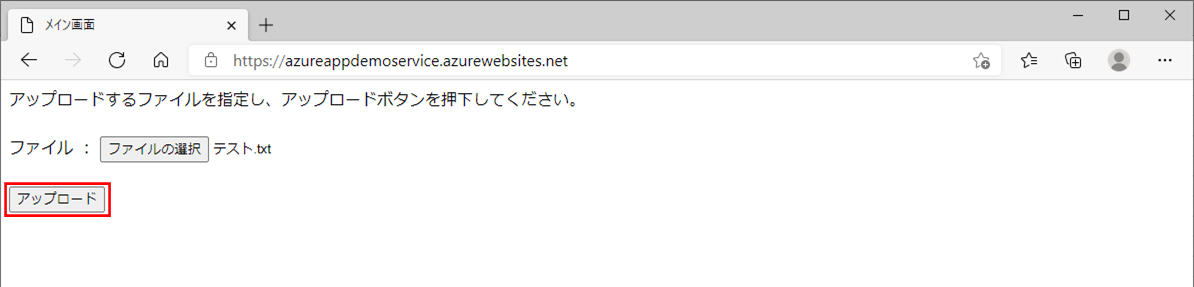
4) 指定したファイルが選択された状態になっていることを確認後、「アップロード」ボタンを押下する。
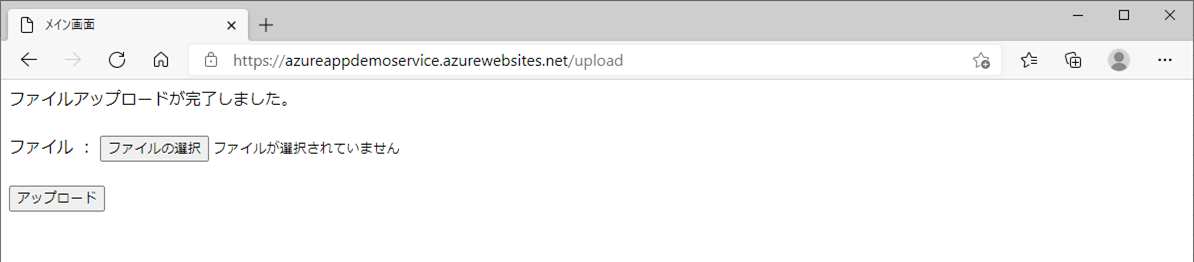
5) アップロードが完了し、完了メッセージが表示されることが確認できる。
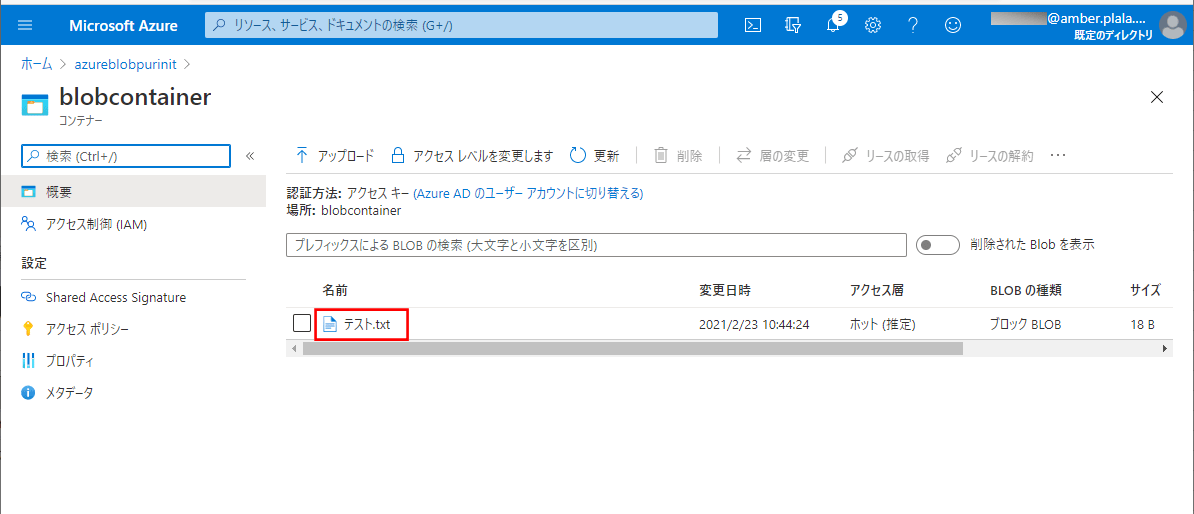
6) サンプルプログラム実行後、以下のように、アップロードしたファイルが配置されていることが確認できる。
要点まとめ
- JavaでSpring Bootフレームワークを利用してファイルをアップロードするプログラムのファイルアップロード先は、Azure Blob Storageのコンテナー内に設定することができる。