API通信をAESで暗号化してみた
今回は、以前作成したREST API通信のプログラムを、共通鍵暗号方式の1つであるAES(Advanced Encryption Standard)を利用して暗号化するようにしてみたので、そのサンプルプログラムを共有する。
共通鍵暗号方式については、以下のサイトを参照のこと。
https://www.infraexpert.com/study/security4.html
前提条件
下記記事のサンプルプログラムの作成と前提条件のデータ作成が完了していること。

サーバー側のプログラムの作成と実行
作成したサーバー側(demo_server)サンプルプログラムの構成は以下の通り。
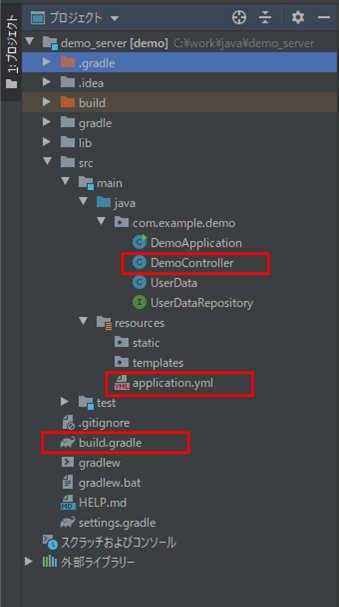
なお、上記の赤枠は、前提条件のプログラムから変更したプログラムである。
build.gradleの内容は以下の通りで、暗号化を行うための設定を追加している。
plugins {
	id 'org.springframework.boot' version '2.1.7.RELEASE'
	id 'java'
}

apply plugin: 'io.spring.dependency-management'

group = 'com.example'
version = '0.0.1-SNAPSHOT'
sourceCompatibility = '1.8'

repositories {
	mavenCentral()
}

dependencies {
	implementation 'org.springframework.boot:spring-boot-starter-thymeleaf'
	implementation 'org.springframework.boot:spring-boot-starter-web'
	testImplementation 'org.springframework.boot:spring-boot-starter-test'
	//lombokの設定を追加
	compileOnly 'org.projectlombok:lombok:1.18.10'
	annotationProcessor 'org.projectlombok:lombok:1.18.10'
	//oracleを利用するための設定を追加
	compile files('lib/ojdbc6.jar')
	implementation 'org.springframework.boot:spring-boot-starter-data-jpa'
	//暗号化を行うための設定を追加
	compile group: 'commons-codec', name: 'commons-codec', version: '1.8'
}
application.ymlの内容は以下の通りで、暗号化に必要な項目を追加している。 暗号化キー(key)は、16バイトの文字列を設定している。
# ポート番号:8085で起動
server:
  port: 8085
# DB接続情報
spring:
  datasource:
    url: jdbc:oracle:thin:@localhost:1521:xe
    username: USER01
    password: USER01
    driverClassName: oracle.jdbc.driver.OracleDriver
# 暗号化項目を設定
encrypt:
  algorithm: AES
  charset: utf-8
  key: 1234567890abcdef


![]()
![]()

コントローラクラスの内容は以下の通りで、encryptメソッドでAESによる暗号化を行っている。なお、暗号化に必要な項目値は、application.ymlから取得している。
package com.example.demo;

import com.fasterxml.jackson.core.JsonProcessingException;
import com.fasterxml.jackson.databind.ObjectMapper;
import org.apache.commons.codec.binary.Base64;
import org.springframework.beans.factory.annotation.Autowired;
import org.springframework.beans.factory.annotation.Value;
import org.springframework.data.domain.Sort;
import org.springframework.util.StringUtils;
import org.springframework.web.bind.annotation.GetMapping;
import org.springframework.web.bind.annotation.RestController;

import javax.crypto.Cipher;
import javax.crypto.spec.SecretKeySpec;
import java.util.List;

import static org.springframework.data.domain.Sort.Direction.ASC;

@RestController
public class DemoController {

    /**
     * 暗号化アルゴリズム
     */
    @Value("${encrypt.algorithm}")
    private String encryptAlgorithm;

    /**
     * 暗号化時に利用する文字コード
     */
    @Value("${encrypt.charset}")
    private String encryptCharset;

    /**
     * 暗号化時に利用する秘密鍵
     */
    @Value("${encrypt.key}")
    private String encrypyKey;

    /**
     * ユーザーデータテーブル(user_data)へアクセスするリポジトリ
     */
    @Autowired
    private UserDataRepository repository;

    /**
     * ユーザーデータを全件取得する
     * @return ユーザーデータリスト(JSON形式)
     */
    @GetMapping("/getUserDataList")
    public String getUserDataList(){
        List<UserData> userDataList = repository.findAll(new Sort(ASC, "id"));
        // ユーザーデータが取得できなかった場合は、null値を返す
        if(userDataList == null || userDataList.size() == 0){
            return null;
        }
        for(UserData userData : userDataList){
            // 性別を表示用(男,女)に変換
            userData.setSex("1".equals(userData.getSex()) ? "男" : "女");
            // 名前・メモ・性別を暗号化
            userData.setName(encrypt(userData.getName()));
            userData.setMemo(encrypt(userData.getMemo()));
            userData.setSex(encrypt(userData.getSex()));
        }
        // 取得したユーザーデータをJSON文字列に変換し返却
        return getJsonData(userDataList);
    }

    /**
     * 引数の文字列を暗号化する
     * @param data 任意の文字列
     * @return 暗号化後の文字列
     */
    private String encrypt(String data) {
        if(StringUtils.isEmpty(data)){
            return "";
        }
        String retVal = null;
        try {
            // 暗号化キーオブジェクトを生成
            SecretKeySpec key = new SecretKeySpec(
                    encrypyKey.getBytes(encryptCharset), encryptAlgorithm);
            // Cipherオブジェクトを生成し、暗号化キーオブジェクトで初期化
            // 暗号化キーは、鍵長を16バイト・24バイト・32バイトのいずれかに設定する必要がある
            Cipher cipher = Cipher.getInstance(encryptAlgorithm);
            cipher.init(Cipher.ENCRYPT_MODE, key);
            // 引数の文字列を暗号化
            byte[] byteResult = cipher.doFinal(data.getBytes(encryptCharset));
            // Base64へエンコードし、暗号化文字列を返却
            retVal = Base64.encodeBase64String(byteResult);
        } catch (Exception e) {
            e.printStackTrace();
        }
        return retVal;
    }

    /**
     * 引数のオブジェクトをJSON文字列に変換する
     * @param data オブジェクトのデータ
     * @return 変換後JSON文字列
     */
    private String getJsonData(Object data){
        String retVal = null;
        ObjectMapper objectMapper = new ObjectMapper();
        try{
            retVal = objectMapper.writeValueAsString(data);
        } catch (JsonProcessingException e) {
            System.err.println(e);
        }
        return retVal;
    }

}
その他のソースコード内容は、以下のサイトを参照のこと。
https://github.com/purin-it/java/tree/master/spring-boot-api-aes/demo_server
上記プログラムを作成し、Spring Bootアプリケーションを起動し、「http://localhost:8085/getUserDataList」にアクセスした結果は以下の通り。
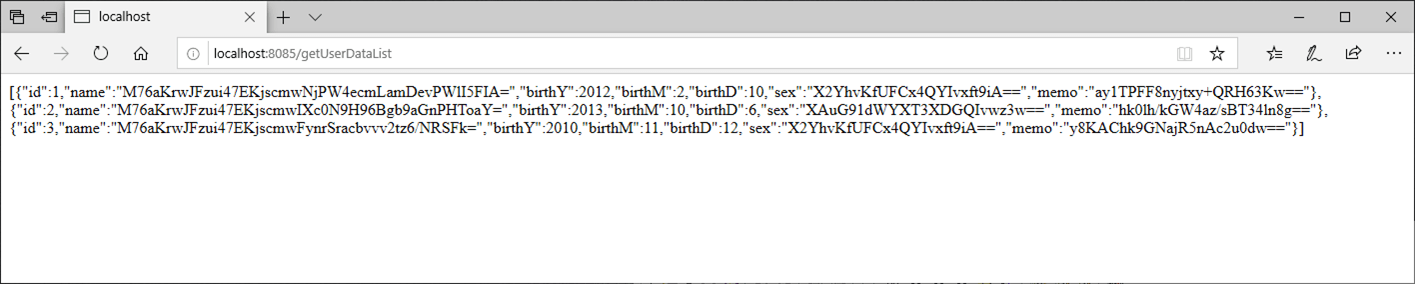
名前(name)、性別(sex)、メモ(memo)を暗号化しているので、その内容が暗号化されていることが確認できる。
クライアント側のプログラムの作成と実行
作成したクライアント側(demo)サンプルプログラムの構成は以下の通り。

なお、上記の赤枠は、前提条件のプログラムから変更したプログラムである。
build.gradleの内容は以下の通りで、暗号化を行うための設定を追加している。
plugins {
	id 'org.springframework.boot' version '2.1.7.RELEASE'
	id 'java'
}

apply plugin: 'io.spring.dependency-management'

group = 'com.example'
version = '0.0.1-SNAPSHOT'
sourceCompatibility = '1.8'

repositories {
	mavenCentral()
}

dependencies {
	implementation 'org.springframework.boot:spring-boot-starter-thymeleaf'
	implementation 'org.springframework.boot:spring-boot-starter-web'
	testImplementation 'org.springframework.boot:spring-boot-starter-test'
	//lombokの設定を追加
	compileOnly 'org.projectlombok:lombok:1.18.10'
	annotationProcessor 'org.projectlombok:lombok:1.18.10'
	//暗号化を行うための設定を追加
	compile group: 'commons-codec', name: 'commons-codec', version: '1.8'
}
application.ymlの内容は以下の通りで、暗号化に必要な項目を追加している。 暗号化キー(key)は、サーバー側と同じ文字列を設定している。
# ポート番号:8084で起動
server:
  port: 8084
# 暗号化項目を設定
encrypt:
  algorithm: AES
  charset: utf-8
  key: 1234567890abcdef
コントローラクラスの内容は以下の通りで、decryptメソッドでAESで暗号化した内容を復号化している。
package com.example.demo;

import org.apache.commons.codec.binary.Base64;
import org.springframework.beans.factory.annotation.Autowired;
import org.springframework.beans.factory.annotation.Value;
import org.springframework.core.ParameterizedTypeReference;
import org.springframework.http.HttpMethod;
import org.springframework.http.ResponseEntity;
import org.springframework.stereotype.Controller;
import org.springframework.ui.Model;
import org.springframework.util.StringUtils;
import org.springframework.web.bind.annotation.GetMapping;
import org.springframework.web.client.RestTemplate;
import javax.crypto.Cipher;
import javax.crypto.spec.SecretKeySpec;
import java.util.List;

@Controller
public class DemoController {

    /**
     * 暗号化アルゴリズム
     */
    @Value("${encrypt.algorithm}")
    private String encryptAlgorithm;

    /**
     * 暗号化時に利用する文字コード
     */
    @Value("${encrypt.charset}")
    private String encryptCharset;

    /**
     * 暗号化時に利用する秘密鍵
     */
    @Value("${encrypt.key}")
    private String encrypyKey;

    /**
     * RestTemplateオブジェクト
     */
    @Autowired
    private RestTemplate restTemplate;

    /**
     * ユーザーデータを取得し、初期表示画面に遷移する
     * @param model Modelオブジェクト
     * @return 初期表示画面へのパス
     */
    @GetMapping("/")
    public String index(Model model){
        // ユーザーデータリストをAPIで取得する
        ResponseEntity<List<UserData>> response = restTemplate.exchange(
                "http://localhost:8085/getUserDataList", HttpMethod.GET,
                null, new ParameterizedTypeReference<List<UserData>>() {});
        List<UserData> userDataList = response.getBody();
        // 各ユーザーデータを編集し、Modelに設定する
        for(UserData userData : userDataList){
            // 名前・メモ・性別・生年月日を復号化
            userData.setName(decrypt(userData.getName()));
            userData.setMemo(decrypt(userData.getMemo()));
            userData.setSex(decrypt(userData.getSex()));
        }
        model.addAttribute("userDataList", userDataList);
        return "index";
    }

    /**
     * 引数の文字列を復号化する
     * @param data 任意の文字列
     * @return 復号化後の文字列
     */
    private String decrypt(String data){
        if(StringUtils.isEmpty(data)){
            return "";
        }
        String retVal = null;
        try {
            // 引数の文字列をBase64へデコード
            byte[] byteText = Base64.decodeBase64(data);
            // 暗号化キーオブジェクトを生成
            SecretKeySpec key = new SecretKeySpec(
                    encrypyKey.getBytes(encryptCharset), encryptAlgorithm);
            // Cipherオブジェクトを生成し、暗号化キーオブジェクトで初期化
            // 暗号化キーは、鍵長を16バイト・24バイト・32バイトのいずれかに設定する必要がある
            Cipher cipher = Cipher.getInstance(encryptAlgorithm);
            cipher.init(Cipher.DECRYPT_MODE, key);
            // 引数の文字列を復号化
            byte[] byteResult = cipher.doFinal(byteText);
            // 復号化後の文字列を返却
            retVal = new String(byteResult, encryptCharset);
        } catch (Exception e) {
            e.printStackTrace();
        }
        return retVal;
    }
}
その他のソースコード内容は、以下のサイトを参照のこと。
https://github.com/purin-it/java/tree/master/spring-boot-api-aes/demo
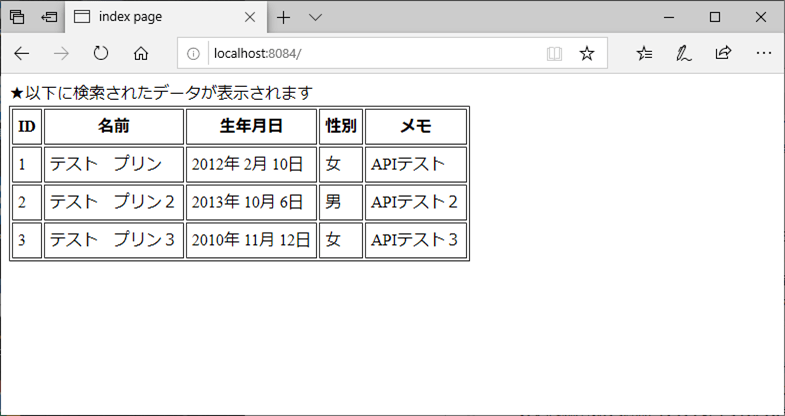
サーバー・クライアント両方のSpring Bootアプリケーションを起動し、「http:// (ホスト名):8084」とアクセスすると、以下の画面が表示されることが確認できる。
要点まとめ
- Cipherクラスを利用すると、共通鍵暗号方式の1つであるAESを利用した処理を簡単に実装できる。
- AESで利用する暗号化キーは、鍵長を16バイト・24バイト・32バイトのいずれかに設定し、暗号化/復号化で同じ暗号化キーを利用する必要がある。