HATEOASを利用すると、RestAPIサービスにおいて、例えば、データ追加後に、追加したデータを取得するURL情報も合わせて返却することができる。
HATEOASについては、以下のサイトを参照のこと。
https://blog.tagbangers.co.jp/2019/04/05/HATEOAS
今回は、STS(Spring Tool Suite)を利用したSpring Bootアプリケーション上で、HATEOASを利用して、データ追加後に、追加したデータを取得するURL情報も合わせて返却してみたので、そのサンプルプログラムを共有する。
前提条件
下記記事の実装がそれぞれ完了していること。


作成したサンプルプログラム(APIサービス)の内容
作成したサンプルプログラム(APIサービス)の構成は以下の通り。
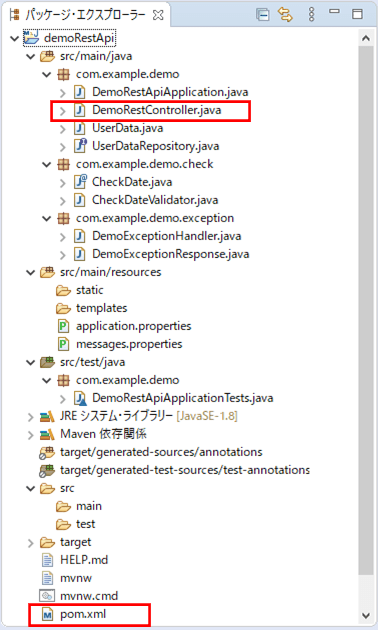
なお、上記の赤枠は、前提条件のプログラムから変更したプログラムである。
pom.xmlの内容は以下の通りで、URL情報を追加するHATEOASのライブラリを追加している。
<!-- HATEOASを利用するためのライブラリを追加 -->
<dependency>
    <groupId>org.springframework.boot</groupId>
    <artifactId>spring-boot-starter-hateoas</artifactId>
</dependency>
また、Restコントローラクラスの内容は以下の通りで、ユーザー情報を追加後、追加したデータを取得するURLを返却するsaveUserDataHateoasメソッドを追加している。
package com.example.demo;

import static org.springframework.hateoas.server.mvc.WebMvcLinkBuilder.linkTo;
import static org.springframework.hateoas.server.mvc.WebMvcLinkBuilder.methodOn;

import java.util.List;
import java.util.Optional;

import javax.validation.Valid;

import org.springframework.beans.factory.annotation.Autowired;
import org.springframework.hateoas.EntityModel;
import org.springframework.hateoas.server.mvc.WebMvcLinkBuilder;
import org.springframework.web.bind.annotation.DeleteMapping;
import org.springframework.web.bind.annotation.GetMapping;
import org.springframework.web.bind.annotation.PathVariable;
import org.springframework.web.bind.annotation.PostMapping;
import org.springframework.web.bind.annotation.PutMapping;
import org.springframework.web.bind.annotation.RequestBody;
import org.springframework.web.bind.annotation.RestController;

/**
 * Rest API定義クラス
 */
@RestController
public class DemoRestController {

    /** ユーザーデータテーブル(user_data)アクセス用リポジトリ */
    @Autowired
    private UserDataRepository repository;

    /**
     * ユーザーデータリストを取得する.
     * @return ユーザーデータリスト
     */
    @GetMapping("/users")
    public List<UserData> getAllUserData() {
        return repository.findAll();
    }

    /**
     * 指定したIDをもつユーザーデータを取得する.
     * @param id ID
     * @return 指定したIDをもつユーザーデータ
     */
    @GetMapping("/users/{id}")
    public UserData getOneUserData(@PathVariable long id) {
        Optional<UserData> userData = repository.findById(id);
        // 指定したIDをもつユーザーデータがあればそのユーザーデータを返す
        if(userData.isPresent()) {
            return userData.get();
        }
        // 指定したIDをもつユーザーデータがなければnullを返す
        return null;
    }

    /**
     * 指定したユーザーデータを登録する.
     * @param userData ユーザーデータ
     * @return 登録したユーザーデータ
     */
    @PostMapping("/users")
    public UserData saveUserData(@Valid @RequestBody UserData userData) {
        return repository.save(userData);
    }

    /**
     * 指定したユーザーデータを更新する.
     * @param id ID
     * @param userData ユーザーデータ
     * @return 更新したユーザーデータ
     */
    @PutMapping("/users/{id}")
    public UserData updateUserData(@PathVariable long id
            , @Valid @RequestBody UserData userData) {
        userData.setId(id);
        return repository.save(userData);
    }

    /**
     * 指定したIDをもつユーザーデータを削除する.
     * @param id ID
     */
    @DeleteMapping("/users/{id}")
    public void deleteUserData(@PathVariable long id) {
        Optional<UserData> userData = repository.findById(id);
        // 指定したIDをもつユーザーデータがあればそのユーザーデータを削除する
        if(userData.isPresent()) {
            repository.deleteById(id);
        }
    }

    /**
     * 指定したユーザーデータを登録し、登録したデータを取得するURLを返却する.
     * @param userData ユーザーデータ
     * @return 登録したデータとそれを取得するURLを含むエンティティモデル
     */
    @PostMapping("/users/hateoas")
    public EntityModel<UserData> saveUserDataHateoas(
            @Valid @RequestBody UserData userData) {
        UserData addUserData = repository.save(userData);
        if(addUserData == null) {
            return null;
        }
        EntityModel<UserData> entityModel = EntityModel.of(addUserData);
        WebMvcLinkBuilder linkTo =
            linkTo(methodOn(this.getClass()).getOneUserData(addUserData.getId()));
        entityModel.add(linkTo.withRel("getAddUserDataUrl"));
        return entityModel;
    }
}
その他のソースコード内容は、以下のサイトを参照のこと。
https://github.com/purin-it/java/tree/master/spring-boot-rest-api-hateoas/demoRestApi

作成したサンプルプログラム(API呼び出し)の内容
作成したサンプルプログラム(API呼び出し)の構成は以下の通り。
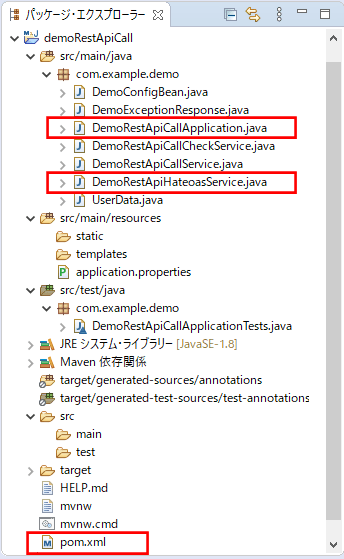
なお、上記の赤枠は、前提条件のプログラムから追加・変更したプログラムである。
pom.xmlの内容は以下の通りで、URL情報を追加するHATEOASのライブラリを追加している。
<!-- HATEOASを利用するためのライブラリを追加 -->
<dependency>
    <groupId>org.springframework.boot</groupId>
    <artifactId>spring-boot-starter-hateoas</artifactId>
</dependency>
また、Rest APIでユーザー情報を追加後、追加したデータを取得するURLを返却する処理の呼び出しを実行するサービスクラスの内容は以下の通り。
package com.example.demo;

import java.util.Optional;

import org.apache.commons.logging.Log;
import org.apache.commons.logging.LogFactory;
import org.springframework.beans.factory.annotation.Autowired;
import org.springframework.core.ParameterizedTypeReference;
import org.springframework.hateoas.EntityModel;
import org.springframework.hateoas.Link;
import org.springframework.http.HttpEntity;
import org.springframework.http.HttpHeaders;
import org.springframework.http.HttpMethod;
import org.springframework.http.ResponseEntity;
import org.springframework.stereotype.Service;
import org.springframework.web.client.RestTemplate;

@Service
public class DemoRestApiHateoasService {

    /** ユーザーデータを追加し、追加したデータを取得するURLも返却可能となるURL */
    private static final String POST_USER_HATEOAS
            = "http://localhost:8085/users/hateoas";

    /** RestTemplateオブジェクト */
    @Autowired
    private RestTemplate restTemplate;

    /** HttpHeadersオブジェクト */
    @Autowired
    private HttpHeaders httpHeaders;

    /** ログ出力のためのクラス */
    private static Log log = LogFactory.getLog(DemoRestApiHateoasService.class);

    public void execRestApiHateoas() {

        log.debug("*** USER_DATAテーブルにid=4のデータを追加し、"
                + "追加したデータを取得するURLも返却した結果 ***");

        // user_dataテーブルに、id=4であるデータを追加
        UserData newUserData
            = new UserData(4, "テスト プリン4", 2014, 10, 11, "1", "テスト4");
        ResponseEntity<EntityModel<UserData>> response
            = restTemplate.exchange(POST_USER_HATEOAS, HttpMethod.POST
                  , new HttpEntity<>(newUserData, httpHeaders)
                  , new ParameterizedTypeReference<EntityModel<UserData>>() {});

        // 戻り値を「EntityModel<UserData>」型で取得
        EntityModel<UserData> entityModel = response.getBody();

        // user_dataテーブルで、追加されたデータを出力
        UserData addUserData = entityModel.getContent();
        log.debug("追加されたuser_dataテーブルの値: " + addUserData);

        // 追加したデータを取得するURLを出力
        Optional<Link> optLink = entityModel.getLink("getAddUserDataUrl");
        if(optLink.isPresent()) {
            String getAddUserDataUrl = optLink.get().toUri().toString();
            log.debug("追加したデータを取得するURL : " + getAddUserDataUrl);
        }

    }

}
さらに、Spring Bootのメインクラスの内容は以下の通りで、Rest APIでユーザー情報を追加後、追加したデータを取得するURLを返却する処理の呼び出しを実行するサービスクラスを呼び出している。
package com.example.demo;

import org.springframework.beans.factory.annotation.Autowired;
import org.springframework.boot.CommandLineRunner;
import org.springframework.boot.SpringApplication;
import org.springframework.boot.autoconfigure.SpringBootApplication;

@SpringBootApplication
public class DemoRestApiCallApplication implements CommandLineRunner {

    /** ユーザーデータを追加し、追加したデータを取得するURLも返却する処理の呼び出しを
        実行するサービスクラス */
    @Autowired
    private DemoRestApiHateoasService demoRestApiHateoasService;

    public static void main(String[] args) {
        SpringApplication.run(DemoRestApiCallApplication.class, args);
    }

    @Override
    public void run(String... args) throws Exception {
        // ユーザーデータを追加し、追加したデータを取得するURLも返却する処理を呼び出す
        demoRestApiHateoasService.execRestApiHateoas();
    }

}
その他のソースコード内容は、以下のサイトを参照のこと。
https://github.com/purin-it/java/tree/master/spring-boot-rest-api-hateoas/demoRestApiCall

サンプルプログラムの実行結果
サンプルプログラムの実行結果は、以下の通り。
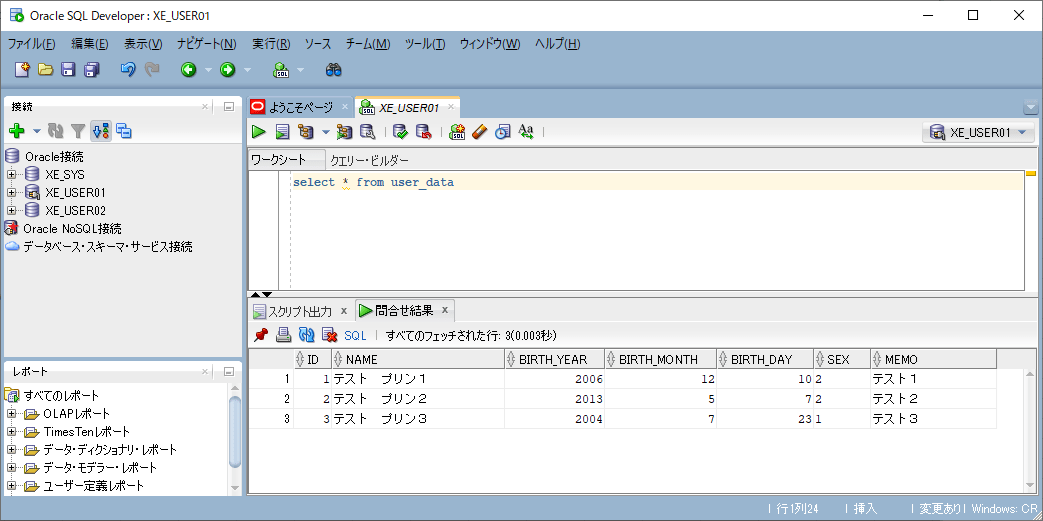
1) 接続先となるOracleデータベース上に、以下のUSER_DATAテーブルとデータを作成しておく。
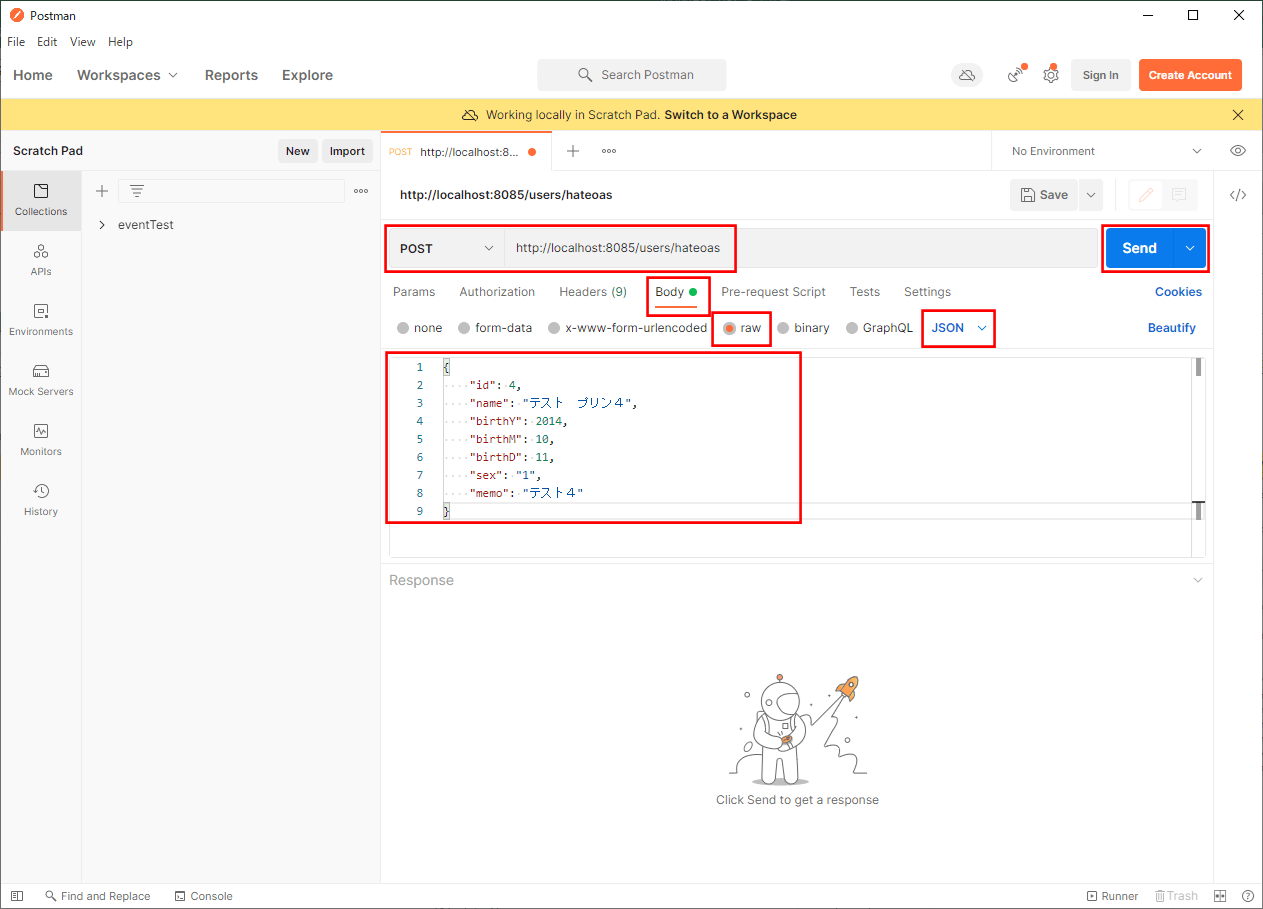
2) 作成したサンプルプログラム(APIサービス)のSpring Bootアプリケーションと、Postmanを起動する。その後。リクエストを「POST」、URLを「http://localhost:8085/users/hateoas」、リクエストボディに追加するデータをJSON形式で設定して「Send」ボタンを押下する。
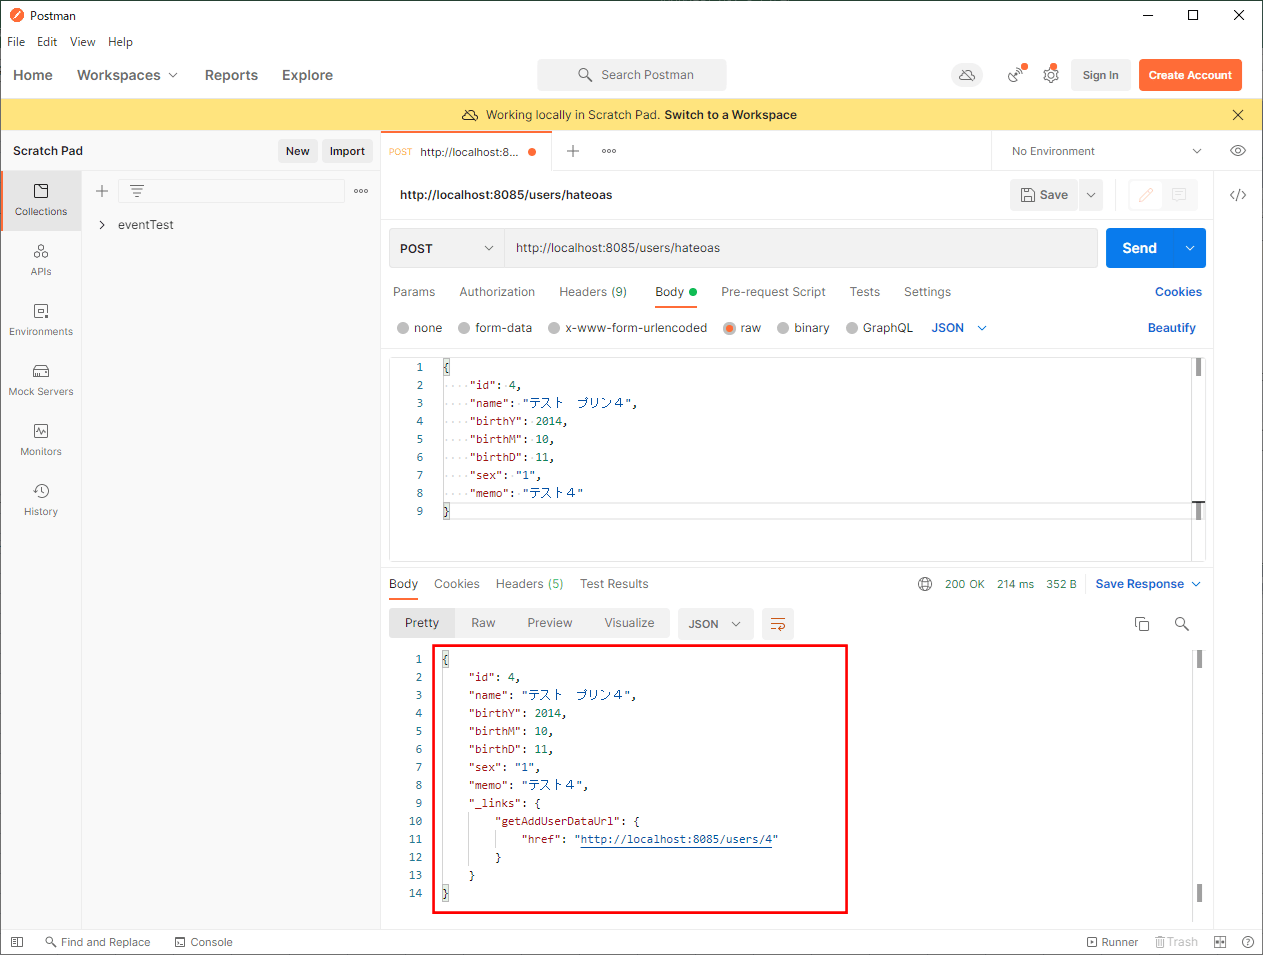
3) 実行した結果、以下のように、追加したデータと追加したデータを取得するURLが返却されることが確認できる。
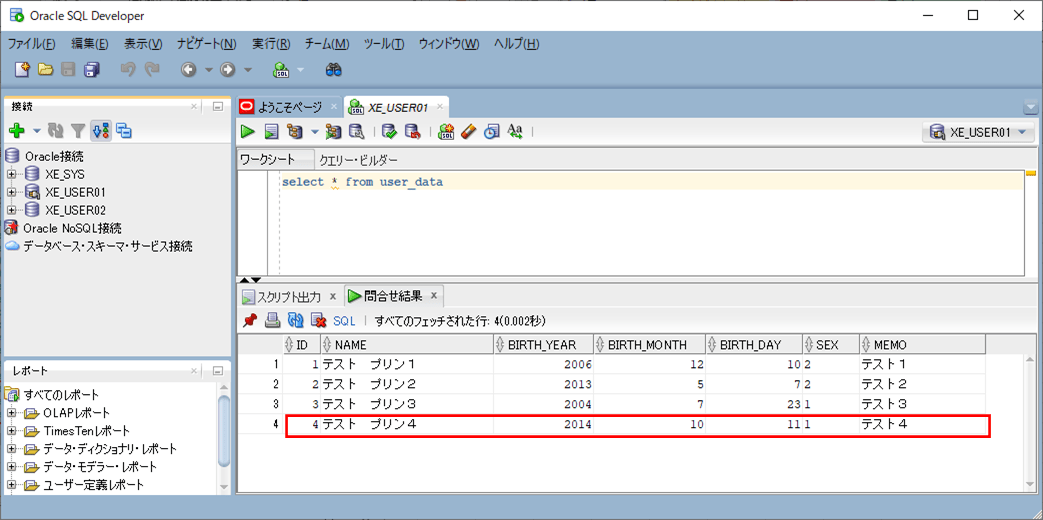
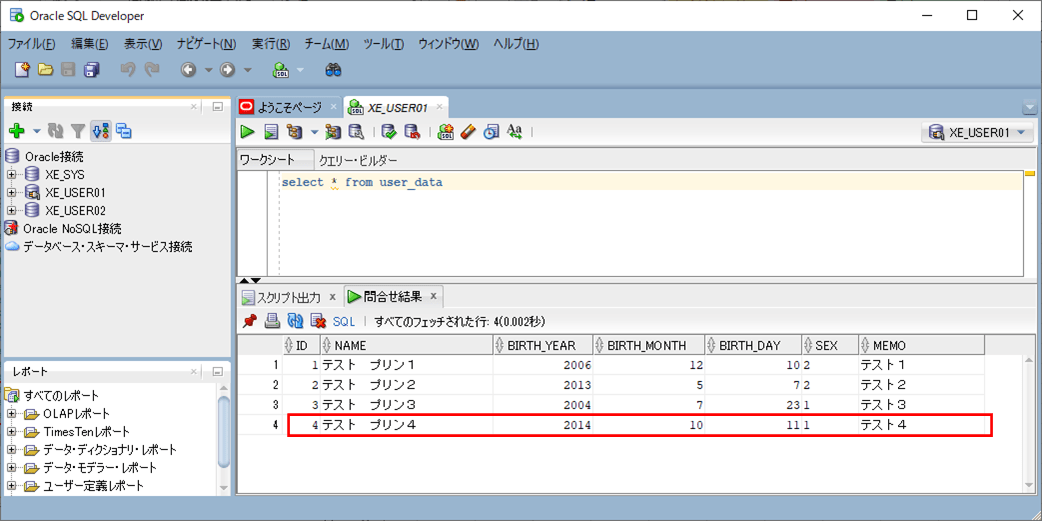
4) 2)~3)までの操作を実行後に、接続先となるOracleデータベース上のUSER_DATAテーブルを確認すると、id=4のデータが追加されていることが確認できる。
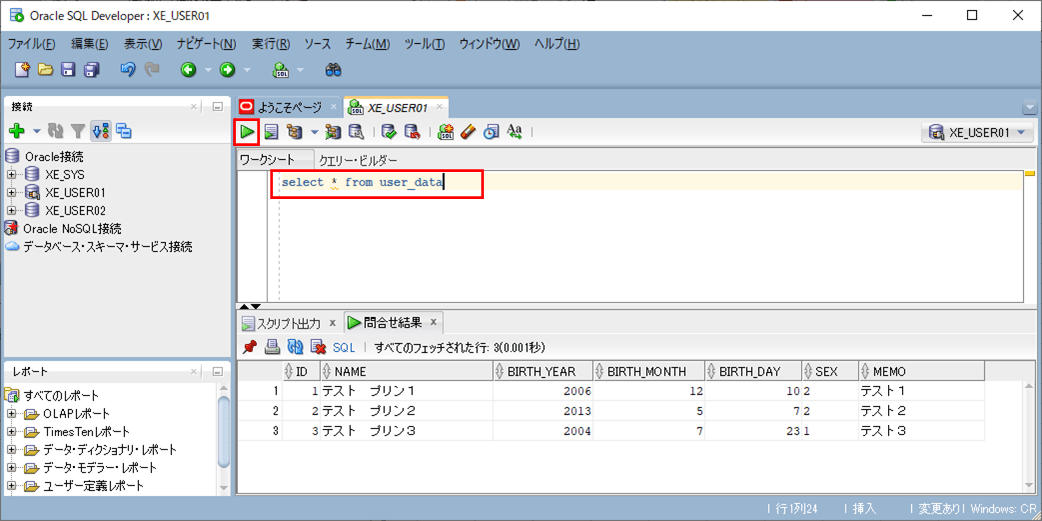
6) 作成したサンプルプログラム(API呼び出し)のSpring Bootアプリケーションを起動する。その結果出力されたログの内容は以下の赤枠の部分で、追加したデータと追加したデータを取得するURLが返却されることが確認できる。

7) 5)~6)までの操作を実行後に、接続先となるOracleデータベース上のUSER_DATAテーブルを確認すると、id=4のデータが追加されていることが確認できる。
要点まとめ
- RestAPIサービスにおいて、HATEOASを利用すると、返却する情報にURL情報を追加することができる。
