これまでは本ブログにて、Spring Bootを利用したサンプルプログラムをいろいろ紹介してきたが、今回は、Spring Bootを利用せずSpring MVCを利用してみたので、その内容を共有する。
Spring MVCは、MVCパターンを利用したSpringのWebアプリケーションを開発するためのフレームワークで、Spring BootはSpring MVCをより使いやすい形にしたものになっている。Spring MVCでは、Spring Bootで不要だったServletの設定やXML形式の設定ファイルの定義、サーバーへのアプリケーションデプロイ等が必要になってくる。
なお、MVCパターンについては、以下のサイトを参照のこと。
https://qiita.com/s_emoto/items/975cc38a3e0de462966a
今回は、Spring MVC用の「Spring Legacyプロジェクト」が作成できるSTS3をダウンロードし、プロジェクトの作成・実行を行ってみたので、その手順を共有する。
前提条件
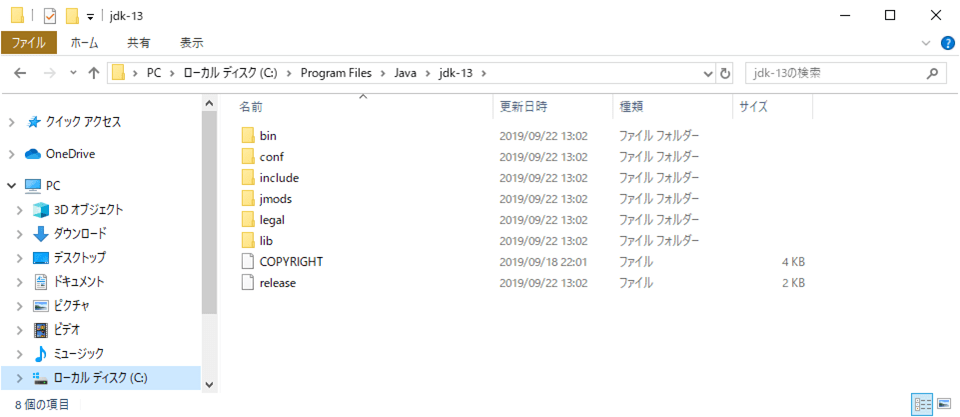
Windows環境上に、バージョン1.8以降のJDKがインストール済であること。
なお、私の環境では、以下のように、JDK13がインストール済になっている。
やってみたこと
STS3のダウンロードと起動
Spring MVCを利用するには、「Spring Legacyプロジェクト」を作成する必要があるが、最新のSTS4の場合、以下のように、「Spring Legacyプロジェクト」が作成できなくなっている。
ちなみに、「Spring スターター・プロジェクト」はSpring Bootのプロジェクトを作成するメニューである。
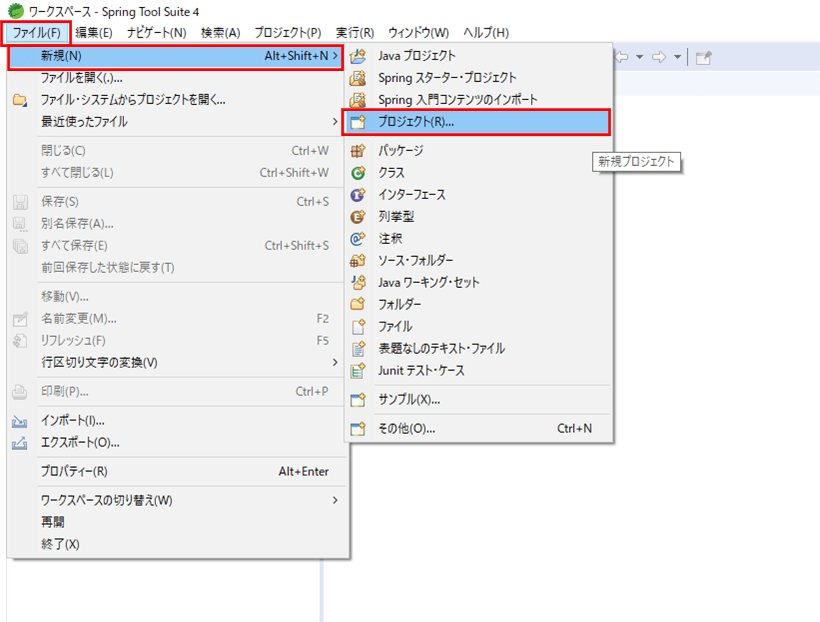
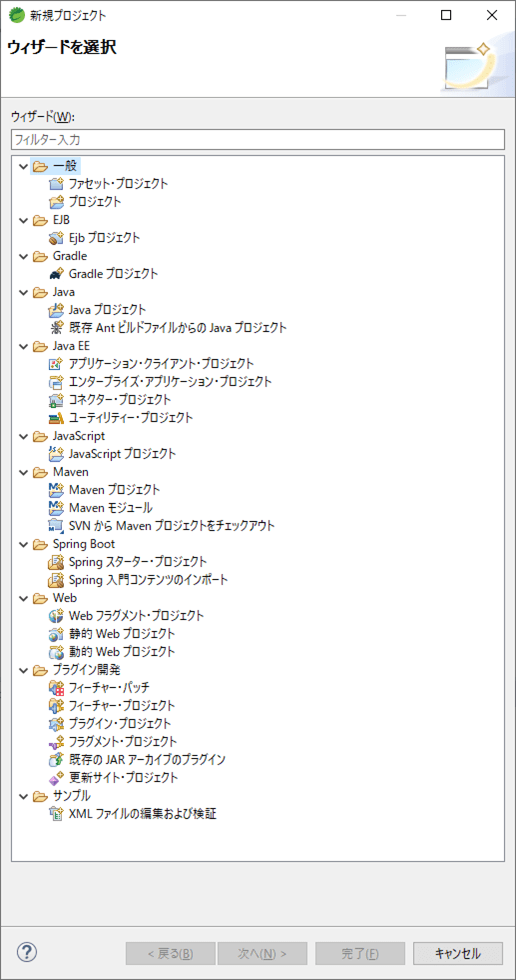
そのため、少し前のSTS3をダウンロードすることにした。その手順は以下の通り。
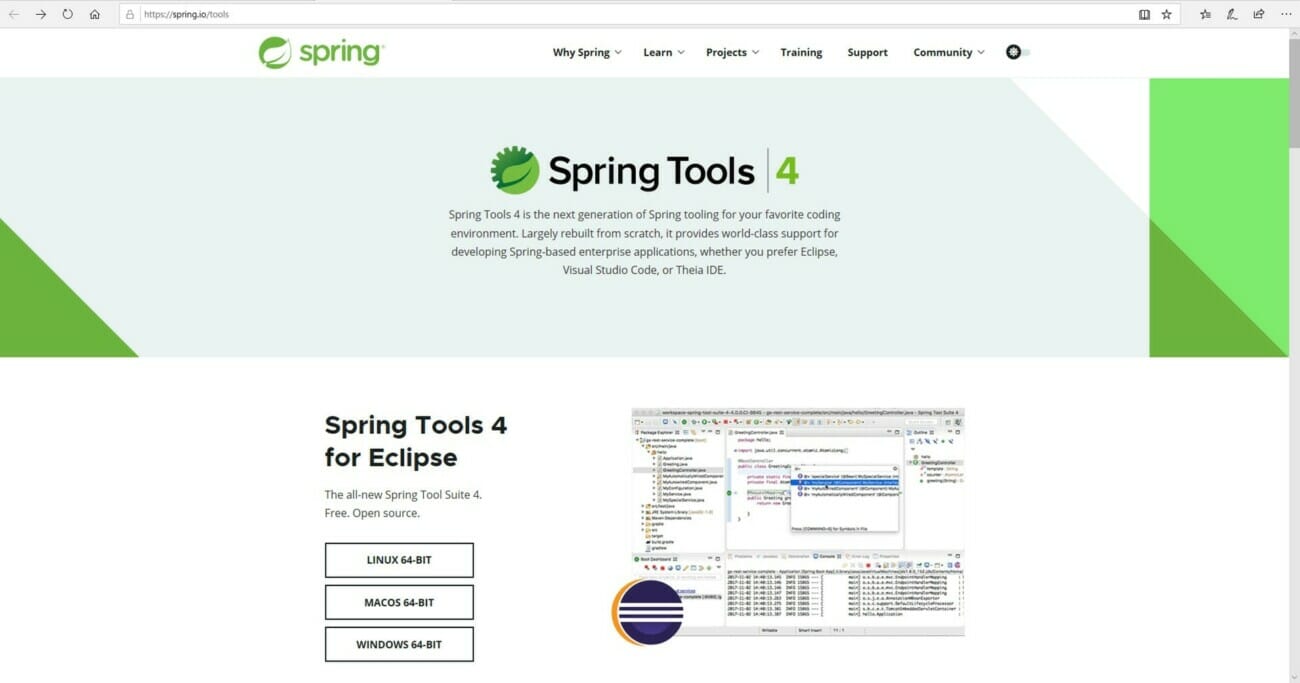
1) 下記サイトにアクセスし、ページ下方にスクロール
https://spring.io/tools
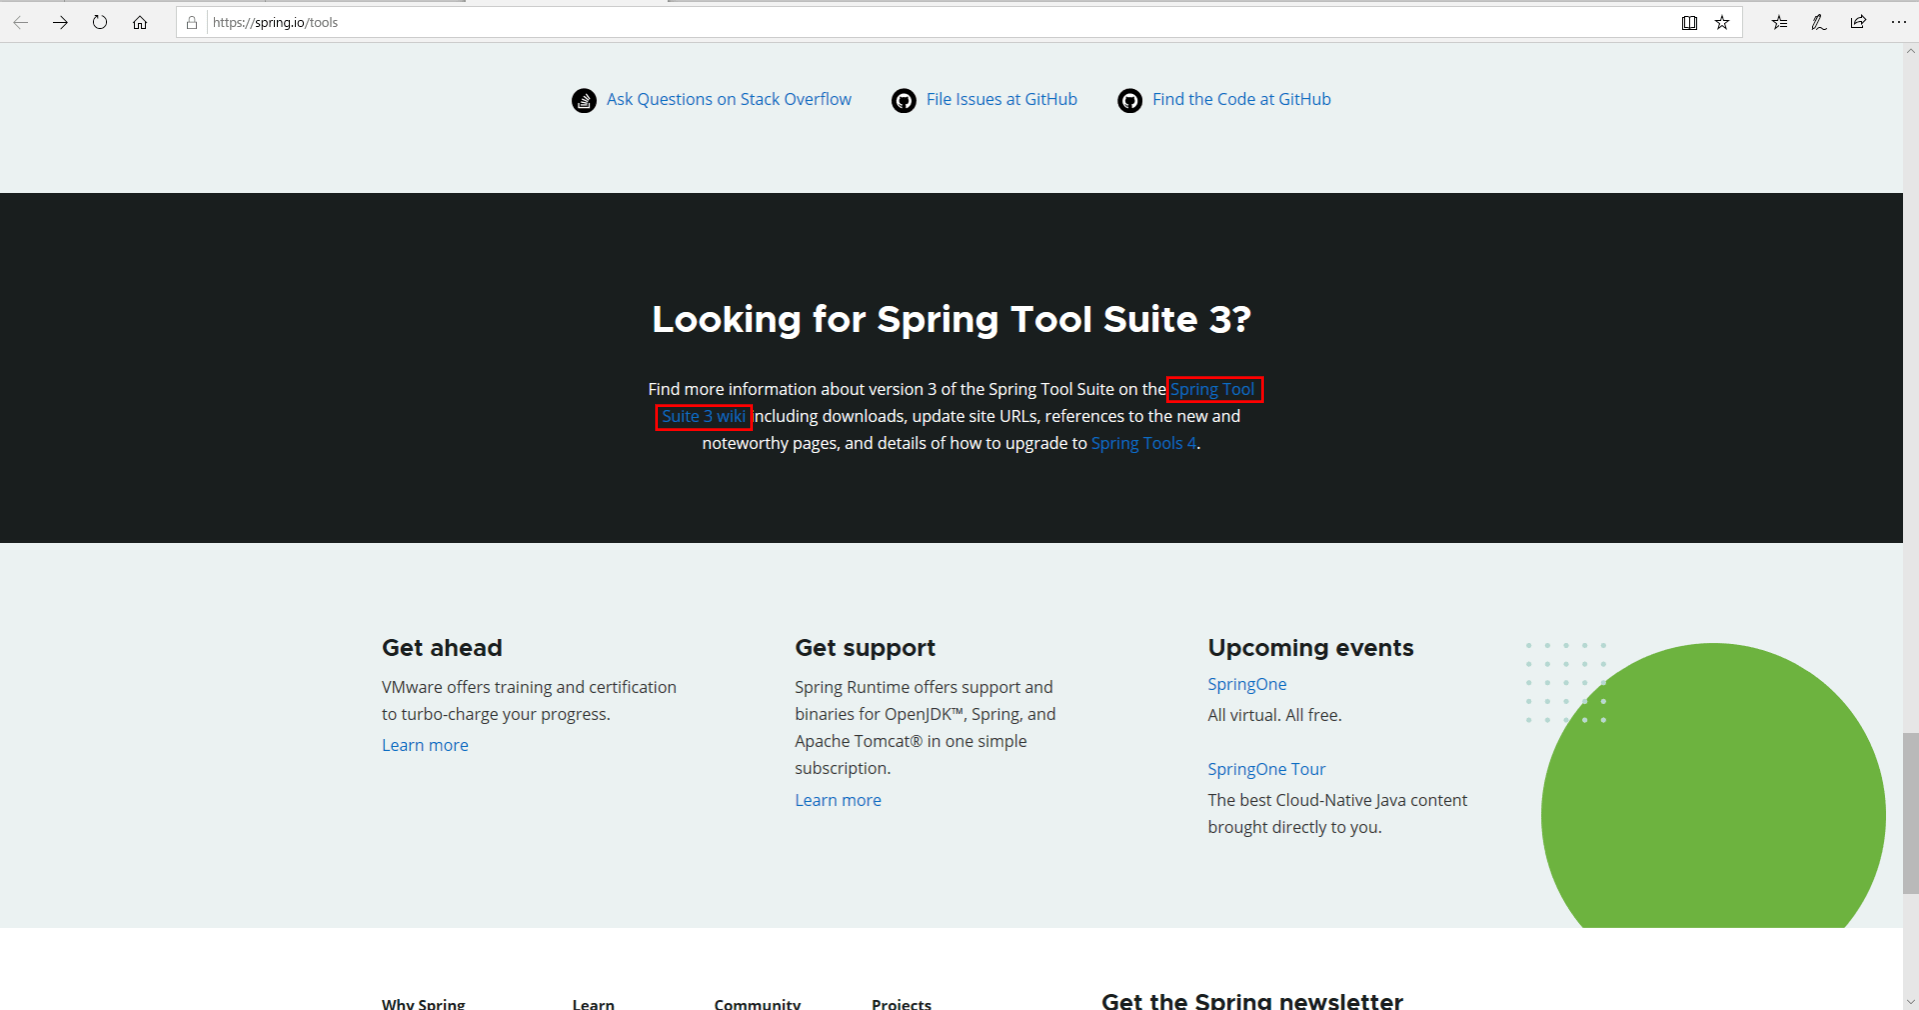
2) 下記「Spring Tool Suite 3 wiki」リンクをクリック
3) STS3のダウンロード画面が表示されるので、最新のSTS3(Windows用)のリンクをクリックし、STS3のZIPファイルを保存する
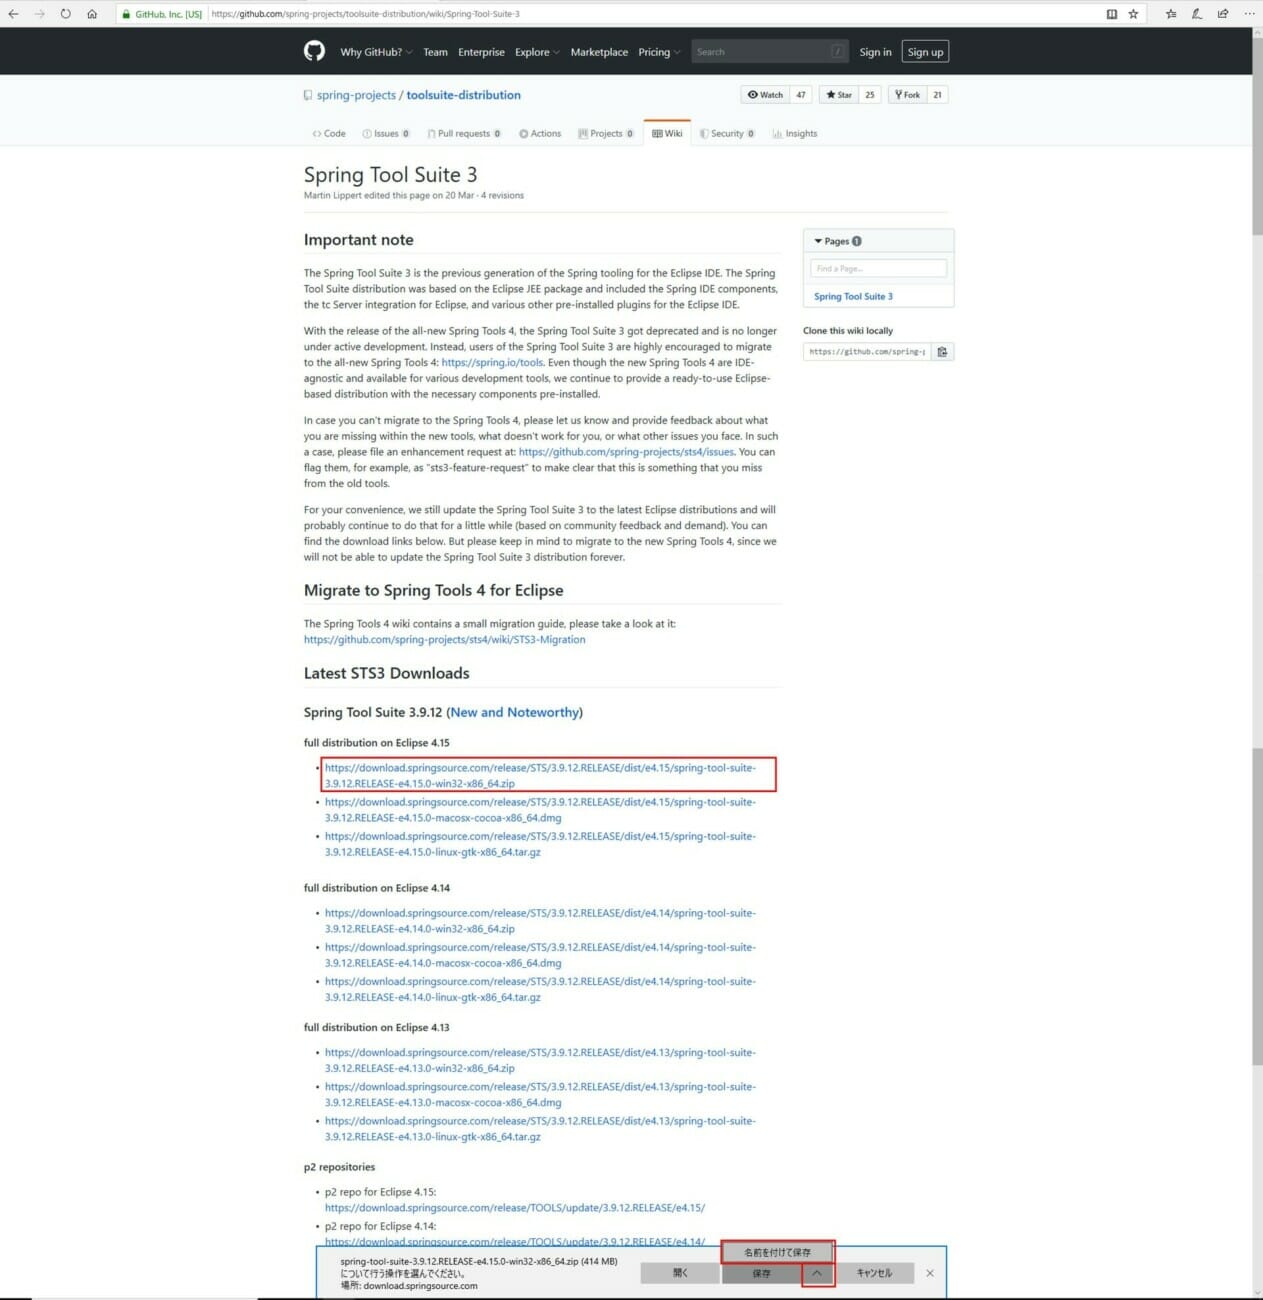
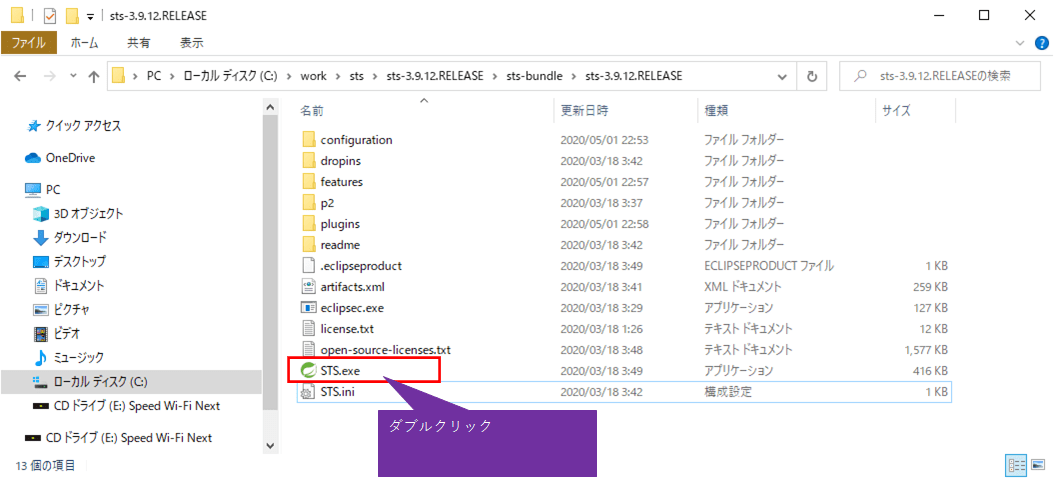
4) 下記「spring-tool-suite-3.9.12.RELEASE-e4.15.0-win32-x86_64.zip」がダウンロードしたSTS3のZIPファイルで、「sts-3.9.12.RELEASE」がそれを解凍したディレクトリとなる

5) 以下、STSのダウンロード方法・日本語化は以下の記事を参照のこと。

なお、「SpringToolSuite4.ini」に追加する日本語化を行うためのライブラリ設定は、下記「STS.ini」に読み替えること。
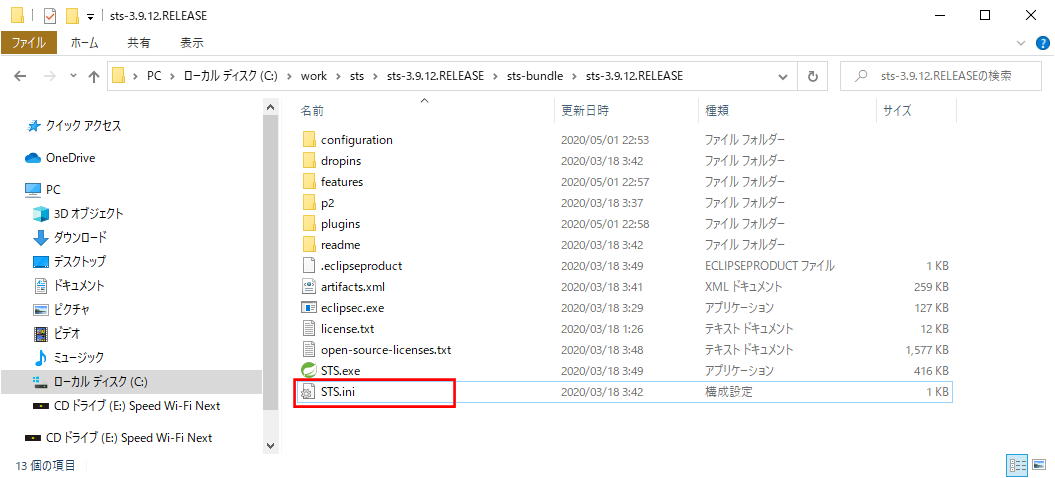
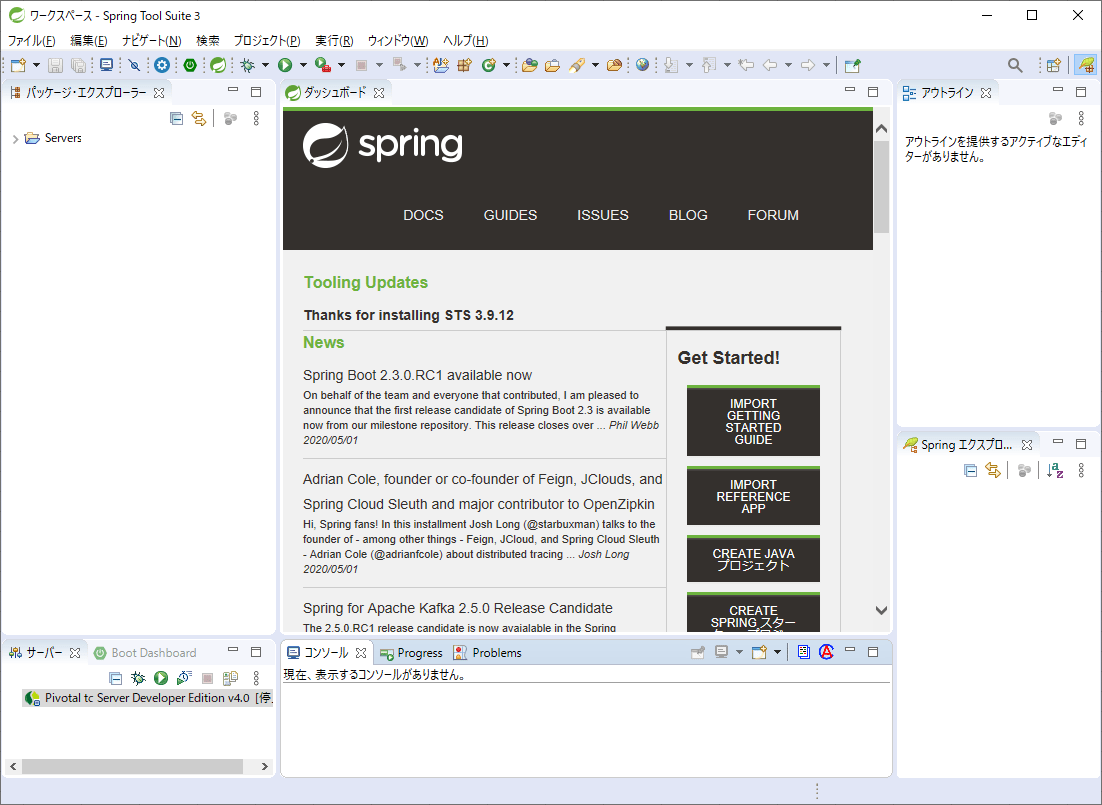
日本語化後、「STS.exe」をダブルクリックすると、以下のように、STS3のワークスペースが起動する。
Spring MVCプロジェクトの作成
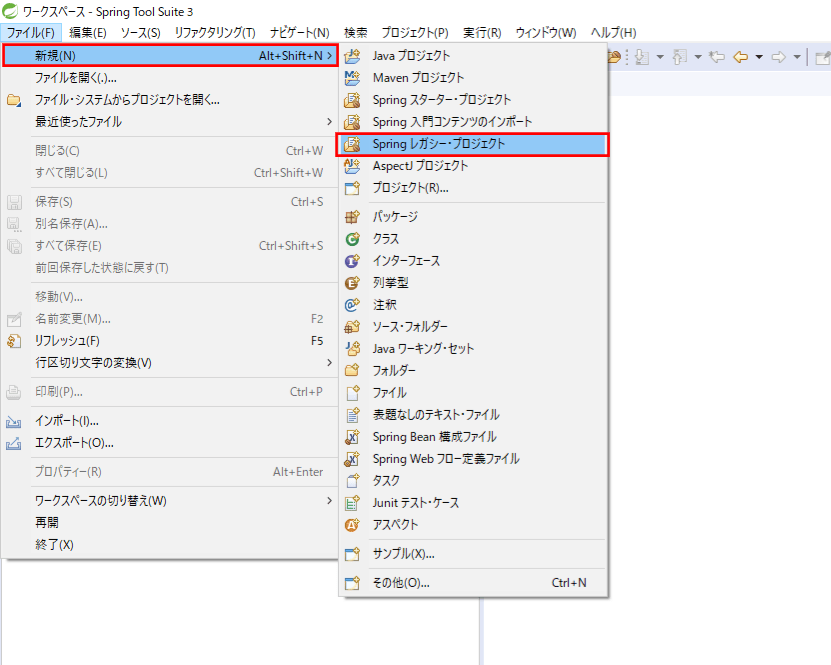
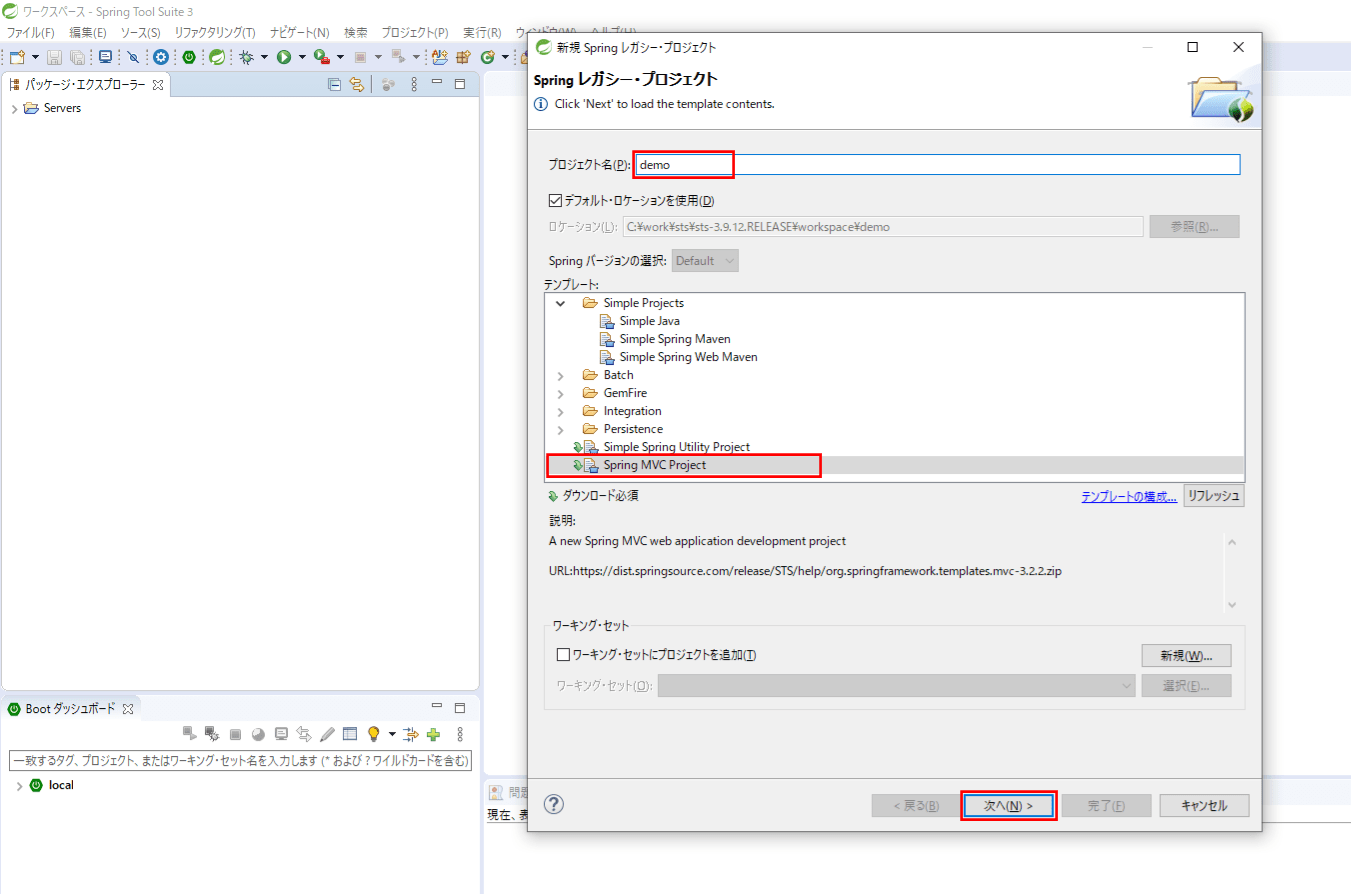
Spring MVCプロジェクトの作成手順は、以下の通り。
1) ファイルメニューから「新規」ー「Spring レガシー・プロジェクト」を選択
2) プロジェクト名を指定し、「Spring MVC Project」のテンプレートを選択し、「次へ」ボタンを押下
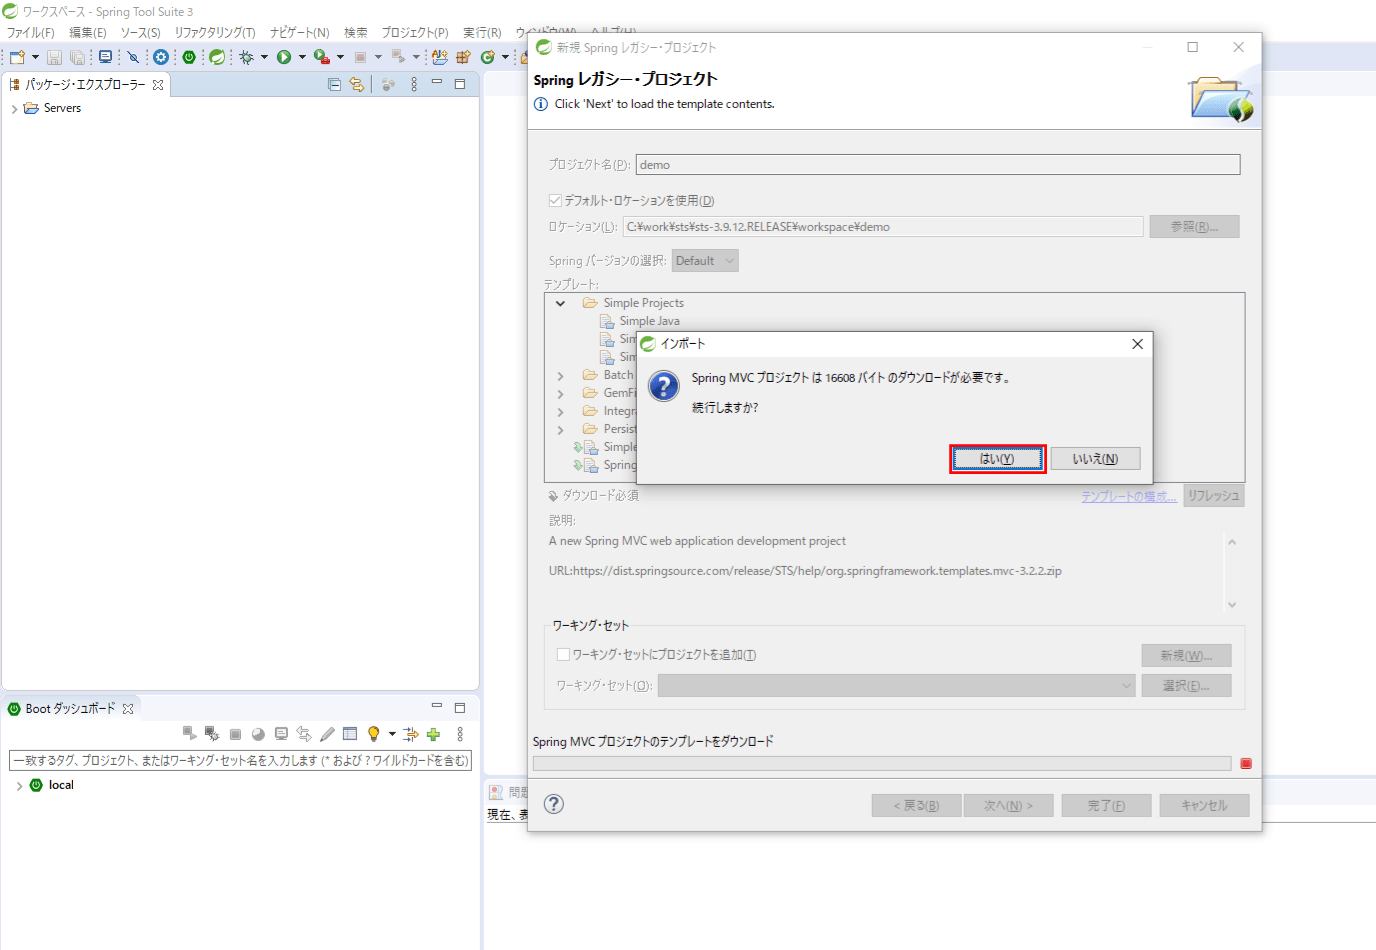
3) 初めてSpring MVCプロジェクトを作成する際は、下記インポート確認画面が表示されるので、「はい」ボタンを押下
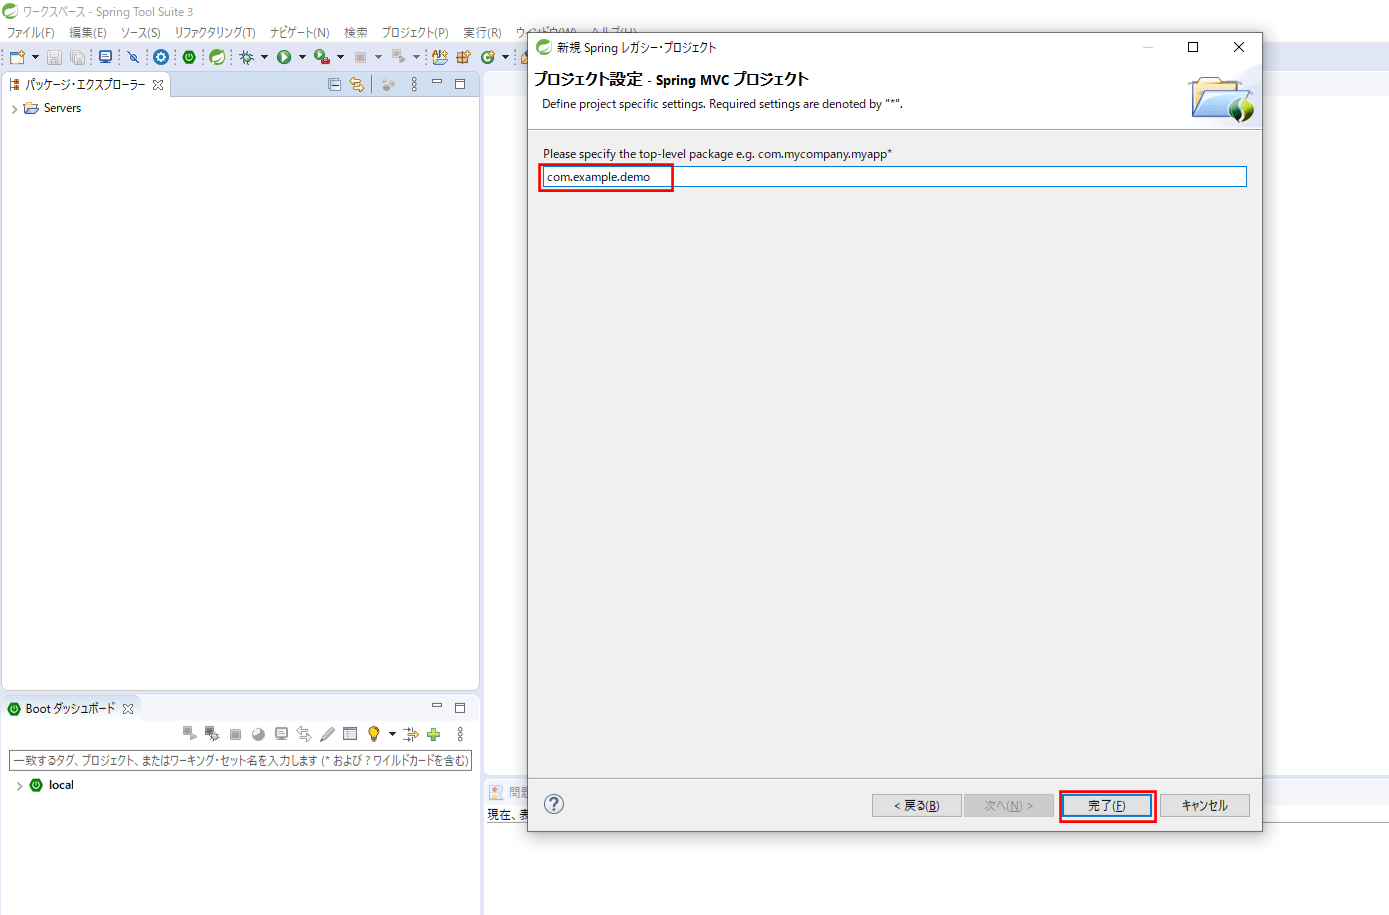
4) Javaソースを格納するパッケージを指定し、「完了」ボタンを押下
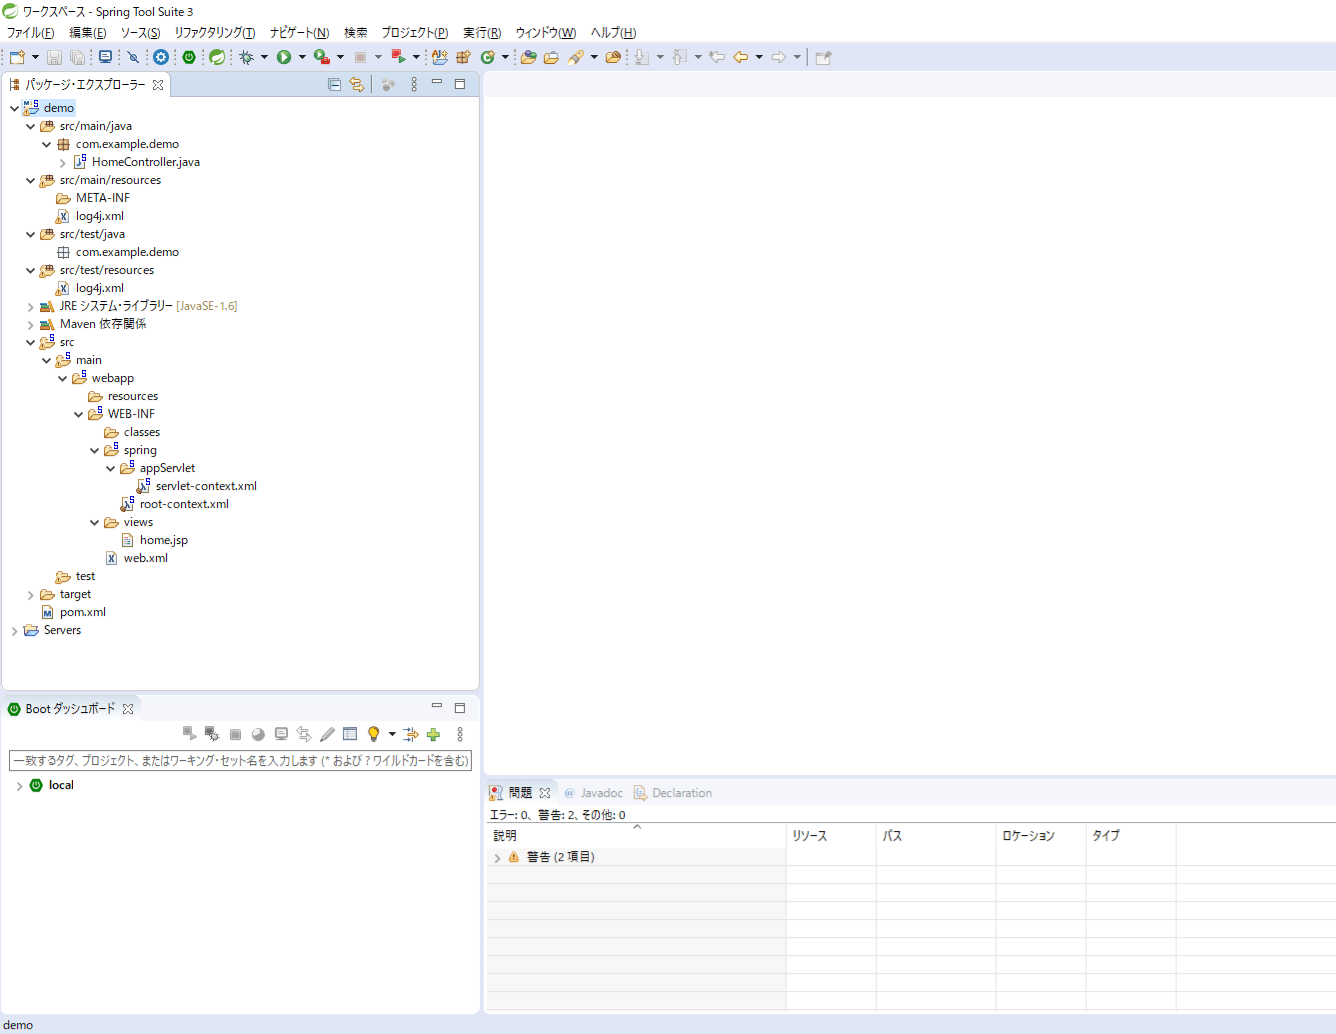
5) 以下のように、Spring MVCプロジェクトが作成されることが確認できる
Spring MVCプロジェクトのソースコード
作成したSpring MVCプロジェクトのソースコードの構成は以下の通り。
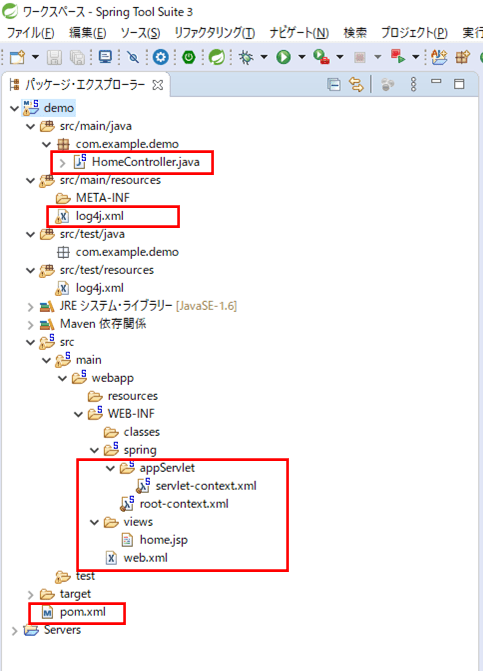
なお、上記赤枠のソースコードの内容は、これから述べる。
pom.xmlの内容は以下の通りで、17行目付近に、springフレームワーク、Spring MVCの依存関係が記載されている。
<?xml version="1.0" encoding="UTF-8"?>
<project xmlns="http://maven.apache.org/POM/4.0.0" xmlns:xsi="http://www.w3.org/2001/XMLSchema-instance"
    xsi:schemaLocation="http://maven.apache.org/POM/4.0.0 https://maven.apache.org/maven-v4_0_0.xsd">
    <modelVersion>4.0.0</modelVersion>
    <groupId>com.example</groupId>
    <artifactId>demo</artifactId>
    <name>demo</name>
    <packaging>war</packaging>
    <version>1.0.0-BUILD-SNAPSHOT</version>
    <properties>
        <java-version>1.6</java-version>
        <org.springframework-version>3.1.1.RELEASE</org.springframework-version>
        <org.aspectj-version>1.6.10</org.aspectj-version>
        <org.slf4j-version>1.6.6</org.slf4j-version>
    </properties>
    <dependencies>
        <!-- Spring -->
        <dependency>
            <groupId>org.springframework</groupId>
            <artifactId>spring-context</artifactId>
            <version>${org.springframework-version}</version>
            <exclusions>
                <!-- Exclude Commons Logging in favor of SLF4j -->
                <exclusion>
                    <groupId>commons-logging</groupId>
                    <artifactId>commons-logging</artifactId>
                </exclusion>
            </exclusions>
        </dependency>
        <dependency>
            <groupId>org.springframework</groupId>
            <artifactId>spring-webmvc</artifactId>
            <version>${org.springframework-version}</version>
        </dependency>

        <!-- AspectJ -->
        <dependency>
            <groupId>org.aspectj</groupId>
            <artifactId>aspectjrt</artifactId>
            <version>${org.aspectj-version}</version>
        </dependency>

        <!-- Logging -->
        <dependency>
            <groupId>org.slf4j</groupId>
            <artifactId>slf4j-api</artifactId>
            <version>${org.slf4j-version}</version>
        </dependency>
        <dependency>
            <groupId>org.slf4j</groupId>
            <artifactId>jcl-over-slf4j</artifactId>
            <version>${org.slf4j-version}</version>
            <scope>runtime</scope>
        </dependency>
        <dependency>
            <groupId>org.slf4j</groupId>
            <artifactId>slf4j-log4j12</artifactId>
            <version>${org.slf4j-version}</version>
            <scope>runtime</scope>
        </dependency>
        <dependency>
            <groupId>log4j</groupId>
            <artifactId>log4j</artifactId>
            <version>1.2.17</version>
            <exclusions>
                <exclusion>
                    <groupId>javax.mail</groupId>
                    <artifactId>mail</artifactId>
                </exclusion>
                <exclusion>
                    <groupId>javax.jms</groupId>
                    <artifactId>jms</artifactId>
                </exclusion>
                <exclusion>
                    <groupId>com.sun.jdmk</groupId>
                    <artifactId>jmxtools</artifactId>
                </exclusion>
                <exclusion>
                    <groupId>com.sun.jmx</groupId>
                    <artifactId>jmxri</artifactId>
                </exclusion>
            </exclusions>
            <scope>runtime</scope>
        </dependency>

        <!-- @Inject -->
        <dependency>
            <groupId>javax.inject</groupId>
            <artifactId>javax.inject</artifactId>
            <version>1</version>
        </dependency>

        <!-- Servlet -->
        <dependency>
            <groupId>javax.servlet</groupId>
            <artifactId>servlet-api</artifactId>
            <version>2.5</version>
            <scope>provided</scope>
        </dependency>
        <dependency>
            <groupId>javax.servlet.jsp</groupId>
            <artifactId>jsp-api</artifactId>
            <version>2.1</version>
            <scope>provided</scope>
        </dependency>
        <dependency>
            <groupId>javax.servlet</groupId>
            <artifactId>jstl</artifactId>
            <version>1.2</version>
        </dependency>

        <!-- Test -->
        <dependency>
            <groupId>junit</groupId>
            <artifactId>junit</artifactId>
            <version>4.13.1</version>
            <scope>test</scope>
        </dependency>
    </dependencies>
    <build>
        <plugins>
            <plugin>
                <artifactId>maven-eclipse-plugin</artifactId>
                <version>2.9</version>
                <configuration>
                    <additionalProjectnatures>
                        <projectnature>org.springframework.ide.eclipse.core.springnature</projectnature>
                    </additionalProjectnatures>
                    <additionalBuildcommands>
                        <buildcommand>org.springframework.ide.eclipse.core.springbuilder</buildcommand>
                    </additionalBuildcommands>
                    <downloadSources>true</downloadSources>
                    <downloadJavadocs>true</downloadJavadocs>
                </configuration>
            </plugin>
            <plugin>
                <groupId>org.apache.maven.plugins</groupId>
                <artifactId>maven-compiler-plugin</artifactId>
                <version>2.5.1</version>
                <configuration>
                    <source>1.6</source>
                    <target>1.6</target>
                    <compilerArgument>-Xlint:all</compilerArgument>
                    <showWarnings>true</showWarnings>
                    <showDeprecation>true</showDeprecation>
                </configuration>
            </plugin>
            <plugin>
                <groupId>org.codehaus.mojo</groupId>
                <artifactId>exec-maven-plugin</artifactId>
                <version>1.2.1</version>
                <configuration>
                    <mainClass>org.test.int1.Main</mainClass>
                </configuration>
            </plugin>
        </plugins>
    </build>
</project>

また、web.xmlの内容は以下の通りで、サーブレットが起動されたタイミングで、root-context.xml、servlet-context.xmlを読み込むようになっている。
<?xml version="1.0" encoding="UTF-8"?>
<web-app version="2.5" xmlns="http://java.sun.com/xml/ns/javaee"
    xmlns:xsi="http://www.w3.org/2001/XMLSchema-instance"
    xsi:schemaLocation="http://java.sun.com/xml/ns/javaee https://java.sun.com/xml/ns/javaee/web-app_2_5.xsd">

    <!-- The definition of the Root Spring Container shared by all Servlets and Filters -->
    <context-param>
        <param-name>contextConfigLocation</param-name>
        <param-value>/WEB-INF/spring/root-context.xml</param-value>
    </context-param>

    <!-- Creates the Spring Container shared by all Servlets and Filters -->
    <listener>
        <listener-class>org.springframework.web.context.ContextLoaderListener</listener-class>
    </listener>

    <!-- Processes application requests -->
    <servlet>
        <servlet-name>appServlet</servlet-name>
        <servlet-class>org.springframework.web.servlet.DispatcherServlet</servlet-class>
        <init-param>
            <param-name>contextConfigLocation</param-name>
            <param-value>/WEB-INF/spring/appServlet/servlet-context.xml</param-value>
        </init-param>
        <load-on-startup>1</load-on-startup>
    </servlet>

    <servlet-mapping>
        <servlet-name>appServlet</servlet-name>
        <url-pattern>/</url-pattern>
    </servlet-mapping>

</web-app>
また、root-context.xmlの内容は以下の通りで、設定内容は空になっている。
<?xml version="1.0" encoding="UTF-8"?>
<beans xmlns="http://www.springframework.org/schema/beans"
    xmlns:xsi="http://www.w3.org/2001/XMLSchema-instance"
    xsi:schemaLocation="http://www.springframework.org/schema/beans https://www.springframework.org/schema/beans/spring-beans.xsd">

    <!-- Root Context: defines shared resources visible to all other web components -->

</beans>
さらに、servlet-context.xmlの内容は以下の通り。
<?xml version="1.0" encoding="UTF-8"?>
<beans:beans xmlns="http://www.springframework.org/schema/mvc"
    xmlns:xsi="http://www.w3.org/2001/XMLSchema-instance"
    xmlns:beans="http://www.springframework.org/schema/beans"
    xmlns:context="http://www.springframework.org/schema/context"
    xsi:schemaLocation="http://www.springframework.org/schema/mvc https://www.springframework.org/schema/mvc/spring-mvc.xsd
        http://www.springframework.org/schema/beans https://www.springframework.org/schema/beans/spring-beans.xsd
        http://www.springframework.org/schema/context https://www.springframework.org/schema/context/spring-context.xsd">

    <!-- DispatcherServlet Context: defines this servlet's request-processing infrastructure -->

    <!-- Enables the Spring MVC @Controller programming model -->
    <annotation-driven />

    <!-- Handles HTTP GET requests for /resources/** by efficiently serving up static resources in the ${webappRoot}/resources directory -->
    <resources mapping="/resources/**" location="/resources/" />

    <!-- Resolves views selected for rendering by @Controllers to .jsp resources in the /WEB-INF/views directory -->
    <beans:bean class="org.springframework.web.servlet.view.InternalResourceViewResolver">
        <beans:property name="prefix" value="/WEB-INF/views/" />
        <beans:property name="suffix" value=".jsp" />
    </beans:bean>

    <context:component-scan base-package="com.example.demo" />

</beans:beans>
上記タグのうち、beans:beanタグは、/WEB-INF/views/フォルダ下のJSPファイルを読み込むための設定になっている。さらに、context:component-scanタグ・anotation-drivenタグは、com.example.demo下の@Autowired,@Component,@Controller等アノテーションが付与されているクラスを読み込むための設定になっている。

log4j.xmlの内容は以下の通りで、Springフレームワークのログを出力するようになっている。
<?xml version="1.0" encoding="UTF-8"?>
<!DOCTYPE log4j:configuration PUBLIC "-//APACHE//DTD LOG4J 1.2//EN" "log4j.dtd">
<log4j:configuration xmlns:log4j="http://jakarta.apache.org/log4j/">

    <!-- Appenders -->
    <appender name="console" class="org.apache.log4j.ConsoleAppender">
        <param name="Target" value="System.out" />
        <layout class="org.apache.log4j.PatternLayout">
            <param name="ConversionPattern" value="%-5p: %c - %m%n" />
        </layout>
    </appender>

    <!-- Application Loggers -->
    <logger name="com.example.demo">
        <level value="info" />
    </logger>

    <!-- 3rdparty Loggers -->
    <logger name="org.springframework.core">
        <level value="info" />
    </logger>

    <logger name="org.springframework.beans">
        <level value="info" />
    </logger>

    <logger name="org.springframework.context">
        <level value="info" />
    </logger>

    <logger name="org.springframework.web">
        <level value="info" />
    </logger>

    <!-- Root Logger -->
    <root>
        <priority value="warn" />
        <appender-ref ref="console" />
    </root>

</log4j:configuration>
また、コントローラクラスの内容は以下の通り。現在日時をModelオブジェクトに設定する部分を一部変更しているが、Spring Bootの場合と同じ@Controller, @RequestMappingアノテーションを利用している。
package com.example.demo;

import java.time.LocalDateTime;
import java.time.format.DateTimeFormatter;
import java.time.format.ResolverStyle;
import java.util.Locale;

import org.slf4j.Logger;
import org.slf4j.LoggerFactory;
import org.springframework.stereotype.Controller;
import org.springframework.ui.Model;
import org.springframework.web.bind.annotation.RequestMapping;
import org.springframework.web.bind.annotation.RequestMethod;

/**
 * Handles requests for the application home page.
 */
@Controller
public class HomeController {

    private static final Logger logger
        = LoggerFactory.getLogger(HomeController.class);

    /**
     * Simply selects the home view to render by returning its name.
     */
    @RequestMapping(value = "/", method = RequestMethod.GET)
    public String home(Locale locale, Model model) {
        logger.info("Welcome home! The client locale is {}.", locale);

        //現在日時をModelオブジェクトに設定
        String formattedDate = convertLocalDateTimeToStr(
                       LocalDateTime.now(), "uuuu/MM/dd HH:mm:ss");
        model.addAttribute("serverTime", formattedDate );

        return "home";
    }

    /**
     * 日時(西暦)を文字列変換した結果を返す
     * @param localDateTime 日時(西暦)
     * @param dateTimeFormat 日時(西暦)のフォーマット
     * @return 変換後の文字列
     */
    private static String convertLocalDateTimeToStr(
           LocalDateTime localDateTime, String dateTimeFormat){
        DateTimeFormatter df = DateTimeFormatter.ofPattern(dateTimeFormat)
                                  .withResolverStyle(ResolverStyle.STRICT);
        return localDateTime.format(df);
    }

}
また、遷移先となるJSP画面は以下の通り。
<%@ taglib uri="http://java.sun.com/jsp/jstl/core" prefix="c" %>
<%@ page session="false" %>
<html>
    <head>
        <title>Home</title>
    </head>
    <body>
        <h1>Hello world!</h1>
        <P>The time on the server is ${serverTime}.</P>
    </body>
</html>

サーバーのポート番号変更
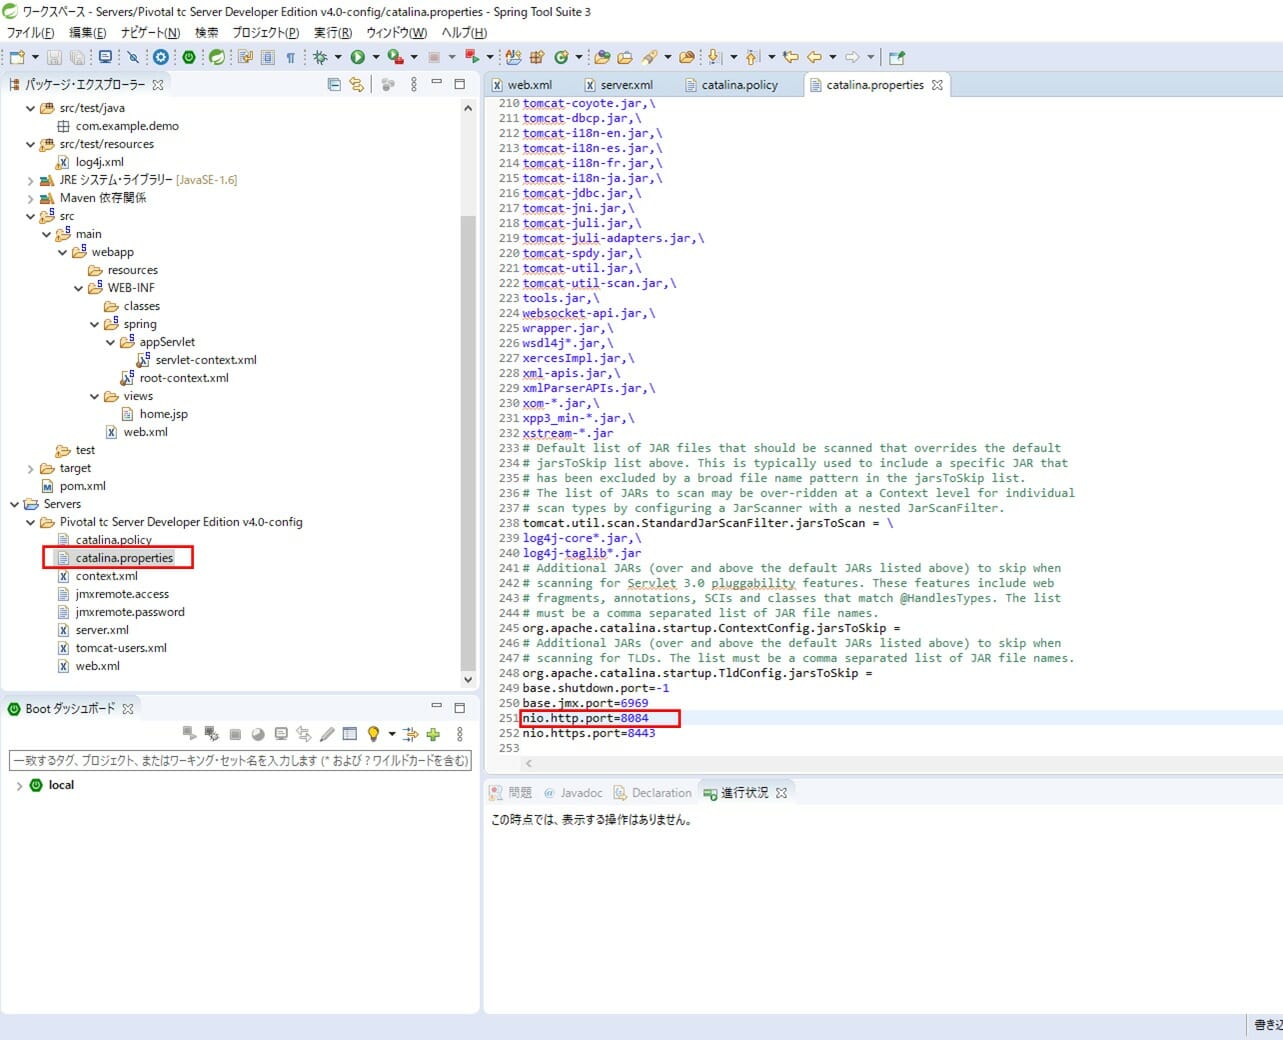
サーバーのポート番号変更は、Spring Bootの場合は、application.propertiesファイルの「server.port」を変更していたが、Spring MVCの場合は、以下のように、サーバー定義ファイル内の、catalina.propertiesのnio.http.portを変更すればよい。
Spring MVCプロジェクトの実行
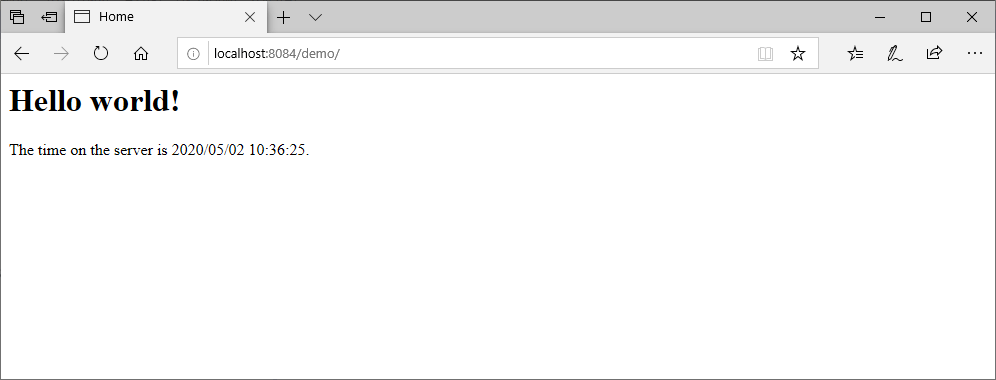
Spring MVCプロジェクトを実行するには、サーバー上にプロジェクトを追加後、サーバーを起動する。その後、Webブラウザ上で「http://(サーバー名):(ポート番号)/(プロジェクト名)/」とアクセスする。その手順は以下の通り。
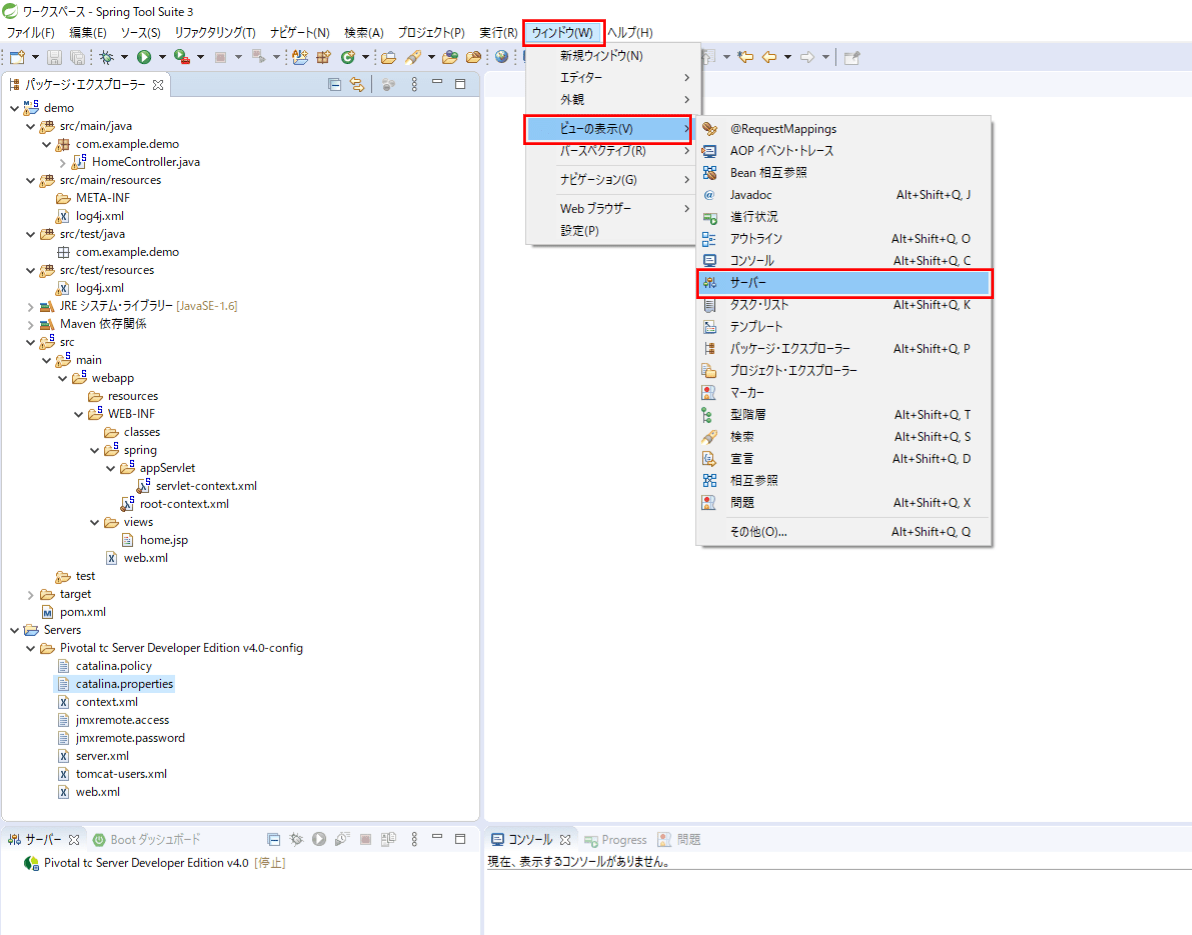
1) ウィンドウメニューから「ビューの表示」ー「サーバー」を選択する。なお、「サーバー」が一覧に表示されていない場合は、「その他」を選択後、「サーバー」を選択する。
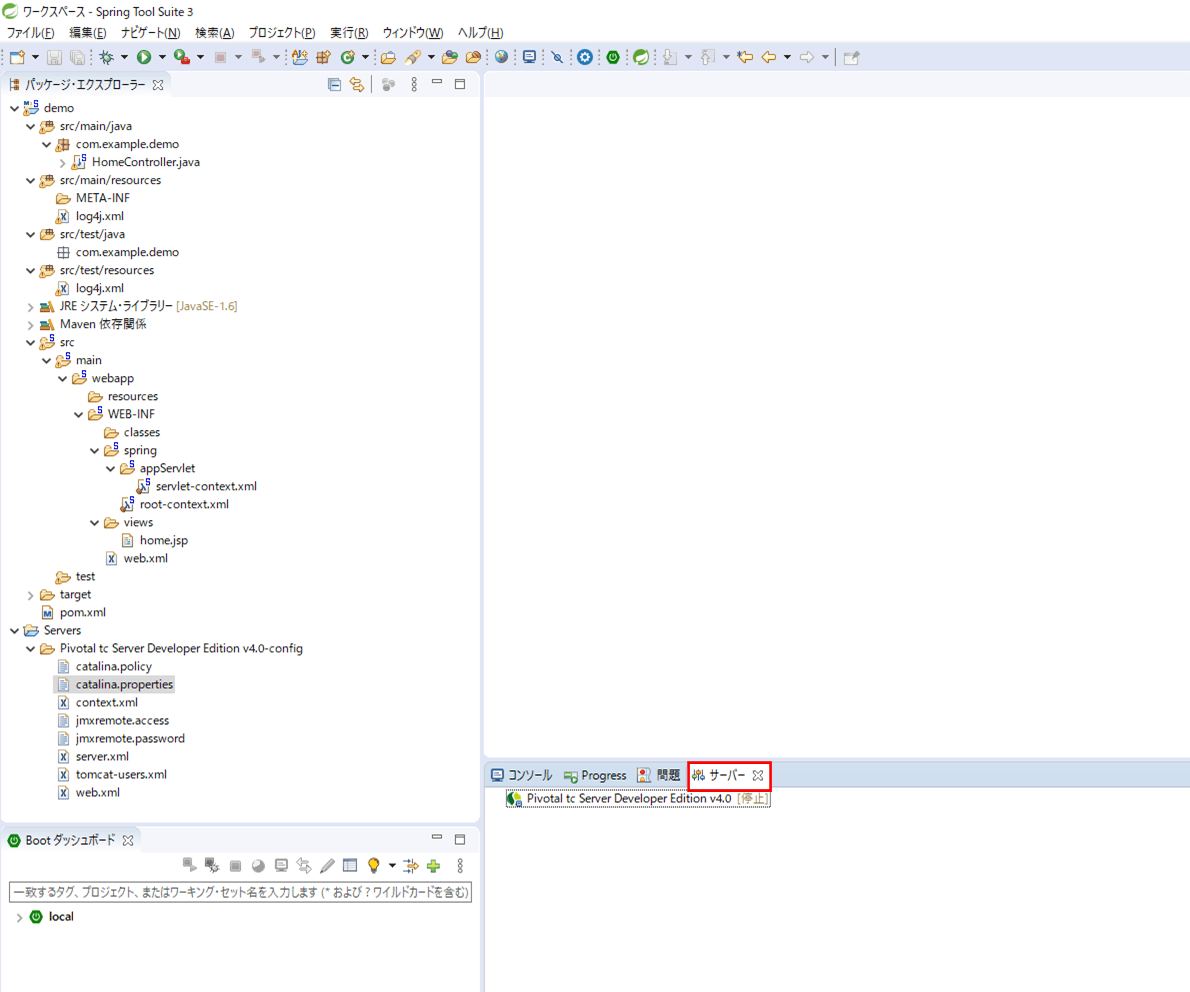
2) 以下のように、画面下の方に「サーバー」ビューが表示されることが確認できる
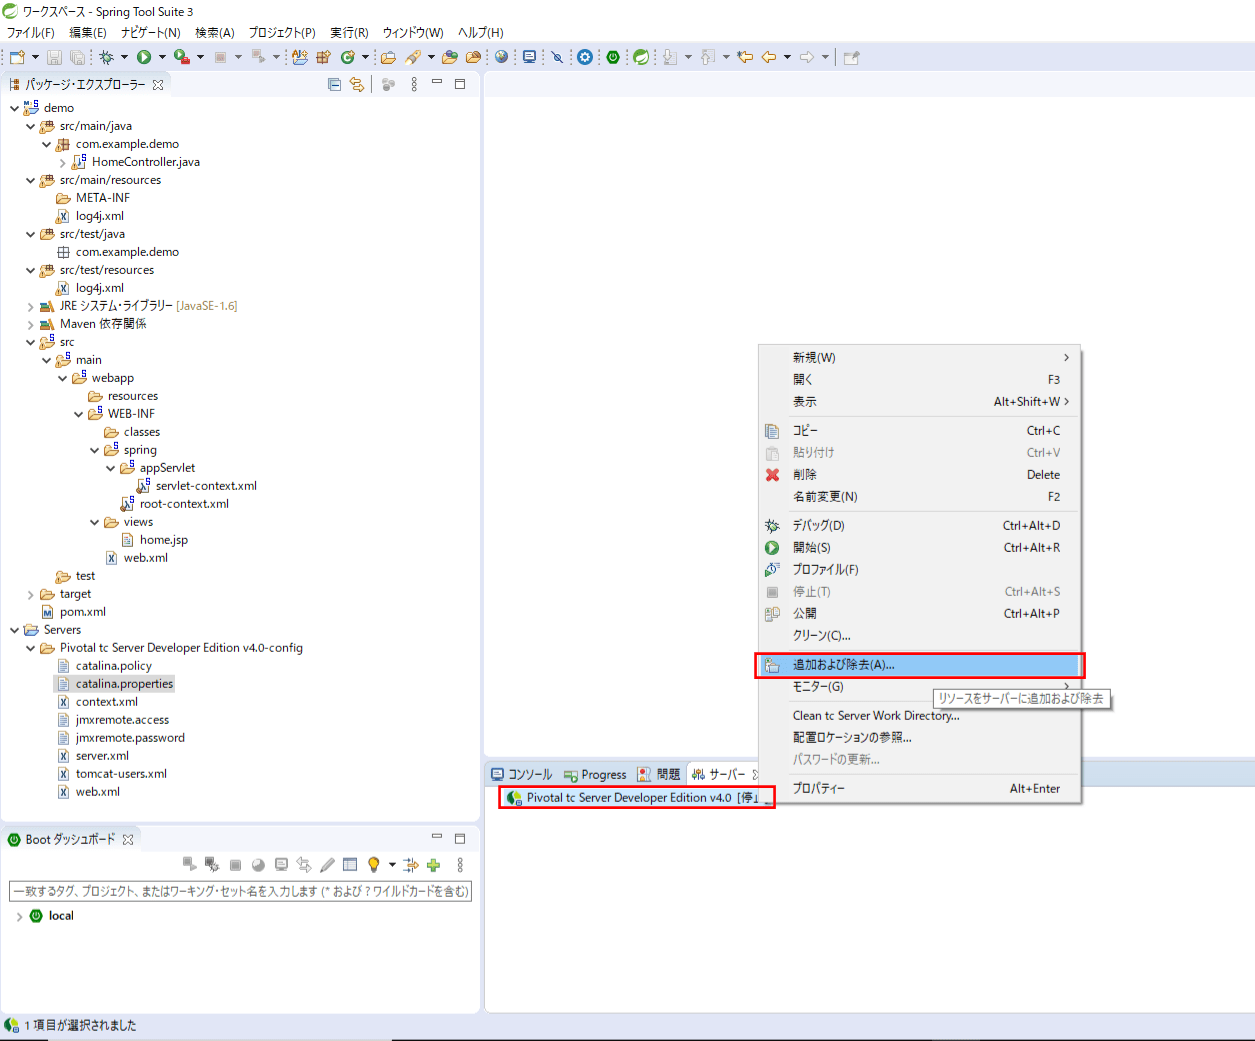
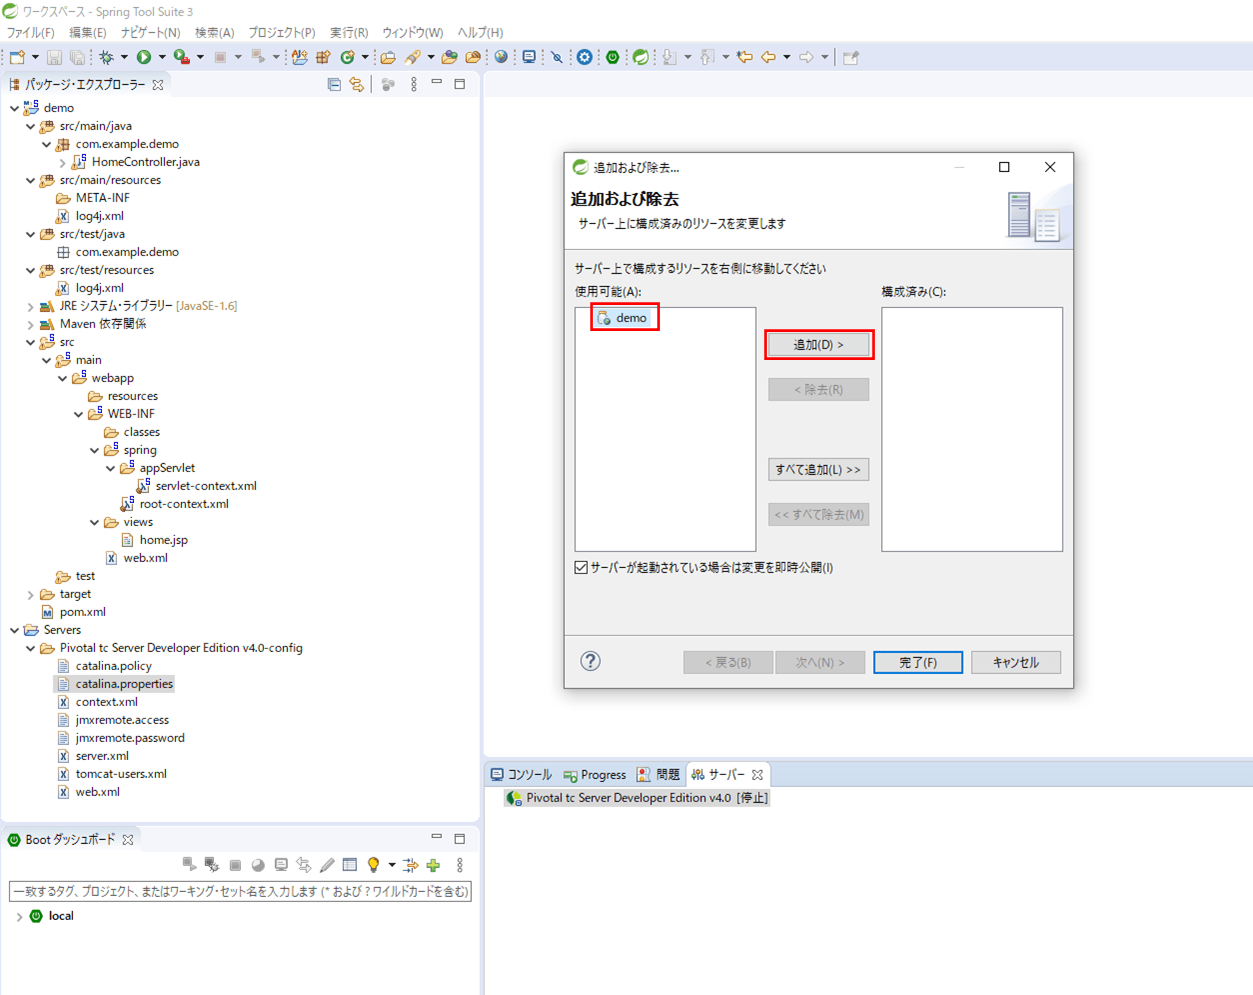
3) サーバーを選択し右クリックし、「追加および除去」を選択
4) 作成済のdemoプロジェクトを選択し、「追加」ボタンを押下
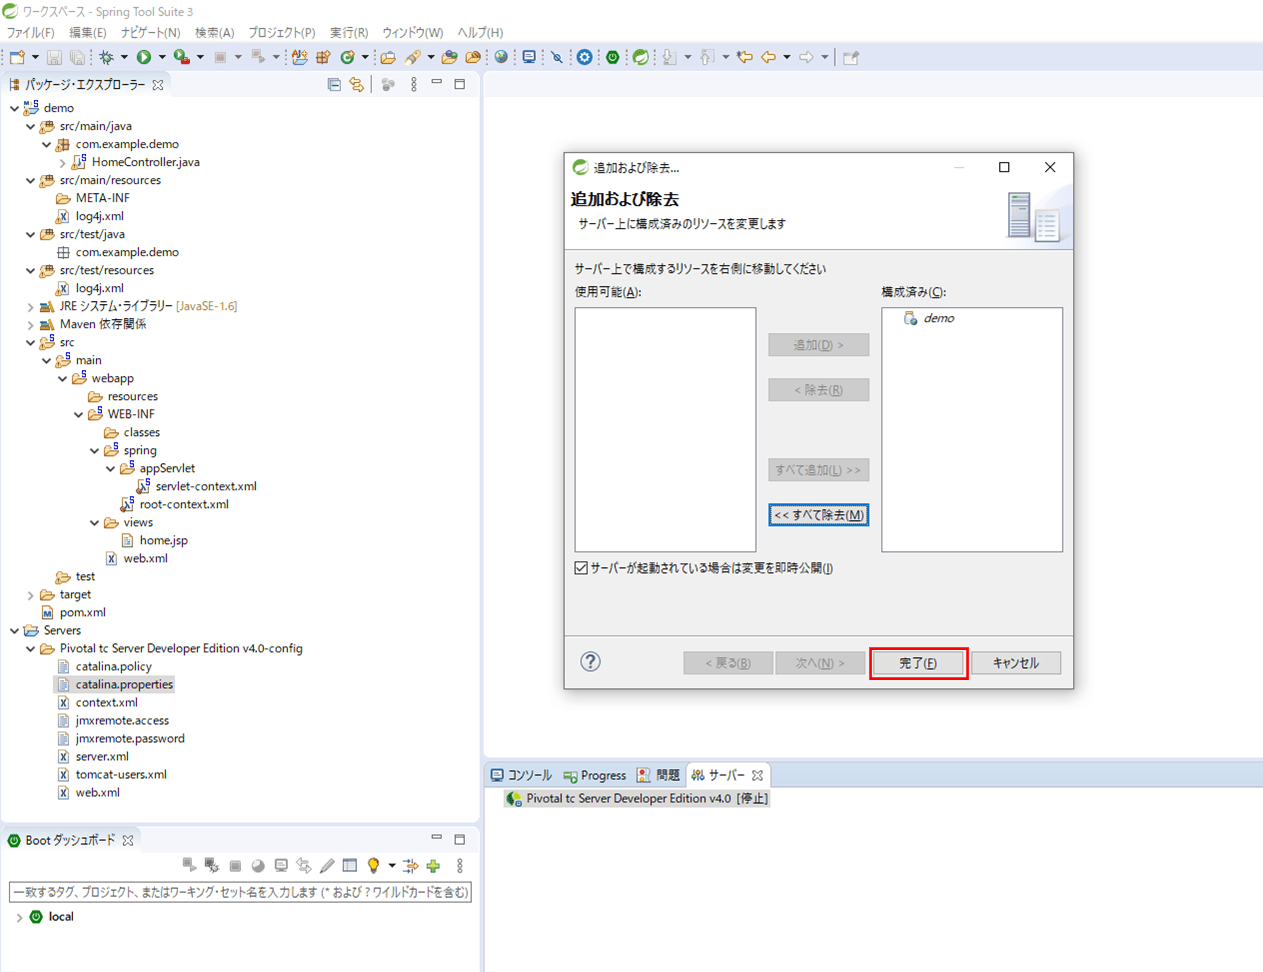
5) demoプロジェクトが「構成済み」に移動することを確認後、「完了」ボタンを押下
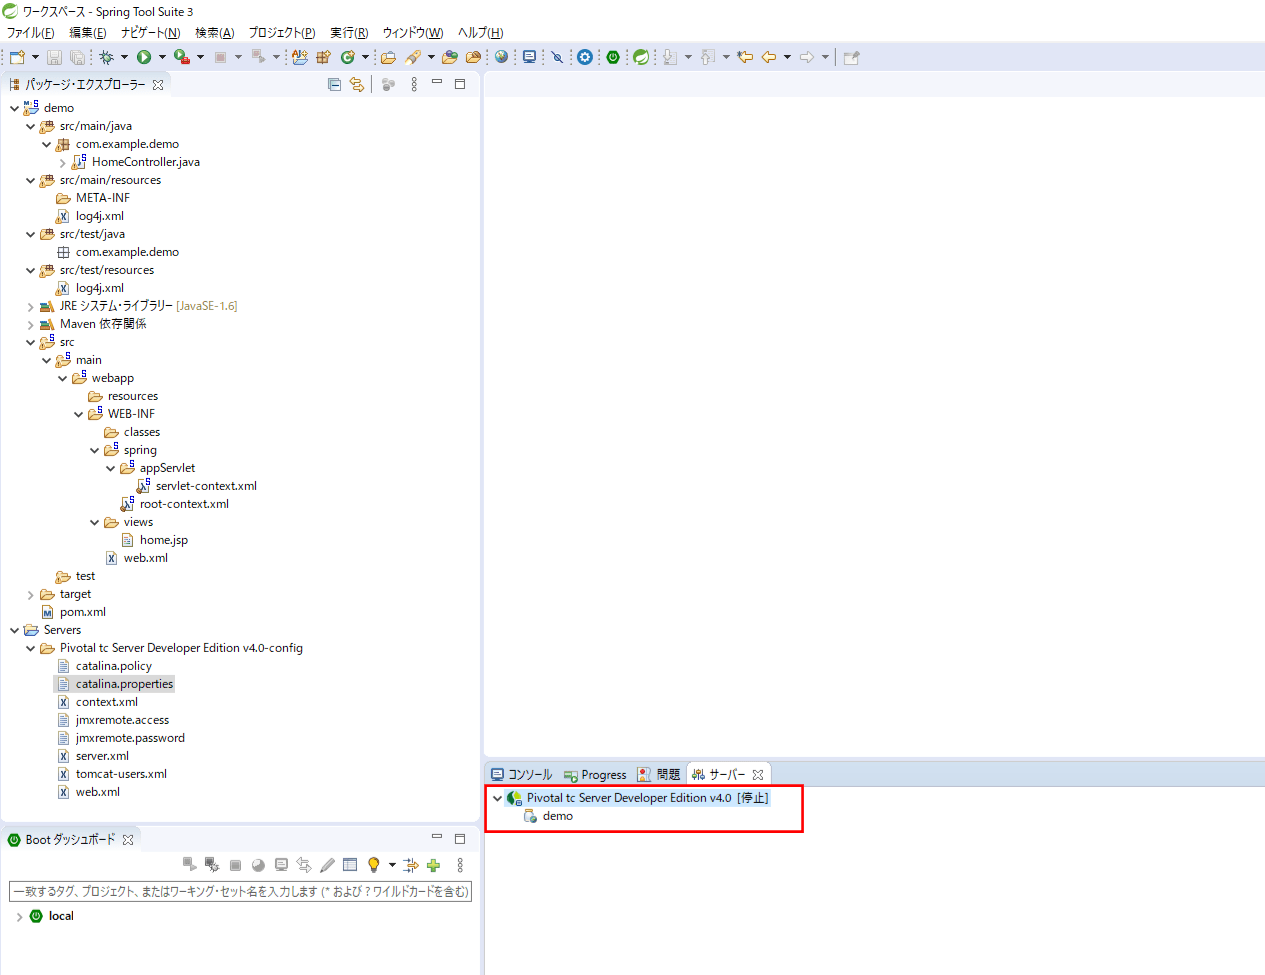
6) 以下のように、サーバーに「demo」プロジェクトが追加されることが確認できる
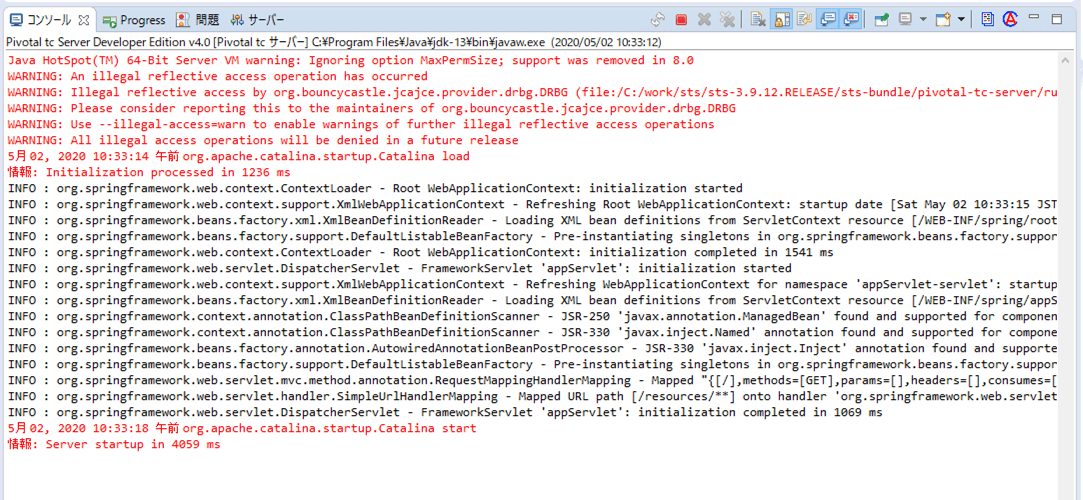
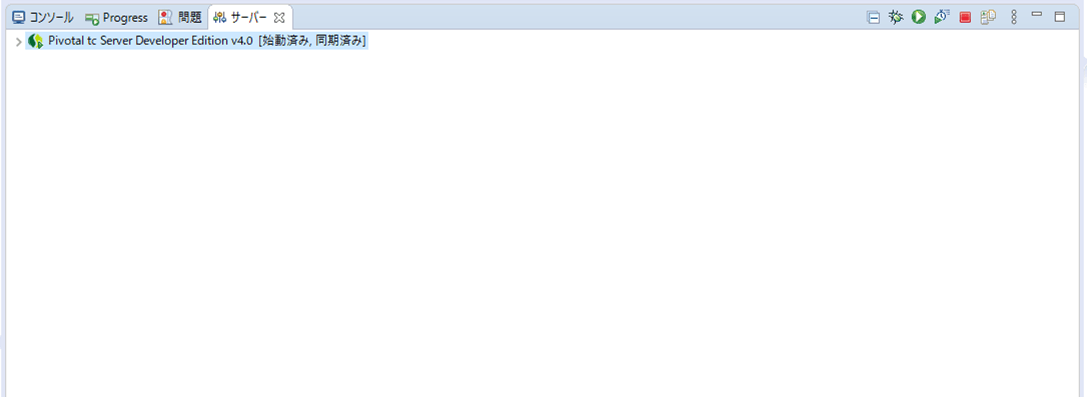
8) サーバーが起動すると、「コンソール」ログ、「サーバー」の内容が以下のようになっていることが確認できる
9) Webブラウザ上で「http://(サーバー名):(ポート番号)/(プロジェクト名)/」とアクセスすると、下記画面が表示される。URL末尾にプロジェクト名が必要なので注意すること。
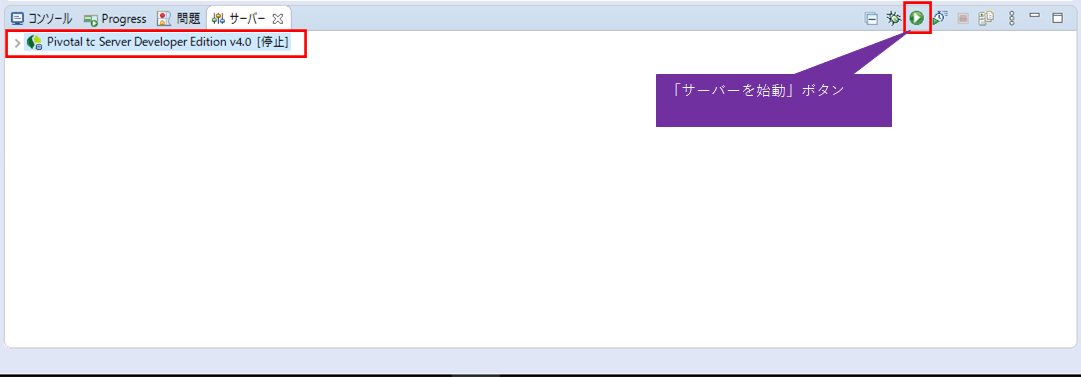
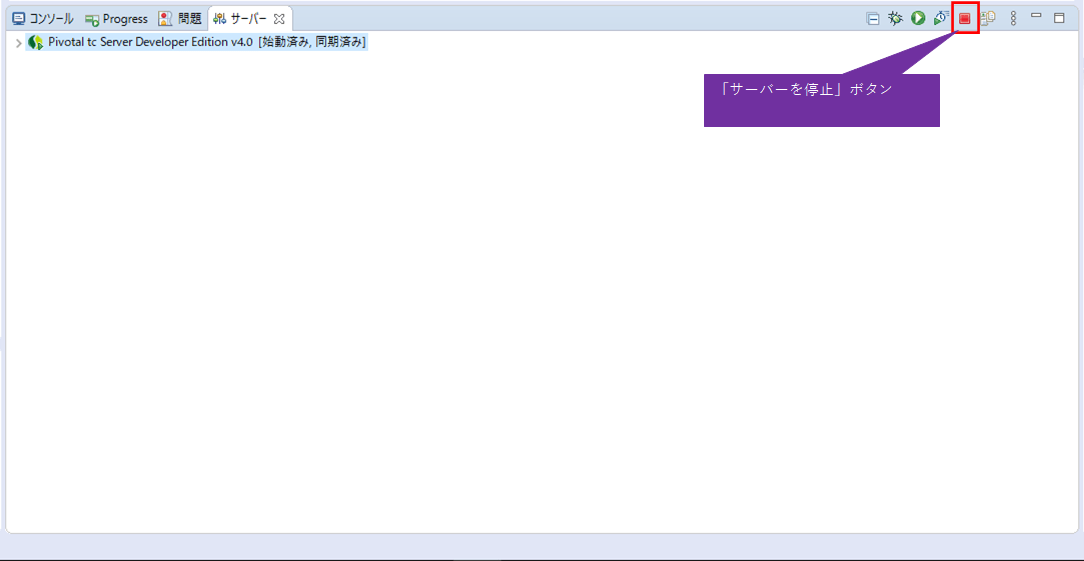
10) サーバーの停止は、「サーバーを停止」ボタンを押下すればよい
要点まとめ
- Spring MVCプロジェクトを作成するには、STS3をダウンロードし、「Spring Legacyプロジェクト」作成時に「Spring MVC Project」のテンプレートを選択する。
- Spring MVCプロジェクトを実行するには、サーバー上にプロジェクトを追加後、サーバーを起動する。その後、Webブラウザ上で「http://(サーバー名):(ポート番号)/(プロジェクト名)/」とアクセスすればよい。
